I'm Jim. 😀 Wayne is Wayne
If you already have physical clearance, don't bother changing anything.
You're welcome to fiddle with various caps, see if it makes much difference. You'll be adding a lot of possible failure points if you do what you're suggesting. It works and sounds beautiful as designed...
If you already have physical clearance, don't bother changing anything.
You're welcome to fiddle with various caps, see if it makes much difference. You'll be adding a lot of possible failure points if you do what you're suggesting. It works and sounds beautiful as designed...
Wayne is Full Nelson ........ while Nelson is just Half Wayne
while Jim is ...... just 6L6
though , both Wayne and 6L6 are flying

while Jim is ...... just 6L6
though , both Wayne and 6L6 are flying
The WHAMMY can be used without the coupling caps with any of the opamps the Fet input just typically have lower offset due to input bias current. The caps are kind of a safety factor if you are unsure of what is feeding the circuit.
Dear Wayne,
I wanted to ask you, did you read stories of Sir Francis Chichester?
Regards,
Gyuri
I wanted to ask you, did you read stories of Sir Francis Chichester?
Regards,
Gyuri
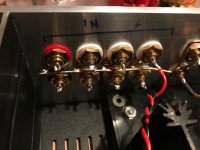
Do you have the potentiometer body grounded?
The attenuator has ground connection leads which connect to audio ground on the board set up for the potentiometer ground. The body of the attenuator may ground through the chassis as there appears to be metal to metal contact with the front plate which is grounded to safety ground. Of course, it is possible that the potentiometer body is anodized and the brass mounting hardware does not really connect to the body. To be sure I'd have to scrape to bare metal and make a connection to the chassis ground, most likely through soldering wire to the potentiometer body and then to a screw with star washer to the front plate.
The attenuator has ground connection leads which connect to audio ground on the board set up for the potentiometer ground. The body of the attenuator may ground through the chassis as there appears to be metal to metal contact with the front plate which is grounded to safety ground. Of course, it is possible that the potentiometer body is anodized and the brass mounting hardware does not really connect to the body. To be sure I'd have to scrape to bare metal and make a connection to the chassis ground, most likely through soldering wire to the potentiometer body and then to a screw with star washer to the front plate.
I know personally, the potentiometer did not ground to chassis due to the anodized coating. Also, you need to make sure the front panel is even chassis grounded at all which depends on the case you decided to use.
I had hum issues before I made sure the potentiometer was grounded, so it is worth a check.
Thanks, Rich, I'll try grounding the attenuator body. My front plate is definitely grounded to the safety ground, I checked continuity with a multimeter.
I scraped the anodizing off the chassis sides at the bolts and slipped a star washer in between to ensure good contact.
In retrospect I think the attenuator may not be worth the cost and trouble compared to the standard ALPS audio pot.
I scraped the anodizing off the chassis sides at the bolts and slipped a star washer in between to ensure good contact.
In retrospect I think the attenuator may not be worth the cost and trouble compared to the standard ALPS audio pot.
Wayne,
I have low DC offset from my DAC so I tried the Whammy without input caps and it certainly sounds a little different. I need to do some comparison listening tests to see if I think it sounds better.
What is it about FET opamps that makes them sound better without input caps ?
Which of the opamps 'recommended' for the Whammy are 'FET' ?
Thanks
Mark
IMO, regardless of which opamps you use, it will always sound better without caps. It's neutral VS coloration. The caps are just to remove DC from the input signal. However some people may prefer coloration. Thus why they prefer different opamps than I might. But it's always some compromise. So given the choice I'd take out the caps.
I use Mundorf inter-stage coupling caps in my SET amps. But really no choice. They have to stay. Mundorf Silver/Oils probably sound pretty good in the WHAMMY too.
You're so far off stock at this point that you need to be sure wat you think works actually works...
First, disconnect all the input/output wiring from the Whammy and use one set of inputs directly to the PCB's input, and wire the headphone jack, and make sure the Whammy first and foremost works as designed.
With that verified we can continue forward, without knowing that it's all just shoveling sand into the tide. 🙂 We'll get it figured out. 😀
I've pared it back to the basics, removing the selector switch and the power indicator LEDs. Upon testing I found this reduced but did not eliminate the problem.
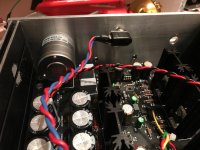
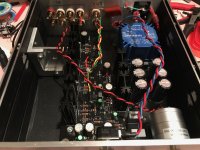
I've also made some changes to the grounding. The sheilded input cables to the pcb were solid core coaxial cable and broke with the movement of working on the unit, so were replaced with twisted wire. I've removed the anodizing from all the edges of the cabinet sides, removed the paint from the top and bottom panels where they touch the sides. I've removed the wires which formerly were tying together the cabinet sides and bottom panel. Along the way as I make changes I've been testing the system and found that the grounding improvements have made some noticeable improvement in the noise, but not eliminated it entirely.
I checked the potentiometer body grounding with a continuity tester and found that it was grounded through the chassis to the safety ground.
The radio noise is was such that I could hear an actual faint radio broadcast and is now gone. Most of the other noise is greatly diminished to the point where it can't be heard when I put my ear next to a speaker with everything powered up but with no input attached. With an iphone the noise is just slightly louder. However when I connect inexpensive CD/DVD players with two prong plugs to it, the very noticeable 30hz hum is still there, which is audible at all but the lowest levels of the preamp. An old audio CD player (ADCOM with 3 prong plug) does not produce the loud hum, but is a bit noisier than the iphone.
So, is a bit of noise at full volume normal for the Whammy? It's just enough noise to hear without having to put your ear next to the speaker, and at normal listening volumes not audible. My commercial preamp makes no noise even at full volume with the same cheap CD/DVD players attached.
The iphone and ADCOM cd player sound pretty good playing at normal levels and my WHAMMY does provide a bit of gain, it's probably twice as loud at full volume compared to connecting my iphone directly to the amp (ACA, so full volume is not crazy loud with my test speakers (Realistic Minimus 7s). I'm thinking there is still something amiss as many have noted how quiet their WHAMMY's are in terms of noise.
So thanks to those who have provided some input, I feel like I'm making some progress and am looking forward to figuring out if there is still something amiss.
Attachments
Last edited:
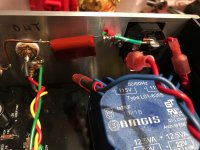
Connect your RCA ground buss to the output ground. As far as I can tell, your inputs are not connected to ground except through the capacitor...
Thanks!
Now I see where I went wrong. I think I missed something in your build example. I took another look at your build in the guide. Am I seeing this correctly? Your RCA jack input grounds are grounded to the safety ground via the capacitor and are also grounded to the audio ground on the board near the potentiometer via the sheilding in your input cable from the jacks to the board.
So in my case I can tie into audio ground from the output jack which is very close to the input bus.
I measure 14milli volts dc at the headphone jack is this to high? I built this from the full kit
Better reading is left channel 15 and right 9 milli volts making one side louder than the other
I read and understand about DC offset basics.
The question is...suppose the first time I check and it gives me a perfect 0mV DC offset on Whammy, will it stay at 0mV everything time i turn on the same system and be worry free?
The question is...suppose the first time I check and it gives me a perfect 0mV DC offset on Whammy, will it stay at 0mV everything time i turn on the same system and be worry free?
I read and understand about DC offset basics.
The question is...suppose the first time I check and it gives me a perfect 0mV DC offset on Whammy, will it stay at 0mV everything time i turn on the same system and be worry free?
I checked my dc offsets with music playing from each of the input sources I intended to use. In my case this was dac and phono.
Connect your RCA ground buss to the output ground. As far as I can tell, your inputs are not connected to ground except through the capacitor...
That worked, thanks so much 6L6. Project done, and it sounds great. I increased the gain by substituting 10k for 4.75k resistors at R4 and R8 (or was it R10). Now it really works like I would expect a preamp to work.
Thanks Wayne, 6L6 and all the contributors to the thread. Without assistance from the DIYaudio community I'd wouldn't have a working project.
I checked my dc offsets with music playing from each of the input sources I intended to use. In my case this was dac and phono.
Ok thanks.
I am planning to try a cap-less version.
I will check the DC offset every time I turn on the system.
- Home
- Amplifiers
- Pass Labs
- "WHAMMY" Pass DIY headphone amp guide