How does this type of amp behave if you use a rail fuse for +24V and -24V and one of the rail fuses burns? …...will the output go either +24V or -24V?
Is some kind of speaker protection needed in this case?
Is some kind of speaker protection needed in this case?
Serious reply, not joking:
Try it! Connect dummy 8 ohm load resistors to the outputs, connect shorting plugs to the input, then use insulated plastic pliers to quickly yank out one of the rail fuses. Measure what happens. You may want to enlist a couple of friends to take cell phone videos of the measuring instruments (DVMs, oscilloscopes, whatever) for two or three minutes after the fuse pull.
Second reply, also not joking:
Have a look over in the other, older, thread started by Nelson Pass in 2015. Maybe this experiment has already been performed and results already discussed.
Thanks to the presence of coupling capacitor C2 on the amplifier main board, the input stage plays no role in the amplifier's behavior when a rail fuse blows. It'll do the same thing no matter which daughter card is installed. It'll do the same thing even if NO daughter card is installed.
Last edited:
Thank you!
I will have a closer look at the original thread and see if I can find the result of the experiment. But I think I can read "between the lines" that nothing bad happens at the output. So no need for a relay at the output and some smart way to cut if a rail fuse burns…..I am just in a state where I prepare the built. Not started yet…...
I will have a closer look at the original thread and see if I can find the result of the experiment. But I think I can read "between the lines" that nothing bad happens at the output. So no need for a relay at the output and some smart way to cut if a rail fuse burns…..I am just in a state where I prepare the built. Not started yet…...
I inadvertently did this experiment several times by shorting one of the supply rails to ground through a shorted heatsinkpad. The amp is remarkably resilient and it is a small miracle my test speakers lived to tell the tale.
.. dB
.. dB
Pass DIY Addict
Joined 2000
Paid Member
This finding is good to know. Nelson's designs are just great- they withstand much of the abuses that we dish out as we learn things for the first (or second, or third...) time! I see this as a key benefit of constructing relatively (and deceptively) simple designs.
Howdy Folks,
RV1 orientation: I see a pins 1, 2 & 3 marked on the resistor and on the pcb, a square solder point and two circular ones. Some resources say orientation does not matter, while some diagrams indicate it does. I do not see anything on the schematic or in the forums which tells me which is true. Thanks for any advice...
RV1 orientation: I see a pins 1, 2 & 3 marked on the resistor and on the pcb, a square solder point and two circular ones. Some resources say orientation does not matter, while some diagrams indicate it does. I do not see anything on the schematic or in the forums which tells me which is true. Thanks for any advice...
Hello
First of all I would like to thank Mark Johnson, 6L6, Zen Mod for their answers, availability or assembly guides.
And of course Mr. Nelson Pass.
My m2 ischikawa amplifier, is finished and connected to my system.
It replaces a Zen v1 amp. It is connected to the Zen flange preamplifier and full range 8 mkII lb 8 mkII speakers from ems fertin.
The mountain view card is made but I will connect it later. today I want to enjoy the original M2
How it sounds.
For me Zen was perfection, but the M2 is a little softer and reveals more nuances it is also more lively. As if it were unbridled and reveals an additional notion of sound depth.
But Zen is already incredibly good at it.
I was thinking of driving a Ferrari with Zen, today I still drive a Ferrari but with additional options in terms of comfort.
For people who hesitate between which amplifier to build, do the one that will seem simplest to you you will not have been disappointed.
For information for European manufacturers:
suppliers:
audiophonics for cables and connectors
Mouser and Digikey pay attention to the customs duties to be added which seem higher at digikey.
Diyaudiostore for superb cards and lsj74 and keraterm.
reichelt for the Talema power supply transformer and screws
don-audio for edcor pc600
hifi-2000 for the 4u box but in 21cm height. manual tapping and holes.
total cost 800 euros.
I'm running at $1300 Australian, that is with the 4U deluxe aluminium chassis and rear panel kit from diyaudio store (here).
That is with the Tucson, Mountain View and Austin buffers.
That is with the Tucson, Mountain View and Austin buffers.
Coors made it for NASA.Do you know where these can be purchased?
Coors Aluminum Nitride CERAMIC Plate Sheet High Purity 99% ALUMINA 2.5"X2.5x1mm
Coors Aluminum Nitride CERAMIC Plate Sheet High Purity 99% ALUMINA 2.5"X2.5x1mm | eBay
Hello
For information for European manufacturers:
suppliers:
audiophonics for cables and connectors
Mouser and Digikey pay attention to the customs duties to be added which seem higher at digikey.
Diyaudiostore for superb cards and lsj74 and keraterm.
reichelt for the Talema power supply transformer and screws
don-audio for edcor pc600
hifi-2000 for the 4u box but in 21cm height. manual tapping and holes.
total cost 800 euros.
Fantastic, thanks! Always good to hear some supplier advice from fellow Europeans.
Can you share pictures of your finished amp?
Since nobody else has bothered to mention it, I will: Keratherm thermal pads were good enough for Nelson Pass when he built and sold the original First Watt M2 amplifiers. Probably that means they are good enough for my M2, as well.
I ordered two packs of 10 pre-cut Keratherm insulators from the diyAudio store. AND, just to be conservative, I also ordered a sheet of uncut Keratherm insulator from eBay. That way, if either one of the vendors was out of stock, or used a very slow shipping method, I'd have a backup. A second possibility of receiving some thermal pads right away.
There are quite a few eBay sellers of Keratherm sheets; the one I happened to purhcase from, is in the UK.
eBay link
As it turned out, I got lucky. BOTH the diyAudio store, and the eBay seller, shipped right away. And so I had plenty of thermal pads well before I needed them to bolt my M2x power transistors on their heatsinks.
edit- whoops, forgot to mention that I bought a 1/8 inch (3.2 mm) hole punch from the craft store, to create M3 sized bolt holes for the cut-it-myself Keratherm insulators. Here's what it looks like: photo link on Amazon
_
Last edited:
Hello
Mr Mixi, I would have liked to post pictures but I can't access it from my computer on the diyaudio site my browser is too old.
And with my ipad tablet I can but I can't attach a picture in my post.
Sorry.
Bye
Mr Mixi, I would have liked to post pictures but I can't access it from my computer on the diyaudio site my browser is too old.
And with my ipad tablet I can but I can't attach a picture in my post.
Sorry.
Bye
Coors made it for NASA...
Thank you for the link, only 2 left
 need 4 minimum, shame.
Since nobody else has bothered to mention it, I will: Keratherm thermal pads were good enough for Nelson Pass when he built and sold the original First Watt M2 amplifiers. Probably that means they are good enough for my M2, as well.
But please don't lose hope on thermal ceramic. 🙂
Keratherm 86/82 is one of the best of the flexible thermal pads, but modern thermal ceramic should be even beter at heat transfer and dielectric stats.
Of course main downside of ceramic thermal pads (and also mica) is the necessity to use thermal grease (paste, compound and so on).
Keratherm 86/82 is clean and pretty.
So based on budget and technical assignment there are alternatives.
Some gathered comparisons (with no pretend on absolute values):
Mica (thickness 0.075mm)
Thermal Conductivity - 0.528 W/mK
Breakdown voltage - 12...35 kV
Keratherm 86/82 (thickness 0.25mm)
Thermal Conductivity - 6.5 W/mK
Breakdown voltage - 1 kV
Aluminum Oxide Ceramic (thickness 0.5mm)
Thermal Conductivity - 15...25 W/mK
Breakdown voltage - 25 kV
Aluminum Nitride Ceramic (thickness 0.5mm)
Thermal Conductivity - 150...200 W/mK
Breakdown voltage - 17 kV
Beryllium Oxide Ceramic (thickness 0.81mm)
Thermal Conductivity - 180...285 W/mK
Breakdown voltage - 11 kV
Aluminum
Thermal Conductivity - 237 W/mK
Cuprum
Thermal Conductivity - 401 W/mK
Thank you for the link, only 2 left
There are many other vendors that still have more left. However, have you thought about how you would cut a hole in one? AlN is only machineanlr with diamond.
Maybe they make pads with a hole for the M3 bolt. But you might be just better off with the aluminum oxide pads which work more than well enough and come in almost any size and shape for TO220/247/3P etc with a hole precut.
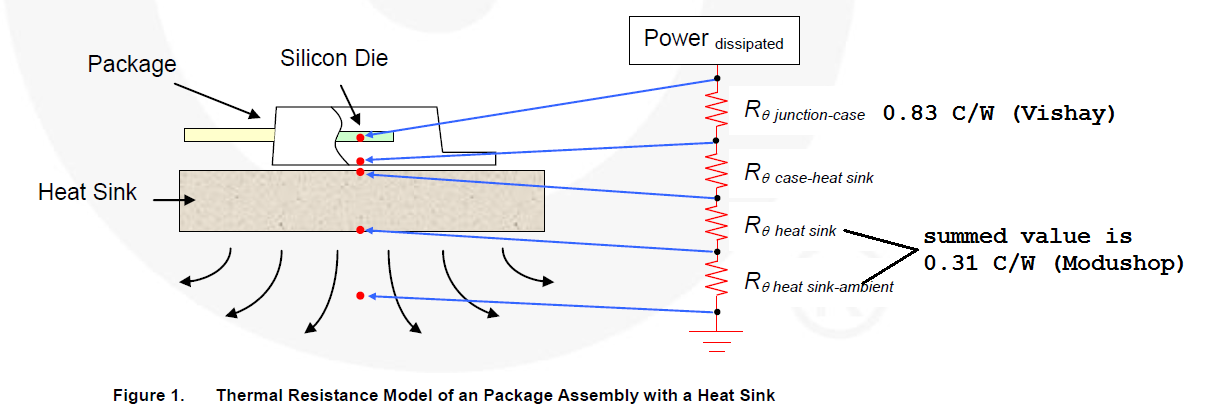
In the M2 amplifier, the complete thermal resistance from IRFP240 / IRFP9240 output transistor's junction to ambient, is
where XXX is the thermal resistance of the mounting pad in degC/Watt. See Figure 1 below.
Now all you have to do is plug in your own value of XXX for your own favorite unobtanium thermal mounting system that nobody sells, and compare the complete thermal resistance (1.14 + XXX) against the complete thermal resistance when using Keratherm (1.14 + Keratherm) from the diyAudio store.
_
_
ThetaJA = 1.14 degC/Watt + XXX
where XXX is the thermal resistance of the mounting pad in degC/Watt. See Figure 1 below.
Now all you have to do is plug in your own value of XXX for your own favorite unobtanium thermal mounting system that nobody sells, and compare the complete thermal resistance (1.14 + XXX) against the complete thermal resistance when using Keratherm (1.14 + Keratherm) from the diyAudio store.
_
_
Attachments

Use a small diamond rotary saw on a dremel to cut and small burr bit for the holes, use lots of water.... how you would cut a hole in one? AlN is only machineanlr with diamond. ...
Hello
Mr Mixi, I would have liked to post pictures but I can't access it from my computer on the diyaudio site my browser is too old.
And with my ipad tablet I can but I can't attach a picture in my post.
Sorry.
Bye
no worries. enjoying the sound is more important than pictures 🙂
- Home
- Amplifiers
- Pass Labs
- The diyAudio First Watt M2x