My "avant-garde" M2 build
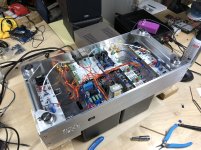
I want to share my finalized M2 build. After 2 years of owning a CNC machine, I've finally gotten comfortable and proficient enough for my first build with a "from scratch" enclosure. It ended up 20.5" x 11 x 9 and weighs right around 40 lbs!
Some details of the components:
- PSU and M2 PCBs from teabag GB
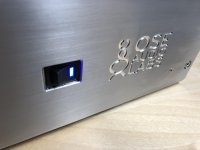
- Softstart and speaker protect from diyaudio store. The speaker protect indicator is broken out to the front panel LED switch so it blinks during protection / startup 🙂
- Heatsinks are from Heatsink USA, 10.08" profile (http://www.heatsinkusa.com/10-080/) for M2s, and smaller profile for bridge rectifier
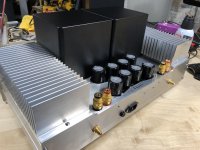
- I got a good deal on the transformers on eBay. They are from Signal Transformer, 300VA/36VCT, have a static shield, and weigh a good 8 lbs each: https://belfuse.com/resources/MPI.pdf
- Iron transformer cover, massive binding posts, RCAs, feet are from gd-parts on eBay / Wholesale Buy Various Tube Guitar Amp DIY Repair Parts from mafaudio Vintage HIFI DIY. After seeing similar binding posts mounted vertically on some McIntosh amps, I knew I wanted to try something similar.
- T-slot extrusions for the sides from Misumi
I couldn't be happier with the M2's performance. Thank you to everyone that made this build possible and for making such a great project available.
I want to share my finalized M2 build. After 2 years of owning a CNC machine, I've finally gotten comfortable and proficient enough for my first build with a "from scratch" enclosure. It ended up 20.5" x 11 x 9 and weighs right around 40 lbs!
Some details of the components:
- PSU and M2 PCBs from teabag GB
- Softstart and speaker protect from diyaudio store. The speaker protect indicator is broken out to the front panel LED switch so it blinks during protection / startup 🙂
- Heatsinks are from Heatsink USA, 10.08" profile (http://www.heatsinkusa.com/10-080/) for M2s, and smaller profile for bridge rectifier
- I got a good deal on the transformers on eBay. They are from Signal Transformer, 300VA/36VCT, have a static shield, and weigh a good 8 lbs each: https://belfuse.com/resources/MPI.pdf
- Iron transformer cover, massive binding posts, RCAs, feet are from gd-parts on eBay / Wholesale Buy Various Tube Guitar Amp DIY Repair Parts from mafaudio Vintage HIFI DIY. After seeing similar binding posts mounted vertically on some McIntosh amps, I knew I wanted to try something similar.
- T-slot extrusions for the sides from Misumi
I couldn't be happier with the M2's performance. Thank you to everyone that made this build possible and for making such a great project available.
Attachments


@ Gtose
Excellent Diy work , I like it Your M2 style
Thanks for all useful links and interesting description
 🙂 Bravo
Excellent Diy work , I like it Your M2 style
Thanks for all useful links and interesting description
🙂 BravoPass DIY Addict
Joined 2000
Paid Member
Wow- awesome tube diy inspiration! You might need to add floor joist supports under those transformers? 😉
Beautiful piece of work! I see tons of hours in this build.
And I really like Teabag's boards for the M2.
This makes me wonder how much benefit an improved power supply could provide for the excellent M2.
Jim
And I really like Teabag's boards for the M2.
This makes me wonder how much benefit an improved power supply could provide for the excellent M2.
Jim
Lovely work on the M2, gtose.
I like the rocker switch with indicator. Can you share the pn?
BK
I like the rocker switch with indicator. Can you share the pn?
BK
Thank you all for the kind words!
@bk856er: Of course, it is the R1966 series from E-Switch and there are a lot of configurations available. The one I got is R1966ABLKBLKEFBLU E-Switch | Mouser.
@bk856er: Of course, it is the R1966 series from E-Switch and there are a lot of configurations available. The one I got is R1966ABLKBLKEFBLU E-Switch | Mouser.
Hi Gtose,
Looks real NICE,I like the transformer covers ! Looks like you got the CNC working well!
Happy lookin' and listen!
NS
Looks real NICE,I like the transformer covers ! Looks like you got the CNC working well!
Happy lookin' and listen!
NS
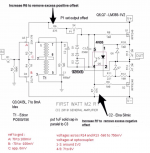
reference adjustment?
my M2 is playing really nice for some weeks now buttttt...
i don't get it to work within the proclaimed specs on the attached scheme.
point A is 72mV,
point B is -64mV,
point C is 5mV,
voltage across R13/14 is 600mV,
voltage at optocoupler is 1-2: 1.047V
4-5: 10.4V
offset is fine
same on both channels.
all parts from Teabags BOM except Q1,2 = FQA
and Q3,4 = 8.84mA selected Toshibas from NicMac.
am i splitting hair or is there a real bug?
any input welcome
Attachments
Phew!
What a relief
so the little imbalance at the buffer is ntwa?
thank you zen mod for still being awake
A.
What a relief
so the little imbalance at the buffer is ntwa?
thank you zen mod for still being awake
A.
well , 5mV is max I would allow to be fed to xformer
so , you're good
I'm not awake , just playing one in public
🙂
so , you're good
I'm not awake , just playing one in public
🙂
A question about the M2 Output Stage - does it transit to ClassAB when Class A bias current is exceeded due to higher drive levels? Thanks.
oh , yes
but , you'll hardly meet that with 8R load ..... you need to bang it with 4R load , Klunk! will arose , though not so harsh audible
but , you'll hardly meet that with 8R load ..... you need to bang it with 4R load , Klunk! will arose , though not so harsh audible
- Home
- Amplifiers
- Pass Labs
- Official M2 schematic