That pretty much explains it. This is why first thing I asked was about how you connected the gate.
What are the two violet and one black wire doing? Connected to a common chassis bolt?
The loop areas at the input sockets are very big.
The exposed core should be very much shorter.
The pig tail should be much shorter.
Aim to keep the short pigtail very close to the core for low loop area. It would be better to have two smaller pigtails, diametrically opposed and connected to the barrel beside the core/Hot
Hi Andrew,
The two violet wires are shield wires from the trafos going to the chassis safety earth, the one black wire I think you are referring to is actually green and it is the safety earth wire from the IEC socket, and yes they are connected to a common chassis bolt.
I'm not sure how to reduce the loop areas of the input sockets, the selector switch will be mounted on the front of the case, so the input wires need to make it up to the switch and pot.
I'm not sure what you mean by the exposed core.
If by pigtails you mean the low voltage secondary wires leaving the trafos, I left them long for now to test the PSU, once everything else is wrapped up and functioning I'll trim them short.
Paul
If by pigtails you mean the low voltage secondary wires leaving the trafos, I left them long for now to test the PSU, once everything else is wrapped up and functioning I'll trim them short.
Perfect... this sort of making everything nice, when finish testing, completely removed the last bit remaining hum i got at that time 🙂
Jesper.
That pretty much explains it. This is why first thing I asked was about how you connected the gate.
Thanks Salas; as soon as I read your previous post I knew where I had gone wrong.
Hopefully things will be up and running in the next couple of days albeit mounted on a piece of plywood.
Jesper how's Mimi doing? Finishing?
Naaahhh 😀 ... Long time.
I am testing one channel on small pcspeakers right now 🙂
Bias is 0.6 (1.3A ~25watt) pro mosfet (2 mosfets)
Maybee testing later on main hifi with DCG3 😀
http://www.diyaudio.com/forums/pass-labs/301312-alephj-mimi-mini.html
Is this thread jacking ?!.. haha
Jesper.
Thanks Salas; as soon as I read your previous post I knew where I had gone wrong.
Hopefully things will be up and running in the next couple of days albeit mounted on a piece of plywood.
Time for a little storytelling

Wooden piece mounting is timeless. That's where the word breadboarding comes from. Ancient diyers mounted globe valves and chokes and huge capacitors on bread cutting boards they found handy. Marvelous W shaped filaments warmly glowing in the dark inspired them. You will make do with Ledbars 🙂
Hi Matthias,Hi MagicBus,
I'm really curious how your pre-amp works out, because I'll go the same route. But I have to wait at least 2 more months before I can start doing this!
Have fun and please report back!
Matthias
I think mine will take a couple of weeks before any listening evaluation. I' ll report for any progress.
Kostas
Completed the cabling and finished at last.
Only waiting for some new knobs, as the first ones I ordered were lost on the post.
It sounds better than the single BIB one, but the transformer on the BIB has to be replaced, as probably it inserts some hum and is not very silent, so this is not a conclusive judgement.
Only waiting for some new knobs, as the first ones I ordered were lost on the post.
It sounds better than the single BIB one, but the transformer on the BIB has to be replaced, as probably it inserts some hum and is not very silent, so this is not a conclusive judgement.
Attachments
![IMG_20170109_171326[1].jpg](/community/data/attachments/529/529550-8ba4a8c005186d0060352258f34b24ba.jpg?hash=i6SowAUYbQ)
![IMG_20170109_171400[2].jpg](/community/data/attachments/529/529575-bfe4e8dabcc39a45f895322f7f5c8fb8.jpg?hash=v-To2rzDmk)
Looks like a more organized and systematic build with parts and wiring consistency, also superior transformers than in your first one. Congratulations.
Completed the cabling and finished at last.
Only waiting for some new knobs, as the first ones I ordered were lost on the post.
It sounds better than the single BIB one, but the transformer on the BIB has to be replaced, as probably it inserts some hum and is not very silent, so this is not a conclusive judgement.
Very nice chassis... where did you get it ? -DIY?
Congratulations with youre build.
Jesper.
Completed the cabling and finished at last.
Only waiting for some new knobs, as the first ones I ordered were lost on the post.
It sounds better than the single BIB one, but the transformer on the BIB has to be replaced, as probably it inserts some hum and is not very silent, so this is not a conclusive judgement.
Is this Selectronic or Audiophonics sold r-cores? Still all good?
As always can't decide these or Audio Toroidy.pl.
Very nice chassis... where did you get it ? -DIY?
Congratulations with youre build.
Jesper.
It' s from toroidy with plexiglass front panel.
Is this Selectronic or Audiophonics sold r-cores? Still all good?
As always can't decide these or Audio Toroidy.pl.
From Selectronic. Absolutely silent transformers. I am very happy from r-cores in my builds. Toroidy has some good ones too, haven' t try the low wattage ones though and the audio grade ones were more expensive than the r-cores.
Also I bought a Toroidy pair for my power amps but not installed them yet.
George, how was your offset? I forgot to ask. As I am am interested in how the AD823 copes statistically for its spec tolerances in various builds.
Have to buy a couple of trannies 🙂 Settling for 150ma bias. (30ohm headphones). Is 50VA recommended or a bare minimum?
Sincerely
Sincerely
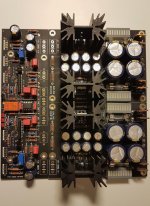
When you jumper link you really mean it I see. Those Rz/J links are massive 🙂
What type of TO-220 bridge diodes you selected there?
What type of TO-220 bridge diodes you selected there?
Yes - those links just fitted in the holes 🙂 I had the wire in front of me when assembling the board 🙂
I had 8 pcs byv79-e in a bag which I had never used and I did not want to store them anymore 🙂 Thats the reason for trying them here. If they are not usable in this config It is easy to change them to the specified ones in the group buy.
I had 8 pcs byv79-e in a bag which I had never used and I did not want to store them anymore 🙂 Thats the reason for trying them here. If they are not usable in this config It is easy to change them to the specified ones in the group buy.
- Home
- Source & Line
- Analog Line Level
- Salas DCG3 preamp (line & headphone)