I have already released a "Linkwitz Transform" capable plugin. It's filter type 25 in my ACDf plugin. See the documentation for more info.
Hi dynamike. I'm using a Behringer
Ah it sounded like you were using 4+ outputs to do a crossover? I had a hard enough time getting 2 in / 2 out working. I better try again. Others have reported better results with changes to the Rpi drivers etc.
FINALLY... SWEET SUCCESS ! ! !
I decided to try a slightly different approach and now the previous problems have disappeared and everything is working (seemingly) perfectly. No more "ticks" when the limiting is happening or other audible issues.
I can apply 36dB or more of boost and the code throttles back the LT boost curve when the levels are too high. THAT's a real solid sounding bottom end!
The way the code applies the limiting is much better than using a soft "knee" that you often see used in a traditional limiter. With a soft knee there is actually some limiting kicking in below the ultimate limit threshold, before it's really needed. In contrast, in my approach there is only limiting used when the signal exceeds the limit threshold. The look-ahead "goes back in time" and smoothly ramps up the limiting ahead of the point where the signal needs to be limited, which is actually LIKE A DYNAMIC SOFT KNEE. The important difference is that with my approach NO LIMITING takes place if the boosted output signal level does not exceed the threshold. As a result, more of the dynamic range of the signal is retained.
I'm very happy that I was able to work around the previous problems. I need to do some extended listening tests (have already done a few hours worth). Eventually I would like to do some kind of measurements and testing, however, because the nature of the limiting is dynamic I'm not really sure how best to go about that.
The following is some updates info on the latency for this plugin.
The algorithm needs at least one buffer's worth of latency to function. I previously gave the example of using a buffer of 1024 samples at 48kHz, which is actually 21.3 milliseconds (not 2.13 msec that I previously stated). It's possible to use 512 samples of buffer (i have verified this) and maybe even 256 samples, so the latency in those cases would be around 10msec or 5 msec respectively. This is without any additional "lookahead" - the default lookahead falls somewhere between zero and 1 frame (buffer) in length, depending on where in the frame the peak that needs limiting is located.
It's possible to stretch out the "ramping up" of boost reduction of the LT using additional lookahead frames (buffers). Each lookahead frame that is used adds another buffer's worth of delay, e.g. another 5, 10, or 20msec depending on your buffer size. The advantage is that the reduction of the low frequency level (the LT's boost) is smoother and starts farther ahead of the actual peak in the audio signal that is being limited. I haven't really detected much of a difference when e.g. 200 milliseconds of lookahead is used compared to the minimum of one buffer (20msec in my case) in terms of the quality of the audio signal using a pair of high quality sealed ear headphones to monitor the audio output.
Eventually I would like to do some kind of measurements and testing, however, because the nature of the limiting is dynamic I'm not really sure how best to go about that.
Congrats on getting it working!
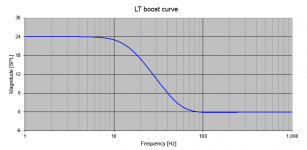
For measurements, could you try doing a series of sweeps with REW at different volumes (looping through the plugin to measure its effect) and post the "all SPL" view? If you can set REW to pink noise instead of sine sweep that would be interesting as well. It should come out looking something like this, right?
An externally hosted image should be here but it was not working when we last tested it.
Not exactly. The highest input level should have the LEAST amount of boost... you have it backwards.Congrats on getting it working!
For measurements, could you try doing a series of sweeps with REW at different volumes (looping through the plugin to measure its effect) and post the "all SPL" view? If you can set REW to pink noise instead of sine sweep that would be interesting as well. It should come out looking something like this, right?
An externally hosted image should be here but it was not working when we last tested it.
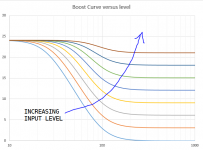
Reverse the order (top to bottom) of the curves and align them so that they all intersect at the lowest frequency, e.g. at the upper left.
Also, the shape of the curves is exactly the same near the middle, where the boost is just beginning. The shape will only differ at the lowest frequencies.
Last edited:
Not exactly. The highest input level should have the LEAST amount of boost... you have it backwards.
Reverse the order (top to bottom) of the curves and align them so that they all intersect at the lowest frequency, e.g. at the upper left.
Also, the shape of the curves is exactly the same near the middle, where the boost is just beginning. The shape will only differ at the lowest frequencies.
Doh, of course. so like this?
An externally hosted image should be here but it was not working when we last tested it.
Like the attached plot. The blue curve has the largest difference between the boost at low and high frequencies. This curve is what you get with very low input level. As the input level is raised, the amount of boost is limited so as the total output will not exceed some level (in this case it's 24dB on the y-axis). This means that the relative difference in level between high and low frequencies is less, because there is less low frequency boost.
In the attached plot the input level increases from lowest curve to highest.
In the attached plot the input level increases from lowest curve to highest.
Attachments
Last edited:
Doh, of course. so like this?
An externally hosted image should be here but it was not working when we last tested it.
Bingo. You posted your reply while I was writing my post.
Like the attached plot. The blue curve has the largest difference between the boost at low and high frequencies. This curve is what you get with very low input level. As the input level is raised, the amount of boost is limited so as the total output will not exceed some level (in this case it's 24dB on the y-axis). This means that the relative difference in level between high and low frequencies is less, because there is less low frequency boost.
In the attached plot the input level increases from lowest curve to highest.
Thank you, yes this is very clear. The measurements through the plugin should match this with a minimum of distortion, if all goes well.
When can we hear it?
Thank you, yes this is very clear. The measurements through the plugin should match this with a minimum of distortion, if all goes well.
When can we hear it?
I could release a beta version today. Check back in a couple of hours for info.
If you make some measurements, please share the results by posting them in this thread.
Here is some info:
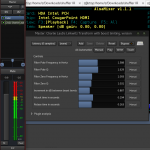
I am current invoking the plugin using ecasound as the LADSPA host. My command line looks like this:
The plugin is called CLLTwbl, short for "Charlie Laub's Linkwitz Transform with boost limiting". I am supplying five parameters. They are, in order of appearance:
The first four parameters describe the desired Linkwitz Transform that will be applied when the input signal level is low. The boost increment is the difference in dB between the N LTs that are run in parallel inside the plugin. Each of these has a slightly lower amount of boost at DC than the one before, starting from the "max" boost specified by the first four parameters and ending at or just above zero boost (e.g. as if Fs was set equal to Fz). The attack time and release time are specified in seconds. Increasing the attack time will increase the amount of time over which the boost limiting is ramped up whenever it is needed and is directly related to the latency of the plugin (longer attack = more latency). The release time does not effect latency. It determines the rate at which the boost is allowed to recover after limiting occurs and should be on the order of 0.5/(the lowest frequency of the system). For example if a subwoofer has an F3 of 20Hz the release should be no less than 0.5/20 seconds (25 msec). Longer times of several times this duration are typically not audible so you might want to be generous and use two to four times the minimum.
When you call the command line shown above in a bash console window the plugin produces output like this:
--------- INFORMATION ---------------------------------------------------
This LT has 31.1261 dB gain at DC. 32 LTs divide the boost into 1dB increments.
5 lookahead frames will be used to approximate the attack time of 120 milliseconds.
The total audio latency is 139.32 milliseconds.
0 > 2.2
2.2 > 4.4
4.4 > 6.6
6.6 > 8.8
8.8 > 11
11 > 11
11 > 8.4458
8.4458 > 6.48469
6.48469 > 8
8 > 8
8 > 6.1424
6.1424 > 4.71614
4.71614 > 3.62105
3.62105 > 2.78025
2.78025 > 2.13468
2.13468 > 1.639
1.639 > 1.25843
1.25843 > 0.966222
0.966222 > 0.741866
0.741866 > 0.569605
0.569605 > 0.437343
0.437343 > 0.335792
0.335792 > 0.257821
0.257821 > 0.197955
0.197955 > 0.15199
0.15199 > 0.116698
0.116698 > 0.0896009
0.0896009 > 0.0687956
0.0687956 > 0.0528213
0.0528213 > 0.0405562
0.0405562 > 0.0311391
0.0311391 > 0.0239086
0.0239086 > 0.018357
0.018357 > 0.0140945
0.0140945 > 0.0108218
0.0108218 > 0
The first couple of lines tell you a little about the setup and give the latency for the amount of attack time used, the buffer and sample rate of the audio, etc.
The stream of numbers that follow are produced whenever the plugin is limiting the signal. Each row is in the format "A > B" where
A is the amount of boost reduction at the beginning of the frame, and
B is the amount of boost reduction at the end of the frame.
During the frame the boost limiting is simply linearly interpolated between the starting and ending values. You can see from the above output the amount of boost reduction reached 11dB during a brief bass transient.
Turn up the input level to produce this output, then turn down the level to stop output from occurring. Go back and look at how much boost limiting took place. During testing I did this while listening through headphones to see if I could detect the effect of the limiting.
The boost limiting information will not be generated by the production plugin, but this is a beta version so just live with it. You can always direct output to dev/null or just edit the code to remove the lines that creates the output.
Feel free to play around with the LT parameters (Fp,Qp,Fz,Qz). For more information on the LT, see:
Active Filters
ESP - The Linkwitz Transform Circuit
I am current invoking the plugin using ecasound as the LADSPA host. My command line looks like this:
Code:
ecasound -b 1024 -i:alsaplugin,0,1,0 -el:CLLTwbl,20,0.6,120,0.707,1,0.12,0.1 -o:alsahw,2,0The plugin is called CLLTwbl, short for "Charlie Laub's Linkwitz Transform with boost limiting". I am supplying five parameters. They are, in order of appearance:
Code:
Fp
Qp
Fz
Qz
boost_increment
attack_time
release_timeWhen you call the command line shown above in a bash console window the plugin produces output like this:
--------- INFORMATION ---------------------------------------------------
This LT has 31.1261 dB gain at DC. 32 LTs divide the boost into 1dB increments.
5 lookahead frames will be used to approximate the attack time of 120 milliseconds.
The total audio latency is 139.32 milliseconds.
0 > 2.2
2.2 > 4.4
4.4 > 6.6
6.6 > 8.8
8.8 > 11
11 > 11
11 > 8.4458
8.4458 > 6.48469
6.48469 > 8
8 > 8
8 > 6.1424
6.1424 > 4.71614
4.71614 > 3.62105
3.62105 > 2.78025
2.78025 > 2.13468
2.13468 > 1.639
1.639 > 1.25843
1.25843 > 0.966222
0.966222 > 0.741866
0.741866 > 0.569605
0.569605 > 0.437343
0.437343 > 0.335792
0.335792 > 0.257821
0.257821 > 0.197955
0.197955 > 0.15199
0.15199 > 0.116698
0.116698 > 0.0896009
0.0896009 > 0.0687956
0.0687956 > 0.0528213
0.0528213 > 0.0405562
0.0405562 > 0.0311391
0.0311391 > 0.0239086
0.0239086 > 0.018357
0.018357 > 0.0140945
0.0140945 > 0.0108218
0.0108218 > 0
The first couple of lines tell you a little about the setup and give the latency for the amount of attack time used, the buffer and sample rate of the audio, etc.
The stream of numbers that follow are produced whenever the plugin is limiting the signal. Each row is in the format "A > B" where
A is the amount of boost reduction at the beginning of the frame, and
B is the amount of boost reduction at the end of the frame.
During the frame the boost limiting is simply linearly interpolated between the starting and ending values. You can see from the above output the amount of boost reduction reached 11dB during a brief bass transient.
Turn up the input level to produce this output, then turn down the level to stop output from occurring. Go back and look at how much boost limiting took place. During testing I did this while listening through headphones to see if I could detect the effect of the limiting.
The boost limiting information will not be generated by the production plugin, but this is a beta version so just live with it. You can always direct output to dev/null or just edit the code to remove the lines that creates the output.
Feel free to play around with the LT parameters (Fp,Qp,Fz,Qz). For more information on the LT, see:
Active Filters
ESP - The Linkwitz Transform Circuit
Last edited:
A TAR file containing the plugin and a Makefile can be downloaded for a short time here:
http://audio.claub.net/temp/CLLTwbl.tar
I will remove this TAR file when I release the production version of the plugin. If you cannot open the link above, check my LADSPA plugin page (link is in my signature).
DIRECTIONS:
Download and extract the tar file.
open a console window and navigate to the location of the extracted folder.
type:
to build and install the plugin.
There are no usage notes (yet) but you can get an idea of what to do by reading the post just prior to this one. I will be creating documentation shortly and will probably post it in this thread.
Please post your impressions, any test results, etc. in this thread. Thanks.
.
http://audio.claub.net/temp/CLLTwbl.tar
I will remove this TAR file when I release the production version of the plugin. If you cannot open the link above, check my LADSPA plugin page (link is in my signature).
DIRECTIONS:
Download and extract the tar file.
open a console window and navigate to the location of the extracted folder.
type:
Code:
sudo make installThere are no usage notes (yet) but you can get an idea of what to do by reading the post just prior to this one. I will be creating documentation shortly and will probably post it in this thread.
Please post your impressions, any test results, etc. in this thread. Thanks.
.
I worked up a model of the CLLTwbl plugin paired with a driver in a closed box to show how limiting the output voltage limits the power delivered by the amp to the driver, which also limits the cone excursion. In this example I am using a Peavey Low Rider 18 (because I actually have a pair of these) in a 100 liter closed box. There is no magic about this driver - it could just as well be any subwoofer driver in a closed box. I am using Unibox to generate the driver plots and my ACD tools to generate the LT curves.
The first (leftmost) two attached plots show the frequency response and cone excursion of the driver in the box specified, given 500W of input power. The Fb is about 56 Hz with Q about 0.78. Excursion tops out around Xmax (Xmax=9.6mm) at low frequencies. We can use a Linkwitz Transform to boost power to the frequencies below Fb to extend the response lower in frequency into real subwoofer territory.
The next three attached plots show what can be achieved when I choose to extend the response lower by two octaves using an LT. The boost that is required is as much as 24dB at low frequencies, and this now transforms the in-box response to Fb=14Hz and Q=0.707. We only have the same 500W of input power available, and Unibox scales the SPL levels shown in the frequency response and excursion plots so that this power level is not exceeded by the boost required by the LT. You can see that with two octaves of extension the frequency response is very flat but if the amp max power should not be exceeded at any frequency the output capability is reduced at higher frequencies - this is the case if we don't want to exceed the 500W power ceiling but we are getting input signal with "full" low frequency level. You can also see that with this frequency response, the excursion remains below Xmax even though the low end of the response has been extended, because the overall gain is reduced. As a consequence, this also limits how "loud" the system can play to about 98dB.
If we want the passband level to be higher (louder) but we still don't want to exceed the 500W capability of the amp or exceed Xmax at any frequency we can simply reduce the LT's boost. The next three plots show an example of the system when the extension has been reduced to 1 octave (12dB). Now the frequency response does not remain flat to as low of a frequency but the passband (e.g. 100Hz and higher) level has risen by 12dB to about 110dB. We have traded off low frequency extension for higher passband SPL level. This is accurate when we don't want to clip the amp or exceed the driver's Xmax.
So, with a conventional Linkwitz Transform you are faced with a choice of how much extension to use, and the amount of extension will influence amp clipping, cone excursion, and passband SPL. What if you could just automatically vary the amount of extension as the program material permits it, using more extension when the amount of low frequency bass was not high enough to exceed the amp's power output capability or the Xmax of the driver, and then dialing it back when there was more bass energy? Well that is EXACTLY what my plugin does! It dynamically changes the LT boost curve from moment to moment, using as much boost as possible without exceeding some signal level threshold. Since the internal signal level is directly related to the amp's output power and, as you can see by my example, to driver cone excursion, the plugin is limiting both of these as well.
The above example is a bit simplistic in that it does not take into account the relative amount of power in the very low bass versus 100Hz and higher, and other factors, but I hope that it illustrates the motivation behind the plugin and the benefits of using it in place of a traditional LT.
Attachments
-
 LT-1 Excursion.gif21.4 KB · Views: 71
 -
 LT-1 Response.gif26.9 KB · Views: 69
 -
 LT-1.PNG26 KB · Views: 69
 -
 LT-0 Excursion.gif21.2 KB · Views: 101
 -
 LT-0 Response.gif27 KB · Views: 105
 -
 LT-0.PNG26.9 KB · Views: 108
 -
 driver wo LT Excursion.gif21.4 KB · Views: 110
 -
 driver wo LT Response.gif27.8 KB · Views: 114
First, in a console, type "listplugins" and then look for the CLLTwbl with ID 9999. It should be listed. If it is listed, have you set the ecasound LADSPA path variable? You should be able to type echo $LADSPA_PATH in a bash console and it should return the path to the plugin. Let me know what happens. It would be better if you can (at least initially) run it in ecasound because it can return error/debug info if there is a problem.
Finally, why are you using the values shown for the parameters Pole Frequency, Pole Q, Zero Frequency, and Zero Q? These are non-sensical and might be causing the plugin to crash. I should probably change the suggested/permitted ranges for these. Try using parameters like:
Pole Frequency = 20
Pole Q = 0.707
Zero Frequency = 100
Zero Q = 0.707
Increment between boost levels = 2
Attack = 0.1
Decay = 0.1
First, in a console, type "listplugins" and then look for the CLLTwbl with ID 9999. It should be listed. If it is listed, have you set the ecasound LADSPA path variable? You should be able to type echo $LADSPA_PATH in a bash console and it should return the path to the plugin. Let me know what happens. It would be better if you can (at least initially) run it in ecasound because it can return error/debug info if there is a problem.
Finally, why are you using the values shown for the parameters Pole Frequency, Pole Q, Zero Frequency, and Zero Q? These are non-sensical and might be causing the plugin to crash. I should probably change the suggested/permitted ranges for these. Try using parameters like:
Pole Frequency = 20
Pole Q = 0.707
Zero Frequency = 100
Zero Q = 0.707
Increment between boost levels = 2
Attack = 0.1
Decay = 0.1
I tried everything within the ranges given by the GUI. I also suspect the nonsense values might be the problem. Will try in ecasound
What were those ranges that you mention above??? I didn't supply any suggested min or max for most of the parameters, so the GUI was just making these up on its own.
It may be the case that the IIR filter calculations suffer roundoff error problems with very low frequency values (like 1 Hz), which can cause the filter to blow up (pin the levels) and not recover. Also, you might have accidentally set the Pole Frequency to be higher than the Zero Frequency, which I didn't think about and this might cause some errors in the code somewhere... not sure. I am coding up a couple of sanity checks on the input parameters and have added suggested parameter ranges as well.
I avoid GUI interfaces - I find that they encourage the user to invoke the plugin and then twiddle with sliders or dials to see what happens without thinking about what is going on, what the values mean, etc. I fear that this is exactly how many people check out these kind of "rack effects".
Good explanation of the why and the how.
I've installed it on Linux (Manjaro) without issue. Ecasound couldn't find it...
If you run listplugins and find CLLTwbl then you can set this environment variable so that ecasound can "find" the LADSPA plugins (typing the following text in the console):
Code:
export LADSPA_PATH=/usr/local/lib/ladspa:/usr/lib/ladspaIf that works, you can put this into your .profile or .bashrc configuration files (these are hidden files) located in the user home directory. Then whenever you log in (.profile) and open a bash shell (.bashrc) this variable will be set and ecasound will find the plugins.
- Status
- Not open for further replies.
- Home
- Source & Line
- PC Based
- IDEA: Linkwitz-Transform LADSPA plugin with lookahead boost control