Many thanks for that, very interesting. I'll have a look for UK sources. Likewise, sorry for the OT digression - I'll stop now unless someone does decide to start an appropriate thread.<snip>
If there are still more questions I will start a new thread. Sorry for the OT digression.
Now I've got the amps sorted for the active system I'll be concentrating on the active crossover. I'm using the Linkwitz from Rod Elliot.
At least with DSP and active XO's you have the ability to
adjust and improve without buying more and more components.
In the end it costs less than passives, IMO.
I would not know about exact cost for an active dsp 3 way setup,
but passively, if the XO point for bass would be around 250 Hz
and a typical 2nd order LP with RCL for bass impedance correction,
3rd order HP mid, 2nd order LP mid and 3rd order HP tweeter,
which is 30 passive parts per pair with single series resistors for
attenuation, it could add up to 124 € + postage. Iron core coils
and bipolar caps for larger values and air core coils with poly caps
for smaller ones.
Additional parts for fine tuning would not present that much
extra cost (BP caps and regular resistors) and going with larger
values coils to start with, could be unwound to more appropriate
values in the design process. Simulation is handy in that respect.
Low passing bass significantly below mentioned would not be
financially interesting anymore.
Having invested much time and funds in DIYing a good quality piece
of discrete class B solid state stereo amp with enough transformer
VA rating for my needs, I could not bring myself easily to trading it
for modern chip amps yet.
it could add up to 124 € + postage.
This is comparable to cost of 2-way active including amps. For 3-way, you need to get a 4-way using qnty 2 of the 2-ways, which basically doubles the cost to $300, but again, that includes the amps (50watts/ch x 8 channels). More power isn't too much more.
Main difference is ease of changing settings with DSP and how it can be used over and over for other projects no matter what XO freq or slope is needed with no new parts.
Last edited:
Well my calibrated microphone has arrived, now what I need to do is figure out how and what I am measuring.
I would suggest a degree of caution concerning the calibration curve. See recent discussion here. The calibration curve that came with my Dayton microphone was nonsense but the microphone itself is fine. I would suggest plotting it first to see if it looks like a calibration curve before plugging it into your measurement software. Welcome to the real world of speaker DIY.Well my calibrated microphone has arrived, now what I need to do is figure out how and what I am measuring.
I would suggest a degree of caution concerning the calibration curve. See recent discussion here. The calibration curve that came with my Dayton microphone was nonsense but the microphone itself is fine. I would suggest plotting it first to see if it looks like a calibration curve before plugging it into your measurement software. Welcome to the real world of speaker DIY.
The OP is new at this, let's get him going with the mechanics of how to do a measurement and worry about the calibration later. It's all fixable and secondary. My cal curve btw, is fine and provides freq response that matches manufacturers curves. Good enough for me.
So first step is to download and install REW.
Did you end up buying the Dayton Audio UMM-6 USB Measurement Microphone via eBay and if so, how much did you pay for delivery and did you have to pay import duty?Well my calibrated microphone has arrived, now what I need to do is figure out how and what I am measuring.
They just sound dead in the midrange, flat and lacklustre compared to my B&Ws.
The UMM-6 was just under £100 incl. P&P and pre-paid duty.
The UMM-6 was just under £100 incl. P&P and pre-paid duty.
They just sound dead in the midrange, flat and lacklustre compared to my B&Ws.
The UMM-6 was just under £100 incl. P&P and pre-paid duty.
Your Wilmslow speaker may have a monitor-type balance. Flat. Neutral. 🙂
It's not everyone's cup of tea.
It's also possible the bass is excessive, giving a recessed quality to the midrange and top. Placement and the room may be important there.
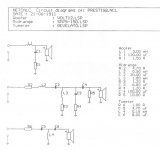
You can up the mid level about 1.5dB by shorting R3, R4 and C4. Changing R5 to 15R would add a dB as well. I'm really amazed that C4 of 100uF is there at all. It does next to nothing and is an expensive component.
I don't think it's good to up the tweeter level via R6, since top end impedance is already low. I would realign those coils so they point sideways, rather than down to reduce interaction with ground planes.
Attachments
Last edited:
The OP is new at this, let's get him going with the mechanics of how to do a measurement and worry about the calibration later. It's all fixable and secondary. My cal curve btw, is fine and provides freq response that matches manufacturers curves. Good enough for me.
So first step is to download and install REW.
Thank you.
I've downloaded REW V5.0 and installed it. I've had a quick play and can get a frequency sweep through my PC speakers.
Can we start by trying to do an uncalibrated sweep using my PC speakers. Starting at the beginning and building up to what we ultimately need to achieve.
Many thanks

When taking a measurement you want to include only the sound radiation from the speaker and not reflections from the floor, wall and ceiling. You can see the presence of reflections in the impulse response. The time difference plus sound travelling at 340 m/s will tell you how far away the offending surface lies.
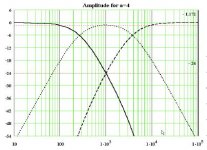
The phase is wrapping round between -180 degrees and +180 degrees.
The phase is wrapping round between -180 degrees and +180 degrees.
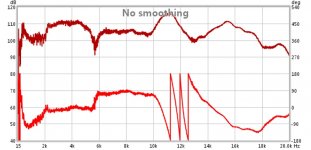
..I guess the driver has its break up over 10kHz…
Peter
Very possible, during the sweep I can only hear it up to just above 10kHz.
Hmm, how old are you;o) I'm 51 and have problems with hearing +10kHz. Saves me a lot of worries of break up in drivers😱)
Peter
Peter
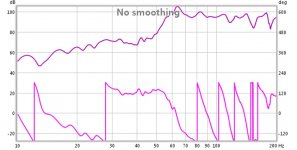
I've managed to open up the scales to show a full range 10Hz - 20kHz scan.
What on earth is happening with the Phase scan? This is a single driver PC speaker.
Set the range from 10Hz to 20kHz, make sure you set the output dB FS level such that you don't clip the mic. Make sure there is at least 10 to 15 dB headroom to avoid clipping mic. Set smoothing to 1/12th octave. We don't need to see all the hash. Put the speaker in the middle of the room angled 45 deg from walls on a stand or stool and keep stool surface away from front of driver to avoid reflection. Put some pillows on floor directly beneath speaker on stool. Use a tripod or mic stand or boom to place mic in position. Measure about 12 in away at first and this reduces room effects. If you have a plain full range speaker measure that first. Good luck.
- Status
- Not open for further replies.
- Home
- Loudspeakers
- Multi-Way
- Wilmslow Audio - Prestige platinum