The little bit of veneering I've done was with the iron-on stuff and it was very easy to work with (I refaced our kitchen cabinets). It gets my recommendation as well.Ryan - that's a freaking shame - was that raw veneer or paper backed?
A lot to be said for the iron-on glue method, particularly with the flexible paper backed material.
How would you go about finishing the pencils, briefly.
Sides first and then front? You iron on and cut afterwards? How does one avoid visible cuts or even damaging the veneer on the other side of the joint/corner?
Sides first and then front? You iron on and cut afterwards? How does one avoid visible cuts or even damaging the veneer on the other side of the joint/corner?
Whether you do the sides first or the front depends on the look you're going for (e.g. whether you want an edge showing towards the front or the sides).How would you go about finishing the pencils, briefly.
Sides first and then front? You iron on and cut afterwards? How does one avoid visible cuts or even damaging the veneer on the other side of the joint/corner?
My preference would be to do the sides first, trim, then do the front and trim. The trimming is the hard part. You can buy special router bits for trimming veneer and special knives/tools as well. I try to do it by hand myself using a very sharp blade, but you always risk a slip here or there so special care is needed. You can either leave a hard edge or round it off very slightly with some very fine sandpaper, but again you need to be very careful not to sand too much or unevenly.
I suggest you try ironing a narrow 'waste' strip of veneer along the edge of a practice board first (e.g. a scrap piece of wood or MDF with a straight edge), and then try trimming it to get a feel for what's involved.
Other people who are more experienced with veneer may well have some other tips or suggestions.
Last edited:
well, I'd composed a long winded (big surprise, huh?) description of my own particular routine, but all it took was a single errant keystroke while trying to multi-task to obliterate it.
short summary;
- paper backed veneer is generally much cheaper per square foot than thicker, "real" veneer, a lot easier to work with, and on large projects can often be hand picked from vendor for grain sequence matching between sheets
- yes, practice on scraps with glue application (short napped velour roller to achieve a light "eggshell" texture on both surfaces) , grain alignment and trimming, particularly for cross grain seams
- let the degree of figuring of the particular sample (some species can vary widely, even along the length of the same sheet) "speak" as to the pattern of layout and amount of waste - trying to squeeze 80% yield from something like a highly figured walnut or cherry can bite you in the @$$ on pattern and grain match/wrapping, particularly on non-rectangular enclosures such as a FrugelHorn
- allow at least 1/2" over cut for trimming and fine alignment of grain matching, and be sure to mark and number each piece for each box
- with some careful setup and handling it's possible to layup and wrap a single piece around the 2 long front edges of something like the Pensil, and
- the light brown kraft paper normally seen as backer is far less obnoxious on exposed edges than say the phenolic backer on plastic laminates - even the thinnest "post-form" varieties, and virtually disappears if you're applying any stain
- I use the iron to fold veneer around corners and scorch demarcation lines around driver and vent openings, and 150G hard sanding block to sand through the bulk of the face veneer on 90dg edges, trim with a 2" chisel, plane blade or Olfa utility knife held flat against the adjacent edge , and finish off with a few more strokes of the sanding block in the direction of the grain
- mask off a veneered face before applying glue to the adjacent face, and remove the tape after glue has set - heat of the iron through the paper can make the tape much messier to remove later
- I generally veneer in the following sequence-
back
front
sides
top
bottom, except on floorstanders like the Pensils, Frugels, etc)
yes, that's the condensed version 😀
Well, after a lot of thinking and roundabouts I have now ordered a pair of Alpair 10Ps as my first project. Looking forward to building Pensils for them.
Not trying to hijack thread, but I too am planning on building Pensil10p. How important is the baffling? I was reading up on the designs. Doesn't look difficult to do, but I would like some opinions from those who added the baffling, and what changes in sound, if any, were observed.
Thanks to all.
Thanks to all.
... but I would like some opinions from those who added the baffling, and what changes in sound, if any, were observed
Are you refering to the holey-brace?
dave
It says to use "Polyfill" to mass-load them. Can't find any around here, but it is normal white,fluffy dampening material?
How should it be distributed througout the cabinet?
How should it be distributed througout the cabinet?
It says to use "Polyfill" to mass-load them. Can't find any around here, but it is normal white,fluffy dampening material?
How should it be distributed througout the cabinet?
Polyfill to damp them. Dacron wool, BAF, Acoustituff, pillow stuffing.
Yes, ditribute evenly thruout the cabinet.
dave
Maybe I am mistaken, but looking at the Pensil10p drawings, it refers to bracing
"3/ bracing is optional. For bracing ideas plase see the bracing sheet in the superPensil12 plans"
In the superPensil12 plans, the second sheet explains the hole filled bracing system.
"3/ bracing is optional. For bracing ideas plase see the bracing sheet in the superPensil12 plans"
In the superPensil12 plans, the second sheet explains the hole filled bracing system.
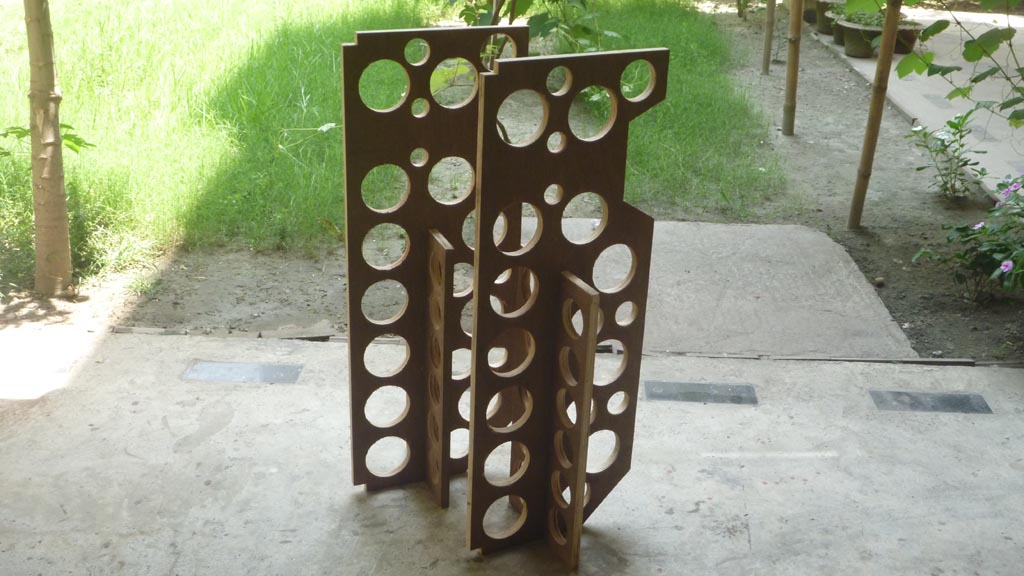
The holey brace will stiffen the cabinet and draw reactive energy from the driver to the back panel (where it will be less noticable and share energy across multiple panels). In the larger versions additional side-to-side braces below the driver are also recommended. Holes mean to reduce impact on internal volume and to increase the complexity of any side-to-side, front-to-back standing wave structures.
The holey braces cab take as much time to do as the rest of the box, hence them being optional. We (Chris & i) would not build a Pensil without them.
dave
The holey braces cab take as much time to do as the rest of the box, hence them being optional. We (Chris & i) would not build a Pensil without them.
dave
Braces as elaborate as these?
http://www.diyaudio.com/forums/markaudio/187179-super-pensil-build-pics.html
http://www.diyaudio.com/forums/markaudio/187179-super-pensil-build-pics.html
Those are very holey braces. Nice.
I suppose if you had a router you could make them even fancier.
~Tom
I suppose if you had a router you could make them even fancier.
~Tom
Last edited:
But is it neccessary to have such big braces, and from the design it seems it has to fit exactly behind the magnet so that it is fixed in its place?
Is there any theory on how big hold and how many, or just to find a balance between strength and holes?
-----------------------------------------------------------------------------------------
Concerning Mass-loading, is it important to "block" the air so that there is noe direct path through the speaker except having the air pass through polyfill?
Jan - yup pretty much - the cross braces don't necessarily need to interlock - that can be a pain on really large enclosures - as long as they fit tight
the left hand enclosures were for Tannoy 15" DC Gold monitors - braces all CNC machined, the right hand for floorstanders for Fostex FE167E - by hand
CNC wins every time
the left hand enclosures were for Tannoy 15" DC Gold monitors - braces all CNC machined, the right hand for floorstanders for Fostex FE167E - by hand
CNC wins every time
Attachments

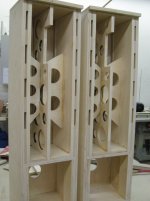
Holy crap! (pun intended) Very nice job, but that's a lot of work. How do you ensure the braces fit snugly (and are glued tightly) along their holey length?Jan - yup pretty much - the cross braces don't necessarily need to interlock - that can be a pain on really large enclosures - as long as they fit tight
the left hand enclosures were for Tannoy 15" DC Gold monitors - braces all CNC machined, the right hand for floorstanders for Fostex FE167E - by hand
CNC wins every time
Is there any theory on how big hold and how many, or just to find a balance between strength and holes?
~30-35% holes.
dave
- Status
- Not open for further replies.
- Home
- More Vendors...
- Planet 10 hifi
- Mark Audio Alpair floorstander, pensil - horn or?