freeDSP Aurora-based USB 8-channel DSP/DAC/Preamp/Amp Build

Not quite sure where to put this since it ticks the boxes for so many categories, but why not this one? 🙂

Ongoing build thread for my Aurora-based "everything" box. This will contain, at the very least, the following devices:

- freeDSP Aurora
- Mean Well RPS-30-7.5
- (2x) TPA3255EVM
- (TBD) (2x) TICore260BTL
- Connex SMPS800RS

The intended use is for the Aurora to act as a USB sound card in my PC so that I can feed a stereo 4-way monitor setup.

Acoustic Suspension Drivers

Hi All,

I have a hankering to build some 2-way Acoustic Suspension (although I use the term loosely) speakers, with 8" woofers.

I've narrowed my woofer shortlist to two:

SB Acoustics SB23CACS45-8, and the Human Pro005.

Both of these will get me down to 39 - 44Hz with an enclosure of 41 - 43.5 litres.

The question is a little open-ended for my liking, but am I missing any tricks here?... Before I bite the bullet, does anyone have any better suggestions for woofers? 😀

Disassembly of QSC Powerlight 6.0 power amps

Hi. Im new in the wonderful world of QSC power amp repair.Ive been doing electronics for 35 years and just took on a new gig w/ a local stage sound and lighting company.Ive got plenty of time under my belt working on anything from HDTVs TO power and guitar amps,electrician work,etc etc,so I am qualified. My first challenge is I have about a dozen QSC Powerlight amps mainly 6.0 and 9.0s. Electrically,Im not worried about repairing them. However...HOW THE HELL DO THESE THINGS COME OUT OF THE CASE? 3 hours today. Usually power amps have a top and bottom cover,bingo presto. Im talking about the Powerlight 6.0 here. Its in a "tub". I got the back fan panel and top off,no problem. How do you get the rest of the chassis OUT of the case-i.e.power board,front control board. Does the chassis SLIDE OUT,or does everything have to be undone piece by piece,labeled,and unloaded out of the top? Theres absolutely no forums,videos,etc on this. I found the repair manual but that dont do alot. Right off the bat I DO have a burnt up cap on the power board-a blue ceramic disc cap-directly by the power cord,Im guessing thats a power factor cap.Blown to smithereens so bad i cant even get a value,but I cant even get this board OUT of the case! Its the board that sits VERTICALLY with the power cord on it. Talk about 20 pounds of s*it in a 5 pound bag! If anybody can throw me a bone on disassembly of this thing,youlle be helping me feed me family LOL. Thanks! John K Best Electrical inc. (BTW-amp symptons-plug in,flip switch,trips breaker in service panel)

Da 42 Triode

The burning question,

Has anyone tried or succeeded in using this Triode for Audio.
The horribly low 3.0 mav suggests class B with a powerful driver and interstage tranny.
The dissipation is 40 W and max anode voltage is a rather hot 1000 V.

Any takers ?

If you would like to build with them, i have quite a few of them sitting in my cupboard.

Increasing Idle Voltage on Creek Destiny

Hi All,
I've read a lot about so called sound improvements by increasing the idle voltage. The Destiny factory settings is 21.5mV. How is that value calculated? As I understand temperature control plays a major factor? But I've also read that the idle voltage is set below the ideal (Q-point?) voltage for the MOSFETs. Can anyone recommend safe upper limit for setting the idle voltage? I'm trying to improve the sound and favor softer over more detailed. Is 28mV too high? The heatsinks are quite warm but not too hot to the touch. I've attached the schematics for reference. The only modification I've made if any is replacing the HUF76639 MOSFETS with IRL2910.
Thanks for any help.
Best,
Gregory

Attachments

Sony TA-N80ES Replacement Parts Needed

Hi

This is my first thread as a registered user but I have frequently visited the diyaudio forum because the members technical knowledge and informative discussions and now I decided to get some help if it's possible because I need desperately repair an Sony TA-N80ES

The short story is that I'm began to hear some low audible hummm or buzzz from my speakers and I decided to find the problem which lead to that I recaped the amp entirely and in an stupid movement I shorted the driver and output transistors.
The amp wasn't powered but it had spare voltage in the main caps which I didn't drained and after the spark the damage was done. To do thing worst I powered ( the most stupid thing I admit ) the amp and I shortened some more transistors ( and one zener diode ) on the input board.

Now, I'm not electrician or engineer but a simple audiophile amateur which knows some basics on electrical components as well can handle a multimeter and solder iron but now I need desperately some help with this because my know how is not really enough to resort this

The following components I need to replace and I bought some equivalent parts which follows :

2SC3856/2SA1492A ( the original outputs on the right chanel) for 2STC5242/2STA1962 ( these are from STMICROELECTRONICS )

2SC3298A/2SA1306A ( driver transistors ) for MJE15030/MJE15031

The transistors from the input board ( transistor board ) are 2SA1383 and 2SA1360. I couldn't find equivalent replacement but I find originals on Ebay and I bought them (hopefully these are not fakes )

But my biggest problem is that HZ3LL zener diode which I don't know exactly what it doing and whit which replacement part to replace it because it doesn't manufactures anymore.

The D362= HZ3LL(A Grade ) zener diode (HZ3LL - Silicon Epitaxial Planar Zener Diode for Hard Knee Low Noise - Hitachi Semiconductor )

Features
• Vz-Iz characteristics are semi logarithmic linear from IZ = 1nA to 1mA and have sharper breakdown knees in a low current region, and also lower VZ temperature coefficients.
• Low dynamic impedance and low noise in the low current region (approximately 1/10 lower than the current zeners).

8259199434_d08cbe8ab9_b.jpg


the Q362= 2SA1383

the Q462= 2SA1360

Here is some pictures which I presume would be helpful

8259055794_a2724ee0b6_z.jpg


8259139278_fc9051d10f_b.jpg


I really would appreciate any help with these because I really would love to get back my lovely TA-N80ES to life again :bawling:

Help With Provenance: Pass Labs Zen

Hi All,

I tripped across this amp the other day, but passed on it until I could confirm some info on it.

It is a Zen, that I know. I was led to believe that is was built by Pass Labs (not a kit) and that it won some HiFi competition in the 1990's.

Can anyone shed some light on it? There are no markings on the case, only on the board as pictured. Thanks!

Attachments

  • IMG_1522.JPG
    IMG_1522.JPG
    703.8 KB · Views: 730
  • IMG_1524.JPG
    IMG_1524.JPG
    922.7 KB · Views: 731

How to store speaker units

Probably the most stupid question today.. But here goes!

I've currently got plenty of upcoming projects, which means storing of quite a few speaker units. Are there "right" and "wrong" ways to store these precious boxes?

Should they lay upside down? Downside up? Be turned around once in a while?

Can they be kept to close together - can the magnets damage other units kept nearby? Should they be kept away from turntables, amplifiers and other gear?

... or should I just stack the boxes and quit panicking?

TIA :-D

I am a rip off merchant !

Sold a copy of my PCB design software on ebay.
Next day I get a phone call saying I am a rip off merchant as the software just supplies basic libraries and doesn't have a facility for an A3 sheet.

Well I never said it did in the ebay advert ! Clearly says basic libraries.

After a brief discussion it seems he has Eagle system files and wants to design 11 pcb's each with about 130 components on it.

My first response was why spend £7 on some PCBCAD software when Eagle is $332 ! He just said he didnt expect it to be as good as Eagle.
I tried to explain the software doesnt need sheets as you just input schematic on one huge sheet then print out blocks to the printer. Thats worked for me for many years. He didnt want to know.

He was clearly expecting a Rolls Royce for Mondeo money.

Had hundreds of satisfied customers over 10 years.

So I have added in A1 to A6 sheets anyway about an hours work.

Screen voltage on 807/1625

I know that its strongly recommended to respect the 300v screen voltage limit on the 807/1625.


I created a Ltspice model of the RH807 amp I am building and it simulates a screen waveform in the snip attached.


So I assume (asking for corrections in my assumptions):
1. The brief excursions above 300v is not a problem because the majority of the waveform is well under 300V?
2. The 300V rating in this design is to be respected at the DC operating point?
3. There is a big compromise is dropping the screen voltage from the B+ using a resistor because the screen is operating well under 300V when real music is playing?

Attachments

  • rh807screen.png
    rh807screen.png
    17.5 KB · Views: 187

Krell KSA300S power amp.

Heard about this Krell power amp, and how superb the bass response is. I heard a ksa-100, but I'd like to know if there's any drawbacks such as the power outlet amperage, and will it be best to use it on a separate line. I have an air conditioner line rated at 125v- 20 amp, and another separate line at 125v- 30 amp. I've always wanted to purchase this one to go with my other power amp.

FS: Mark Audio Alpair 11MS GOLD Mint pair

Selling a mint pair of Mark Audio Alpair 11MS in GOLD. I have an ebay listing up for these with a starting bid of $115.00. These are $112 each on Madisound right now. I will only ship to the continental US.

I also have the following for sale (not on ebay):

--- Mark Audio CHP-70 pair in natural - in original box: $40.00

--- Fostex FF85WK pair in original boxes: $55.00

I accept paypal and you pay actual shipping via ups ground.

FS, Jeff Bagby Adelphos complete kit (nib, unassembled)

I am selling my complete Adelphos Kit (pair), which I purchased from Meniscus Audio. Has upgraded litz inductors, and Clarity ESA caps. I've only opened the box for pictures, buyer will receive it exactly as I received it. Ports are included in kit.
I redesigned the crossovers in my big Tylers, so I decided not to build the Adelphos.
I paid $795, asking $525 PayPal, buyer pays shipping.
Thanks for looking.
(100% positive feedback ebay rikki900, Audiogon & USAM rikkitik)

Linaeum ET5 tweeter renew

Hello. One of the Optimus LX4's that make up my 'lovely couple' has a faulty Linaeum ET5 tweeter. Does anyone know if they can be disassembled and possibly renewed? The 1995 Radio Shack catalog says the tweeter is a monopole ferrofluid type. Can they be cleaned? Does the ferrofluid evaporate or harden? Is there a type of voice coil? The exposed diaphragm (film) looks intact, however somewhat wrinkled?, as if shrunk! I see a few for sale, but am curious if mine can be saved and recycled? Best Regards and Thank You, civil6.

EL84 PP transformer pair

For sale nice pair of output transformers with primary 8Kohm and secondary 8 or 4 ohms.They build on Ei84 core and are made in Germany.Spec are 20Hz to 20Khz -1dB.They are 15 watts models.Good low cost transformers for tube amp builders.Price 50 eu pair plus 14,90eu shipping inside europe.

Attachments

  • C75F28E4-0E7A-49DD-A90F-D836EF4044AC.jpg
    C75F28E4-0E7A-49DD-A90F-D836EF4044AC.jpg
    842.7 KB · Views: 255
  • DAF4CC9C-1A78-42CC-A683-12B5B10EF54B.jpg
    DAF4CC9C-1A78-42CC-A683-12B5B10EF54B.jpg
    835.9 KB · Views: 251
  • AA668522-352A-4A29-A153-8604B6E0F8DE.jpg
    AA668522-352A-4A29-A153-8604B6E0F8DE.jpg
    785.2 KB · Views: 265

Vox AC4TV tone stack mod

Hi,

Long time reader first time poster. I've been searching google and forums for a few days

I'm relatively new to modding amps but comfortable around higher voltages.

My friend asked me to help him with his AC4TV (schem attached). He's looking to replace the voltage selector knob with a bass roll off.

Snipping out the attenuator network seems straightforward and repurposing the chassis hole seems easy enough.

The tone control reads to me like a variable bright bypass for the volume control, but I could well be wrong and it's not that useful for him and having control of the bottom would make the amp more versatile.

Is it possible to change R12 for a 1M pot and replace the whole stack with a "normal" Fender or Vox TB (ie Princeton or AC15 top-boost)?

Also the function of R15/C12 just plain confuse me.

Thanks,

Lukas

Attachments

  • AC4TV.jpg
    AC4TV.jpg
    118.2 KB · Views: 434

CHEAP Power Supply Iron - Tube and SS

Pre-spring cleaning. Used power supply transformers for sale. Prices don't include shipping.

(2) Baldwin 512-23629A Power transformers. One is older with cloth leads. They came from a Baldwin 45HP2 amp. These support (2) tube rectifiers. Solid state rectification will give you about 415 VDC. These are monsters. $35 each.

(2) 36 VCT @ 4A signal transformers. $20 each.

(1) 120V @ 4A isolation transformer. Big. $49.

(1) Tenpao TOU543005F0 toroid. 120V input: 52.4 VAC CT @ 330 VA; 14V. Nice for a SS amp. $39

(1) 12.6V Filament XFMR from Lowrey "Berkshire" organ. P/N: 41X-8 606720. $19

(1) Tibi Electronics 124/28V (unloaded) Toroid, P/N: 15-0083 Rev. A. This came from a N.E.W. power supply (basically a 24V battery charger). I'm guessing 10-12 amps here. It's big. $29

(2) Toroid Corp #4205-B. 117/24V RMS @ 6.2A. $25 each

(2) Custom (Heyboer) Eico HF-87 Power Supply XFMRs. The voltage from these is too low with a 120V power supply - they are really spec'd for about 130V mains (e.g. 5.8V on the filaments with 120), but should work up to full specs with an inexpensive 10VAC 3A boosting transformer. $39 each.

THX

Telefunken AZ1 Nos rectifier+Valvo AZ11 for free

I sell one rectifier tube Telefunken Mesh plate AZ1 in Nos condition and I will give for free one Valvo AZ11 also mesh plate in good working order (used about 100 hours)but the base was glued,becouse it becomes a little bit loose.The price is 50eu plus 6,90 shipping inside EU.

Attachments

  • 20201121_131254.jpg
    20201121_131254.jpg
    1 MB · Views: 222
  • 20201121_131303.jpg
    20201121_131303.jpg
    1 MB · Views: 220
  • 20201121_131345.jpg
    20201121_131345.jpg
    628.3 KB · Views: 207

  • Locked
Behringer INuke NU3000DSP repair help

Hello! I broke my amplifier by accidentally dropping a piece of copper wire onto an IGBT (T5) which led to the explosion of T1 and T5 on the schematic -> https://schems.com/bmampscom/behringer/Behringer_iNuke_NU3000_sch.pdf

I opened a thread earlier talking about a replacement for these IGBT's and now I am writing this here. Furthermore, my knowledge of repairing is basically zero. Experience is non existent...

A forum member told me "with a quick look I can see some blown smd components like R10,D5,T2,R21 and who knows what else"
That means other components are also possibly destroyed. Here is an image (with new IGBT's and horrible soldering skills)
I have no idea how to proceed in troubleshooting this stuff. A Digital Multimeter is in my repertoire but nothing more.

The amplifier turns on but the fan does not spin and the front LED's are shining RED, which they normally shouldnt because they are intended to glow orange.

Thank you.

Attachments

  • IMG_20210130_105254.jpg
    IMG_20210130_105254.jpg
    1,001.8 KB · Views: 325

Poor frequency response EL84 parafeed HPA

Hi all 😀

I recently completed a parafeed EL84 headphone amplifier. I chose it because I had all the parts and was looking for a simple, fun tube project to build over the holidays.

The tube circuit is a clone of Jim Hagerman's Tuba. I don't want to republish the full schematic here, but it can be found in the user manual: http://www.hagtech.com/pdf/tuba.pdf

I built it point to point and it powers up fine, absolutely no hum. All the voltages check out. However, there is nasty low frequency roll off. The output transformer is a speaker matching style unit - 600ohm primary with 8ohm secondary and a 4ohm centre tap.

Where should I start looking to address the frequency response issue? Is it possibly poor transformers?

Signal schematic and FR plot are attached.

Attachments

  • sch.png
    sch.png
    40.7 KB · Views: 461
  • FR.png
    FR.png
    20.5 KB · Views: 431

Samsung HT-P10 - PWM defective ?

Howdy !

In the diagram below the whole system works except for the final amp stages, only the woofer can be heard from the ground (through the electrolytic capacitor) or from the outputs of the other channels (through the electrolytic capacitor). The woofer does not sound on normal bridge output. All coils and capacitors output checked. DC on output = 0. Idle current = 0.

Is it possible that the PWM is defective or are all the final stages burned, except ½ in the woofer?

Attachments

  • service-Samsung htp10_1.jpg
    service-Samsung htp10_1.jpg
    532.3 KB · Views: 111

QUAD 303 sudden noise in 1 channel

My QUAD 303 was shelved under normal room conditions for 10 years, and it was working flawlessly then.
Today, I connected it again to my 34 preamp, and a set of speakers.
Surprisingly, one channel has developed a constant noise, very audible, like pink noise with only high frequencies. Not crackling noise, not motorboating.
Noise level is independent from volume, even with no preamp, the noise is the same.

I had replaced the filter electrolytics, output electrolytics and electrolytics on the amplifier boards already back in 2000, and used high grade Philips/BC electrolytics (light blue ones). As said, the 303 worked perfectly until I shelved it around 2010.

Today I opened it up and tested rail voltage, half rail voltage, bias and DC setpoints of the transistors. (Un-) fortunately, all seem to be OK.
All capacitors on the boards looked OK too.

With my scope I can trace the noise all the way back to the collector of TR102. Everything "before" that, is clean, including the base of TR102.
Noise level on the speaker terminals is approx 100 mV (tt)

Full schematic can be found here: http://www.meridian-audio.info/public/quad-303-service-data[1961].pdf. I have the "newer than 11500 version".

I could use some guidance to test further, or tips/hints (faulty ceramic cap? noisy resistor?). I know the output triplets can be sensitive to oscillation, but I never changed any transistor, and the noise seems a broad spectrum noise....

I will be off-line during Christmas, but after that I have time to test a little more. TIA!

Attachments

  • IMG_0493.jpg
    IMG_0493.jpg
    415.2 KB · Views: 321

Rockford fostgate BD1501 no outpout, need help

hello guys,


i'm new here, not afford in repair caramp but i have already repaired many weird thigs : phones, tv,.... bga and microsoldering too


but carmap is a new world, already repaired some but i don't understand this issue with a rockford 1501 old stuff.


when powered, red led is ok, not protect mode but i have no output sound . and the board does a acute noise, continuously.


the fets are all goods, no short , no excessive heat


i test voltages on sg3526 and that's not good but don't understand where i have to start checking more, this is the voltages :


1/ 5
2/ 0.5
3/ 4.2
4/ 4.7
5/ 4.99
6/ 0
7/ 0
8/ 0
9/ 3.6
10/ 2.1
11/ 0
12/ 5
13/ 0
14/ 7.5
15/ 0
16/ 0
17/ 7.5
18/ 5


so i have not enough current on VCC ? no out A and B, no SD and no -E


can you help me please ?


thank you

Any news on high voltage negative regulators?

I'm looking for a high voltage (~-150v) negative regulator, something like an LM337 with the voltage and current specs of an IXCP10M45S. I'm looking all over and coming up with bupkis.

For those who are interested, this is for a direct coupled tube amp driver. I know there are ways to do this with positive devices, but they all seem to require a separate transformer and rectifier to avoid mucking up the ground circuit.

I know this has been discussed here before -- years ago -- but I'm hoping there's been some progress. It's starting to look doubtful.

Phase shift near 180° but still lots of margin?

Greetings,

good evening or good morning, depending on where you are😀

Was looking at a pretty expensive discrete Op Amp yesterday, and I found the phase gain plot to be fairly interesting:
GainPhaseplot1.png

The phase shift rolled near to 180 degrees in the middle of effective bandwidth and came back to a margin of some 70 degrees at zero crossing. This reminds me of some SPICE simulation with complicated compensation schemes, say transitional miller compensation or two pole compensation where one can actually adjust the phase to bahave like this. Also, the super feedback op amp introduced by Mr. Samuel Groner has similar behaviour, the phase already shifted more than 180 degrees(!) and then rise back.

Does anyone know if such behaviour will cause problems with stability? Havent seen this "camel back" shape in any of IC op amps..

Clear coat over steel?

I am making a chassis for a tube phono preamp power supply and am using 22 gauge steel sheet. I want to have a "brushed aluminum" look so I was thinking of doing the appropriate sanding, etching it with glacial acetic acid and spraying it with clear coat. The open sides will be filled with hardwood flooring remnants I have.

I have done this with aluminum several times but I have never painted steel without priming first.

Will this work?

attachment.php


attachment.php

Attachments

  • aaaa.jpg
    aaaa.jpg
    192.4 KB · Views: 510
  • bbbb.jpg
    bbbb.jpg
    204.6 KB · Views: 489

What stability margins do you design for?

tl;dr the old rule of thumb says you want 6db of gain margin and 45 degrees phase margin. You may need more than that to avoid EMI; try 20db of gain margin and 60 degrees of phase margin.


There's an FM radio transmitter in my neighborhood. I've seen two different preamps pick its signal up audibly. Neither device contains an intentional tuner.


In each case the FM interference is quiet -- inaudible with a signal playing, and with no signal playing, the FM station is just above the noise floor in a quiet room. You can tell it's there, if not make out what they're saying.


In each case, spice predicted the preamp had adequate stability margins: better than 45 degrees of phase margin and 6db of gain margin. (I've heard both 6db and 10db as recommended minimums for gain margin.) In both cases, the ULGF was fairly high, in the 10MHz to 20Mhz range.


Playing sharp squarewaves through both preamps showed nothing untoward, no hint of oscillation. Yet the FM pickup was there.


On one of them, I modified the frequency compensation for more generous margins in spice: 24db gain margin, 60 degree phase margin, and a ULGF right around 1MHz.


This fixed the FM pickup. It's completely gone.


Why does it work? The reduced ULGF keeps the critical segments of the loopgain plot well below frequencies where parasitics pop up. Simulation should match the real circuit well in the single-digit MHz range, so its stability prediction is believable. At 100Mhz where the RFI is, loopgain is now far below unity. This loop shouldn't be able to do anything at 100Mhz.


We can get generous margins without sacrificing in-band feedback:


  1. Use any of the compensation schemes with two LF poles and a zero at a couple of hundred kHz. I like TPC but TMC can work, lead-lag can work. They all provides >60db of feedback in-band while allowing for low ULGF in the 1-2Mhz range.
  2. If you use a lead cap across the NFB resistor to improve phase margin, add a resistor around 1k in series with the lead cap to improve gain margin too.

This probably applies to power amps and line/pre amps alike, though I've only really seen bad RFI with preamps.

Steel tubing for open baffle frame????

Hi guys. I have wanted to mess around with full range drivers for quite some time. My problem is the only wood working tools i own are a couple of chainsaws.
Was over at a friends house a couple weeks ago and he was playing with Tang Band 1808s mounted on an open baffle. No bass but the vocals were impressive to say the least.
So..Got to thinking about making some L shaped legs from 1 1/2 inch square tubing. Clamp some angle iron to the tubing as rests for the baffle, then using duct tape and pieces from a cardboard box to experiment till I got the sound right. The angle pieces could be moved vertically so the height of the driver could be adjusted.
Question..Would the steel resonate at some frequency and garbage up the sound?? I could fill the tubing with sand and weld some caps so I didn't have sand leaking all over the living room if need be. Would that be a better way to go, or forget about the metal stands altogether?? Am much better at working with metal than wood.
Anyway, your thoughts on such an arrangement?? Thanks for any input guys. Regards, J.D.

30V Power supply PCB

Hi,

I'm designing a power supply for an amplifier project using +-30V rails. It's a straightforward design but I wanted to check that I hadn't missed anything. I've included fuses on the secondary and DC rails and a small capacitor across the secondary. The GND terminal on the PCB will go to a separate star ground point. Douglas Self says that local decoupling capacitors on the amplifier boards should be grounded to the main filter capacitors and not the star ground so perhaps I should add an additional connection next to the CT connection.

I have completed all connections on the PCB with copper fill as I'd like to use a 1oz board due to the big price difference. My only concern with this is that the pins on the bridge rectifier still only make contact with the copper over a small area. I have included square cutouts in the board to secure the electrolytics with cable ties, mounted flat on the board.

At the moment, there is no provision for a heatsink for the rectifier. I do not know if this will be necessary. I have seen guitar amplifiers (which this is for) using the same type with no heatsinking so I don't know what the real world circumstances require.

All criticism is greatly appreciated!

Thanks,
James

Attachments

  • PSU Schematic.PNG
    PSU Schematic.PNG
    59.3 KB · Views: 184
  • PSU PCB bottom.PNG
    PSU PCB bottom.PNG
    70.5 KB · Views: 188
  • PSU PCB top.PNG
    PSU PCB top.PNG
    74.9 KB · Views: 175

Observations: built the "Vintage 6SL7 Phono Stage" board from Tavish Deisgn

My audio addiction has advanced to the point I am interested in designing my own equipment. I have been lurking here for some time and thought I’d share the results from my first project.

I bought the “Vintage 6SL7 Phono Stage” circuit board from Tavish Design. They provide the board, schematics, parts list, and instructions. They also sell completed units.

This was my first DIY project.

Sourcing the parts from DigiKey and Mouser and building the board was straightforward enough. Everything went together easily and the instructions were comprehensive and easy to follow.

I wanted to design a chassis that compliments the rest of my system as well as the turntable that I plan to buy soon.

I settled on using the freely available Protocase designer software available from the Protocase fabrication company in Canada.

This CAD program comes supplied with basic templates for various types of enclosures, including five-sided enclosures, U-shaped enclosures, L-shaped enclosures, among others. The program provides a library of sheet metal stock (cold rolled steel, stainless steel, and aluminum), and all of the various fasteners that they offer (studs, standoffs, nuts, etc.) The program is also aware of all the powder coat finishing options that the offer, which can be previewed on their web site. The CAD program can also be used to create cutouts in sheet metal parts of any size or shape. The CAD program can also be used to add graphics to any surface. They offer silk screening and digital inkjet printing.

Protocase uses an automated CAD/CAM process, where sheet metal is laser cut, folded, welded, and finished.

The phono preamp board is intended to be mounted in a chassis on top of standoffs, with cutouts that mate with board-mounted connectors.

I chose to design a U-shaped enclosure with a cover that is fastened with screws to the sides of the chassis and lifts off from the top. I chose this design because the board contains DIP switches for setting resistive and capacitive loading of moving magnet and moving coil cartridges, so occasional access to the board could be necessary.

This was my first experience at designing a chassis and using CAD software and I didn’t have any dimensions available for the board or the connectors. Not being brave enough to chance a misalignment of connectors, I decided to mount the board on standoffs in the center of the chassis. I used thru-hole power, ground, and BNC connectors and wired these connectors to the board directly. I also used a snap-fit power switch and press-fit LEDs for the indicators.

I bought a digital caliper and took careful measurements of all hole positions on the board before assembly.

The CAD program places cutouts and fasteners using X/Y offset measurements from an origin, so I first had to calculate the offsets for all of the cutouts. I chose to lay out the chassis first in Visio. This allowed me to accurately position all of the cutouts. I then used Visio’s dimension features to calculate offsets relative to the origin. I chose to use the digital inkjet option for the labeling because this was considerably less expensive than silk screening. I was very happy with the finished results.

I was relieved when the chassis arrived a few days after placing the order and holes in the board aligned with the standoffs and the connectors fit.

I did make two mistakes. I neglected to account for the thickness of the power coat finish when specifying dimensions for the cutouts. I had to slightly enlarge the diameter of two holes on the back panel, but the mistake is not visible.

Pictures of the circuit board and finished chassis are attached.

Attachments

  • Circuit Board.jpg
    Circuit Board.jpg
    100.6 KB · Views: 179
  • Chassis 1.jpg
    Chassis 1.jpg
    392.8 KB · Views: 185
  • Chassis Back.jpg
    Chassis Back.jpg
    378.2 KB · Views: 184

Series Capacitor foil orientation in crossover

I have confused myself as to the proper way to connect two identical film capacitors in series with regards to outer/inner foil direction in a loudspeaker crossover application. Please see attachment. I'm doing this because I have lots of the capacitors and I need a value exactly half the capacitance. I'd appreciate any guidance as to the proper option listed. Thanks

Attachments

  • Series.jpg
    Series.jpg
    534.8 KB · Views: 260

Strat Pole Pieces Swap to Alnico Rod

Hi everyone,

1. This old gramma gave me her son's strat (abandoned by her son long ago).

2. The pups have basement ceramic magnets, this sound is junky compared to polepieces of alnico rods.

3. The cost of alnico rodded pups are around 40 to 200 USD for the complete threesome.

4. I may be able to detour such exorbitant cost if I can remove the ceramic basement magnet and its dummy polepieces, then insert pre-cut staggered alnico rods back into the receptacles, retaining the original factory windings and bobbin.

5. Question to you forum experts is whether this is achievable, where to get such alnico polepieces pre-cut (gotta use dremel diamond cutting wheel humbug!), and finally which alnico rod type.

Thanks in advance folks for your assist

need help with Xsim

Hi everyone. I have been playing around on and off in electronics for a good part of the past 6 decades. Now, I have built speakers before but, always with someone else's design and have never built a crossover. Now, I purchased a pair of Dayton DSA115-8 4" mid bass and a bunch of Peerless 811582 tweeters. They were on sale for $4.00 each and in my neck of the woods, you don't find that often. Anyway, as per WinIsd, I designed a small 4.8 Liter vented box with a 1.75" vent. The thing is, I ordered 2 x 2way crossover from China that have their Xover point at 3.2Khz. Now I am having second thoughts. I looked at the parts for the Cnote Xover and to buy all these parts here would cost me close to a cdn Cnote. Hence the China thing. As I was trying to design my Xover in Xsim, I was missing the zma file for the Peerless tweeter and I thought I had a pretty good and simple design. But after learning how to extract the info to get the zma file, nothing I do seems to give me a linear response. I always get a hump in the audible range. I have tried adding and removing coils, caps and resistors to no avail. So I thought I would post my Xsim file here along with the Dayton and Peerless Specs. I would like to try and cross them at 3.2 Khz to use with my Xovers but, I am willing to make some changes. I already added an L pad on the tweeter and a zobel on the woofer. Don't know if they are needed but, I am experimenting. T hank's
Don

Kef B1814

Hi, has anyone out there have any experiences of the Kef B1814 bass driver. This is an 18" x 12" rectangular driver along the lines of the B139 in construction.
I have found very little on the web apart from the Thiele & Small parameters from some guy in Italy! The specs read like they could make good open baffle sub's with a <20Hz resonance and a Qts of 1.2 and they are really big so will move quite abit of air.
Many thanks.

OB with multiple 3 inch FR drivers

Hi,

I am planning to make my first OB speakers for which I will be using eminence alpha 15a two nos per side (top and bottom) and for the mid section I am planning to implement 8 nos per side of FR Tymphany TC8FD05-04 3. Aim is to look like a tekton

My question to all experts here is, is this a doable thing? what are the pointers I should be looking for

for crossover I am going to use a dbx234x but I understand that I need to split further at FR region.

Pioneer A-676 transformer

Hi,

I'm trying to repair a good old A-676 Pioneer, completely dead.

The primary winding of the transformer is open, and I suppose that the internal thermal fuse is somehow broken.

Any suggestion about the way to replace it?

In case of mission impossible, I wish to replace the transformer itself, but the service manual and the schematics I've found don't contain its crucial data (especially, power in VA and secondary windings voltages).

I know that the primary winding voltage is 220v, the 2 filter capacitors are labelled 12,000uF/56v each and the maximum power consumption declared is 650 watt. So, I think that a 600VA 220v/35+35v transformer would be enough for a 70+70w amp, but I'm not sure at all.

Anyone does know something more about?

Many thanks in advance, Paolo

ACCF vs DCCF vs SRPP driver for 6L6GC SE amp

I have a big dilema and trying to get some feedback from the forum here 🙂

While building a SE amp using 6L6GC (15W output transformer) I have a hard time do decide between 3 option for the driver based on 6SL7 dual triode:

- DC coupled cathode follower
- AC coupled cathode follower
- SRPP

I read some articles but would appreciate if you have any opinions about what option would be based with these tubes - 6SL7 + 6L6GC SE.

Thanks

Attachments

  • DCCF.jpg
    DCCF.jpg
    195.1 KB · Views: 408
  • ACCF.jpg
    ACCF.jpg
    202.6 KB · Views: 348
  • SRPP.jpg
    SRPP.jpg
    180.8 KB · Views: 574

ATC SCM45A - changing the amp to a Hypex FA253.

I love my ATCs, they are almost perfect for me.. I tried many other high end monitors, some had little things that I thought were better than ATC but as a whole, ATC won every A/B comparison so far.

But I’m still not perfectly happy with their sound in the low end.. and I’m not talking about sub bass but the low end they should have (-6db at 42Hz)

I have a two way small monitor (AdamT5V) with 5” bass/mid driver who puts what feels like more bass / upper bass(50-100Hz).
I know some of it is “fake” bass that relying on the port and it’s not as accurate as the ATC’s bass but it still enjoyable and I would like to have that character in my ATCs.

My question to those who know the sound of ATC monitors is: what is the reason for their lean bass sound? Is it the crossover design? is it the ports that are so big that I don’t get this pleasing resonance in the upper bass frequencies?
I’m sure it’s a voicing thing and that 2x7” woofers in each speaker can do more than that.

I never tried any speaker DIY but I’m willing to make my first attempt on the SCM45A if it will get me the sound I’m after, so I have two options:

Option 1 is to take this amazing mid dome and the tweeters and buy a new cabinets and use a different woofer for the bass, this is only if the bass drivers in the SCM45A are the reason for this lean sound I hear.

The easier option #2 is to buy a Hypex FA253 or other DSP amp so I could hopefully change the voicing of the speakers to my liking.

Also would like to know if I could order from Hypex a custom size amp that will fit the back of the cabinet instead of the original ATC amp?

LG LH-W751TA - AB class instead of D class

Howdy !

Does anyone know if I take the signal after PWM (Pulse width modulation) not with class D amplifier but with class AB amplifier, can I filter / restore the correct analog signal to the speaker, or not?

In the diagram below I found the woofer output carbonized, the rest of the channels work, the whole system works except for the woofer (compared to which I see 3 final outputs in parallel?!?) I can't find the integrated ST 510 and I asked myself if can replace class AB with a separate module.

On the other hand, if someone worked with this integrated, I do not have a datasheet to see the power connections, can half (center) be functional and only half (woofer) burned (for example at IC 703)?

Attachments

  • service-lg-lhw750_1.jpg
    service-lg-lhw750_1.jpg
    666.1 KB · Views: 110
  • LG LH-W751TA - 01.jpg
    LG LH-W751TA - 01.jpg
    225.1 KB · Views: 125

Starting a Darling on the bench

I've been wanting to do a Darling Amp for the longest time as I have several Military 1626 and 8532/6J4 tubes and all the parts needed. What I don't like about all the Darlings I've seen is that the left/right tubes all share the same cathode resistor and bypass. I have downloaded at least 50 different Darling versions, and I like the attached one best as a start due to its simplicity. I see some problems though...

1 No grid stoppers, so ill add those as carbon composition
2 Shared cathode resistors, so ill separate those and double the values
3 No leak resistor after the volume control, ill add maybe a 500k there just to be safe.
4 And my big pet peeve is when people don't mark the expected final B+ voltage right on the schematic. So ill put this PS into the Duncan PSD program to see what voltage it would be using these parts.
5 The reservoir cap (first cap) should probably be grounded first at the CT then bring a wire over to the next cap to keep the first loop smaller?
6 Ill set the filament voltage by experiment by selecting the best dropping resistor in a closed loop to hit 12.6 while hot.

Any other items on this I should look out for? Any Darling veteran advice?

se1626-1-bill1.gif

Dynaco ST-150 and new oscilloscope

After 50 years getting my feet wet. I bought a Dynaco ST-150 and have a 9db difference between channels on output. I have reset the bias and dc offset and they’re right on. My question is really about the oscilloscope and the design of this amp. The negative speaker terminals are grounded to the chassis(2 wire cord). When I read the chassis/negative speaker terminal to the ground on my oscilloscope lead, I get 20 M ohms. Am I safe using this probe on the output terminals of this amp given its design? My apologies in advance if this belongs in equipment but I wanted to reference the design of this particular amp in the question.

10 year old bug in software.

Many years ago I wrote a PCBCAD software package.

The printer output was done using usual draw line, draw ellipse etc commands.

I found for some reason the text was a bit distorted but had never been able to find out why.

Yesterday someone asked me to add sheets (A1 - A6) on the schematic.
So I added this in and again wasnt terribly happy with the print output.

I found the output was being reduced in width by a factor of 10 somewhere in Microsoft kernel.

So I dug into the internet to see if I had missed something and probably spent a day on it.

I eventually spotted a command e.Graphics.ScaleTransform(100f / 1000, 100f / 1000);
This scales the graphic resolution of 1000 pixels per inch into 100 pixels per inch but doesnt lose detail.
This works better by a factor of 10.

So the problem has been there for 10+ years. Strangely no one who bought the software complained about the text.

Best SS Diy Phono Preamp

I recently came across an article by Marshall Leach " Construct a Wide Bandwidth Preamplifier" The article mentions Daniel Meyer as a reference and the schematic is similar if memory is correct to the phono preamp that Meyer put out as a kit in the mid 75-77 era with the exception that Leach used Fets in the front end of his phono preamp instead of discrete transistors. Meyer actually had two versions of the phono preamp board with the later sounding better. Sorry, all my Southwest Tech info was lost in a recent move so I cannot mention specific board numbers or model numbers. I can only remember the phono board sounded very good if my memory is still intact.

To make a long story short I have the article in hand which includes the circuit board foil pattern for the RIAA input board along with the output board. I don't know how to make a board so I am either seeking information on a company that would make a board or a newer circuit that will sound good, have discrete transistors instead of OPAMPS and the ability to purchase a blank circuit board.

Any help or ideas would be welcome. I would like to keep this as a project since I am retired and bored out of my mind needing something to put together. I would like to mention I am a Tube Freak and currently have a tube phono preamp but would like to give this a try.

"YEDS-3" CD

Hello all :wave:

I'm doing some adjustments on an OLD :geezer: CD player of mine.
in the service manual, it clearly states, that a Test Disc YEDS-3 is required.
I've searched high and low on the web without any luck 🙁
All and any help would be very much appreciated 🙂

Cheers and stay safe.

PS🙁by the way, it's an old pioneer p-d1 from 1982 I believe).

Correct wiring of transformer in a passive DI box

Hi everyone,
I'm building a passive DI box with parts that I've acquired throughout the years. I've identified both windings for proper phasing but my question is: What is the best way to send signal to the transformer for best response? Is it best to insert signal at the begining (the wire end of winding closest to center core of transformer) of coil wind and ground the finishing end of the winding or the other way around? Does it matter?
I always thought that the dots at the winding lead denoted the beginning of the wind but it looks like they are actually there for phasing purposes.
Thanks.

bic venturi formula 4

Goodmornig from Athens,Hellas!
I own from my father a pair of bic venturi formula 4 and i want to upgrade them.
The mids and higs are too match for me ,if they still works and the bass too boomy.
I'm thinking to replace the horns with a tweeter and replace the midrange too.
Also make the cabin closed box.
Which components do you think i should put to them?
Thank you a lot!
(and sorry for my english )

dpa enlightement drive / Philips VAM 1202/12

Hi,

I have to make a CD-Transporter work again, and unfortunately i´m struggling.

Its a dpa "enlightement drive", based on a Philips VAM 1202/12 Pickup/Drive.

The issue is, when a CD is about to load, the lense is moving up and down 3 times, but it wont read (Error).
I already replaced the pickup with a new one, and sometimes it works, CD gets recognised and read.

it seems to help to give the upper clamp (which is magnetic) a little push with the finger (not a spin, just a push) while its trying to read-out, then it starts sometimes

Maybe its a problem with the clamp? lost magnetisation over the years? i put an extra little neodym disc magnet on it, didnt help.

The drive is rubber-mounted, as you can see in the picture.

Do you have any ideas?

thank you, Daniel

Attachments

  • IMG_20210129_194720.jpg
    IMG_20210129_194720.jpg
    694.6 KB · Views: 143
  • IMG_20210129_194809.jpg
    IMG_20210129_194809.jpg
    541.9 KB · Views: 124
  • IMG_20210129_194747.jpg
    IMG_20210129_194747.jpg
    621.8 KB · Views: 136
  • IMG_20210129_194739.jpg
    IMG_20210129_194739.jpg
    602.3 KB · Views: 123

Analog Servo Sub

After talking about my servo sub project in another thread (http://www.diyaudio.com/forums/subw...-gain-servo-controlled-woofer-controller.html ) I decided to start my own. Mostly because I don’t want to clutter his thread with my project, but also so I can present my system and my results in one place. Hopefully this will make it easier for you to give me feedback on what I have done, what I have done wrong and what I can do to improve the system. Please don’t hesitate to be critical. I don’t know much about feedback systems and while it seems I have had some success with the things I have done so far I am sure there are things I should change.
This project started 5 years ago(!) following an article I read in audioXpress 6/06 by Art and Jac Brown. It was put on the shelf until recently when I was inspired by David’s DSP servo efforts in the thread above. Later I have also acquired an article written by Bill Waslo in audioXpress 12/06. He manages to explain how to build and test a servo sub without going into difficult math. The latter suits me particularly well 🙂

System setup:
Woofer: PEERLESS XXLS 12” (830845) in a 135 liter (4.77ft³) sealed box.
Accelerometer: ACH-01-03. Calibrated to 9.6mV/g @ 1kHz
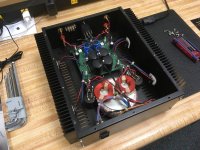
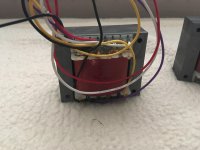
Amplifier: DC coupled LM3886 with +-29V rails
Sound card: M-Audio Audiophile
Pre-filter: MiniDSP 2x8
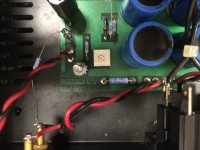
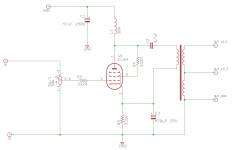
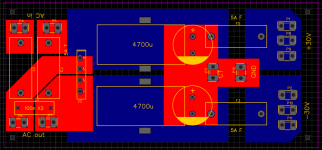
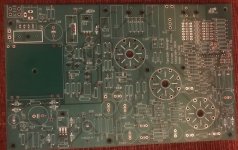
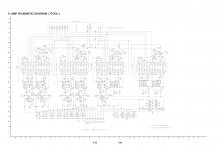
Servo circuit: My own. See schematic.

Measurement tools:
Oscilloscope: Picoscope 3224 (12-bit)
Multimeter: Fluke87
Measurement mic: My own with Linkwitz mod. (calibrated)
Software: REW V5,01 Beta 17
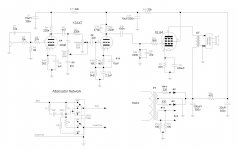
Modelling software:
Speaker: Unibox 408
Electronics: Proteus


Figure1.png
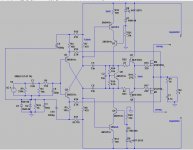
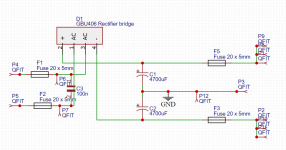
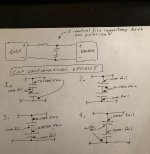
Figure 1. The servo circuit with a graph simulating the response from the accelerometer input to the amplifier output.

Figure 2.png
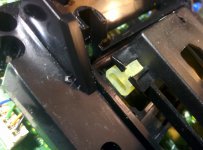
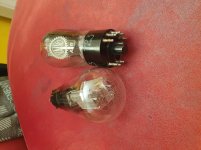
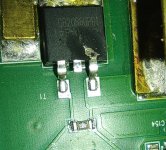
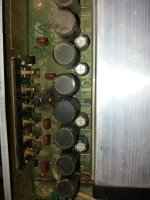
Figure 2. The accelerometer mounting. It is glued with 2-component epoxy under the dust cap. Note the 4gram counterweight on the opposite side.
Figure 3.png
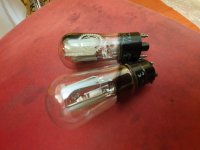
Figure 3. The accelerometer cable comes out between the voice coil wires

The servo circuit.
This is mainly built following Brown’s suggestions.

Input buffer (U1)
A 7400Hz LP filter takes away some of the high frequency noise from the “MiniDSP 2x8” I use as pre-filter and EQ. U1 also serves as input gain adjustment and DC-offset adjustment. The MAX427 has low drift and noise and is unity gain stable.

Accelerometer input (U2)
R6 is needed for negative bias of the accelerometer. C2 and R7 form a 2.1Hz HP filter and prevent the slow DC changes that occur in the accelerometer from entering the servo. R9 and R8 give a gain of 9.4. The accelerometers sensitivity of 9.6mV/g will then be amplified to 90,24mV/g. The op-amp’s rail voltage is +-15V and the OPA637 can swing to about +-13V. Maximum g-force before clipping is then 13V/(90.24mV/g)= 144g. The OPA637 is probably overkill but it was in by box and it’s nice to be on the safe side

Summing amp (U3:A)
The accelerometer signal and the music signal is summed at the positive input of this op-amp. Note that the accelerometer is mounted so that an outwards (positive) motion of the woofer gives a negative signal here. This op-amp also serves as loop gain adjustment with R5 and LOOPGAIN1. I can have up to 32dB gain here. It is now at 29dB.

LP filter and output amp (U3:B)
R10 and C3 form a 4.3Hz LP filter. It attenuates high frequencies and helps shape the phase response so that the accelerometer feedback is inverted (180deg) at the target frequency. I wanted the target frequency to be in the lower part of the woofer frequency band because it is there we have most distortion. In my case this is now at 39Hz. This is a critical area of the servo circuit and this filter has to be shaped to suit the particular woofer/box. I have tried a couple of things here but this is what is working best for now. Both articles I have linked to earlier have more information about this. This op-amp also has a loop gain adjustment with R11 and LOOPGAIN2 of up to 25.8dB. With mine set to 18.5dB (pot at 2k) the system starts to oscillate at 2560Hz and increases fast in intensity at 2480Hz. At 17dB (pot at 1.63k)the system is just stable and I measured all-time best of 0.95% THD at 20Hz with 18.5V RMS on the speaker terminals. The last potmeter (AMP_SHUTDOWN) serves as a quick way of turning off and on the output amplifier when doing adjustments or if things goes “tits-up” 😀.

The output amplifier.
After struggling with low frequency oscillations (1-3Hz) with a standard Rotel amplifier I decided to get rid of the extra 90 degree phase shift that occurs in all standard amplifiers that have a DC blocking capacitor on the input. I also wanted an amplifier without too much power that could rip my woofer apart during testing. I have therefore built a DC coupled LM3886 chip amp with adjustable rail voltages from +-16V to +-29V I can use during testing. Without the extra phase shift I got rid of the low frequency oscillations and its capable of 19V RMS output
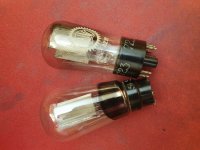
The accelerometer
This is glued with two component epoxy just on top of the voice as showed on the picture. The weight is about 4 grams and a 4 gram Norwegian coin is glued on the opposite side as a counter weight to avoid wrong balance in the cone.
G-force and SPL calculations:
With 100W power at 100Hz the X-Max is estimated to be 1.9mm in my box. The SPL @ 1 m is then 107dB from a 12” woofer. ( SPL = 20*LOG( (1.18/0.00002) * (0.0466m^2*0.0019m/1.41) * (2*3.1416*100Hz^2) ) = 107dB ) The g-force is then 76g ( g = 4*PI^2*100Hz^2*0.0019m/9.81 =76g ) and the “weight” of the accelerometer at that force will be: 4gram * 76g = 304 grams. This would create a bending force that could make the voice coil crash into the magnet.

Testing
First thing to test is open loop response to see what I had to work with. I used REW for this and set it up to sweep from 2Hz to 5kHz in 20 seconds. I made sure that the soundcard and filters included in the signal path was corrected for gain and phase errors with a calibration file. REW has a procedure for this. Here is the results of a loopback with correction active.

Figure 4.png
Figure 4. Measured loopback response with -5dB FS output in REW. Output is from the servo circuit’s input amp with gain set to 0dB. The gain and phase error in the soundcard and servo input amp is corrected with a calibration file so we have 0 gain and -2,9 deg. phase from 2Hz to 20kHz. The black dotted line show the gain correction, and we can see that the 7400Hz input filter has been corrected for. I don’t know why REW insists on correct the phase to -2.9 and not 0 but it is not critical. REW is also calibrated so that -5dB FS output signal is 0dB in the charts. -5dB FS on my soundcard is 989mV RMS. Now that the levels are calibrated and verified I can measure the open loop response.

Step 1.
First I measure the response of only the subwoofer. To get the true phase response of only the woofer I must have a DC coupled amplifier and must omit the HP filter in the accelerometer input and feed the accelerometer directly into the soundcard. Note that this can be somewhat risky because the output of the accelerometer can have a small negative bias and the electrolytic capacitor on the soundcard will have wrong bias. I have addressed this by using a -6V regulator to feed the negative bias of the accelerometer and the output signal from the accelerometer is 0V

Figure 5.png
Figure 5. This is the gain and phase response of the woofer with feedback directly from accelerometer. This plot does not contain any other gain or phase elements other than the DC coupled LM3886, the woofer/box itself and the raw inverted accelerometer output. Top graph is phase. Sweep 12s @ -21 dB FS. I ran this at different levels with the same result. The actual g-force can be calculated by knowing that 0dB on the chart is the same as -5dB FS which is 989mV. From the plot we see that 30Hz is at -31dB. The RMS voltage is then 10^(-31/20)= 28mV. My sensor is calibrated to 9,6mV/g and the RMS g-force is then 31,6/9,6= 2,9g
From this test I was surprised to see that the phase will never cross the forbidden 0 degrees or 360 degrees. In theory it should be possible with infinite loop gain??

Step 2.
Now I want to see how only the HP filter of the accelerometer op-amp affects the loop response. The input to the soundcard is now connected to the output of the accelerometer amplifier. The output from the soundcard is still connected directly to the amplifier (trough the input buffer U1).

Figure 6.png
Figure 6. The blue plot show how the accelerometer filter affects the phase at low frequencies. REW does not let me measure down to DC, but to predict the phase close to DC I have the following theory: We must assume that the woofer itself will approach 180 degree phase shift at DC (remember the accelerometer is inverted) and then the accelerometer capacitor gives us another 90 degrees more phase offset and end up on -90 degrees.

Figure 7.png
Figure 7. This is the SPL from the test. Green is with accelerometer amp. The green graph is actually 20dB higher because of the accelerometer amp, but I have offset it to better see the difference in output.

Step 3.
Now it’s time to connect the rest of the servo circuit and see what kind of margins we have. The signal that was driving the amplifier directly earlier is now fed into the summing amplifier (U3:A) through resistor R3. (Just as it will be in normal operation). The input to the soundcard is as in step 2 fed by the accelerometer amplifier (U1). The accelerometer is NOT connected to the summing amp.

Figure 8.png
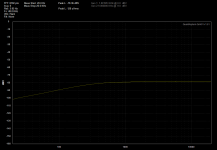
Figure 8. This is the total open loop response. Gain increased until just below oscillation. Sweep done at -40dB FS. That is 35dB lower than the reference level so I have offset the curve +35dB in REW afterwards to easier interpret the plot. The loop gain is +35dB @ 21Hz. From 30 to 50Hz it is +38,5dB and at 100Hz it is +33dB
We can see that the forbidden phase of 360 degrees where the system will oscillate happens when the gain is at 0 which makes sense because the system is now adjusted up to the verge of oscillation. From the plot we can see that this happens at 3640Hz. I don’t know why the (measured) oscillation in my case occurs at 2470Hz and not 3640Hz but it I guess some strange things happen in this area.
But keeping loop gain this high is of course pushing the limits and I adjusted it down 8,5dB.

Figure 9.png
Figure 9. Loop gain adjusted down 8,5 dB.

All testing was done with this loop gain setting. I will post the results in another post
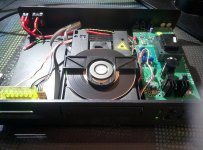
Solid State forum have become a dumpster of commercial cadavers

The attached screenshot pic taken just a moment ago says it all, full of commercial gear in need for service help nothing to do with DIY SS amps but "DIY repair and service".

It's so easy to set up a new forum and doesn't have to wait for anything like the long awaited and delayed upgrade to new forum software XenForo, I would suggest to put the new forum (name suggestion: "Service & Repair") high up, perhaps highest on the list ie above the current Solid State so it's sink hole effect will have a maximum effect sucking in all the quick and lazy "fix my stuff" help request posts that is now swamping Solid State.

Attachments

  • Solid State - diyAudio.jpg
    Solid State - diyAudio.jpg
    135.7 KB · Views: 354

after posting, when posting again the first quoted text remains

I have noticed the following:

I make a comment quoting the text of an existing post as part of my comment. I submit my comment and then go to reply to another post in the same way, quoting the text of a another, different post.
When I do that, the text from the post I quoted in my first comment is still in the dialog box along with the text from the second post I quoted.

Shouldn't quoted text be cleared out once the comment has been posted?

Ht Transformer identification

Good evening,
About 12 years ago I purchased a set or transformers to build a 5 - 10 amplifier.
One is marked up VVT so thats fine can get the data on that no problem, the HT transformer has a label but doesnt state the manufacturer, only the following
DB 1393 15W Mains TX, does anyone on here recognise that data?
I have tried googling but to no avail.
I would like to know what it is just incase i want to make another.

Many thanks

Rich
Projects by fanatics, for fanatics
Get answers and advice for everyone wanting to learn the art of audio.
Join the Community
507,818
Members
7,889,640
Messages

Filter

Forum Statistics

Threads
406,309
Messages
7,889,640
Members
507,818
Latest member
mandy98