Sony CDP-C201

Hello,

I am new here, so my apologies if this is in the wrong area. I have a Sony Stereo system from 1990 that I am trying to restore, the CD player a Sony CDP-C201 is giving me some trouble. It’s very intermittent where at times the laser housing will not lift to read the CD, when this occurs just lifting with my finger fixes the issue for the time being. I have applied Super Lube to the gears, but did not know if there is another lubrication area that I should be looking at? I’m pretty novice at this and don’t want to damage anything beyond repair.

Should I get a Fluke or a cheaper multimeter?

My old Craftsman multimeter was lost in a car Break-in. I've decided to build an Amp Camp Amp and a Korg Nutube preamp and then whatever this new hobby (rabbit hole) puts in front of me. Should I get a Fluke 289, with graphing capabilities or a cheaper multimeter and a bench multimeter or an oscilloscope? I need a multimeter in my tool box and I play with electronics a bit.
Does anyone have some wisdom that might help me to get tools that will help me without wasting a lot of money?
Thank you in advance for sharing your wisdom and/or point of view.

Cambridge audio a1 mk1 not powering on.

Hello so i bought a cambridge a1 mk1 (the original version) off someone and they said that the main board glass fuse blew and to change it and it would work. However after changing it the amp still doesn't turn on.
None of the other fuses had blown, it was the T3.15A which blew which is the last fuses. I also read a few youtube comments which said it could be the transformer since none of the first fuses blew.
Can anyone help me?
I have a DMM so can test things if needed be.

Rookie questions

Building my first set of speakers and keep coming up with questions. They are the Swans HiVi 3.1. Ordered parts for the upgrade. I soldered all the parts just like the pics because i wasn't sure if the caps and resistors were directional. There is only one coil upgrade and i was wondering if it was directional, or didn't matter which leg went where. The other coils were self explanatory.
Thanks Paul

Sharp SC9570AV distortion, missing output channel

~15 year old, wasn't plugged in/used for past 3-4 years.

I have a recording of the working speaker, kind of cracking high distortion. Nothing out of the other one. These are using his 120w. I have some 10w PA speakers that both work on, so it probably has issues with the higher load from the 120w speakers but I might be wrong

I brought a 40W PA amp to his house and hooked his speakers to and both sound fine on it

Caps DO look good, but might be dried out

First recording is on AUX from Cable receiver. That in itself sounds worse than the second selection, which was the receiver

I know it's not a high quality brand that some of you deal with, but this man dosn't have much money right now, cost him a good bit back in the day. Single package amp, I think A-B, on fairly big heatsink with fan

CD does not work but I bet it's the belt

Attachments

Pignose Hog 30 repair and mods

I have recently come to possess a Pignose Hog 30, which I would like to use with my bass ukulele (Self contained electric acoustic u-bass) (yes I know my ubass has it's own built in amp, but I still have the output available and I'm hoping to get even more volume).

Of course the Hog is old, and the lead acid batteries are long gone. A couple of the pots are broken from over-tightening, but these should be pretty simple to replace. But for the batteries, I am thinking to go with li-ion and improve on the run time and weight. So I am wondering: the TDA7240A amp and the NJM4558 op amp in this thing can actually take 18V, so why not run it on 18V and make it a little louder? Would this damage the rest of the circuitry? Obviously I will have to get a different charger, but I would anyway get one that matches to the battery I get. I am looking at 18Vpower tool batteries as a good option. Obviously these will run a little over 18V when full, but this should not be a problem for the chips, right?

I also found this mod: https://www.talkbass.com/threads/is-there-a-pignose-for-bass.74568/#:~:text=I've had a,resistor (was 47k). and it obviously sounds simple and desirable. So I am interested to know if there is a risk of damage to anything doing this? What about doing both - increasing the voltage and the gain mod?

See the schematic and chip datasheets attached.

Attachments

Pre - Estate Sale : Cool Rare parts and accessories

Hi All,
It's been awhile since I have been active on this site, situations beyond human control have taken me away from my beloved audio hobby, and left me in a fight for life. Unfortunately, that fight has been lost; cancer has won, and now, I am dying. That said, I am now starting to go through the years of accumulation,and begin liquidation of my toys. Cancer treatments / surgery are horrifyingly expensive, especially when one doesn't have great insurance, and I am trying to be able to pay for a decent burial, leave my other half a little something, and honestly, put food on the table for the next little while. This is the first pile of stuff that I've gone through, there will be much more to come! Make me offers folks, no reasonable offers refused! I accept Venmo and Zelle payments. Thanks!

Krell Industries: CD clamps / center pucks for the early MD series cd transports, Model KDI. Quantity 2, asking $100.00 each. These are impossible to find, for the most part.
Krell Industries Star - Clamp cd clamp. For the KPS20i & 30 players. Rarest of all, and the only clamp that these machines function with. $300.00
Gryphon "The Exorcist" : Interesting little system / cable demagnetizing widget. Super-clean condition. $150.00

Theta timebase linque conditioner : Anti - jitter box. Nice condition. $200.00

Acoustat MK-121-2A electrostatic interfaces. With the famous (and preferred) Medallion series transformers. This is the second pair I owned, was going to build myself another pair of 3x4 electrostats, but never got around to it. Asking $350.00 for the pair. SOLD

Selenium D3300ti - 2" throat high-frequency compression drivers. VG condition. Nice-sounding, smooth drivers. Asking $200.00 / pair

Miscellaneous VPI, Rega, etc. tonearm counter-weights, many available. $50.00 to 100.00 each.

Bozak B199a - 12" woofers. 2 pair. 1 is good, original condition, second is still original except that one cone was poorly patched after it was damaged (not by me!) Asking 200.00 / all 4

Velodyne various subwoofer drivers. 2- 12" DD series (servo), one 10" DD series (servo), and 2-MASSIVE 8" (not sure of series). Asking 125.00 each for 12", 100.00 for 10", 200.00Pair for the 8" units. 107.JPG108.JPG110.JPG111.JPG112.JPG113.JPG114.JPG115.JPG116.JPG135.JPG137.JPGDSC00267.JPGDSC00268.JPG

Attachments

  • 098.JPG
    098.JPG
    392.5 KB · Views: 94
  • 099.JPG
    099.JPG
    390.5 KB · Views: 105
  • 100.JPG
    100.JPG
    627.2 KB · Views: 108
  • 101.JPG
    101.JPG
    414.2 KB · Views: 90
  • 102.JPG
    102.JPG
    322.6 KB · Views: 99
  • 103.JPG
    103.JPG
    355.8 KB · Views: 91
  • DSC00269.JPG
    DSC00269.JPG
    411.2 KB · Views: 95

LAPT problem

So im making one P3A more .....
This time i thought like testing 1216 -2922 Lapt combo
if my rails are more or less up to 36+36 volts i am ok above that i get oscilation
anyone gan guess why?
is it because 1216-2922 is lapt ?

with in the day i will replace them with the standard 1302-3281 combo to make sure thta nothing else is wrong in the circuit and get back ...

this is a bit weird since all the rest is pretty much the same and i ve made this board and choice of parts a gozillion times .

Stability issues in LTP with elevated grid

I'm currently fiddling around with a tube preamp prototype, in which I've decided to try out using a 6SL7 differential amplifier/LTP as a front end. The operating point is set using a cascoded BJT-CCS in the tail. This is then AC-coupled to a grounded-cathode amplifier stage, which is DC-coupled to a cathode follower as a final stage. Both of these stages uses a single 6SN7.

To make it easier to stabilize the NFB-loop, I have tried to DC-couple the feedback path from the cathode follower to G2 on the input stage LTP. Therefore, the grids are elevated to 33 V by the voltage divider in the NFB-network, and a capacitor provides the AC-ground path for each grid-leak resistor.

I've noted that the elevated grid circuit is having issues with low frequency oscillation at <1 Hz. This is without signal, an is probably started by grid current from the first half of the 6SL7 (?). I discovered it when measuring the DC-voltage (33 V in the schematic), and found that it is fluctuating up and down slowly. Am I missing something obvious here? Is there some simple way to stabilize this elevated grid circuit? Increasing the capacitance will only slow down the time constant, and then it takes ages for the cap to charge up.

Attachments

  • Screenshot 2022-03-24 at 18.01.03.png
    Screenshot 2022-03-24 at 18.01.03.png
    26.4 KB · Views: 170

please change thread title

I started a thread about a Horn, but I didn't put this into the title and that is a disservice to the project !

Can you change the title for me, dear Mods,

https://www.diyaudio.com/community/threads/khorner-fast-waw-using-altec-808-8a.383814/

Instead of "khorner fast waw using altec 808-8a" let's try "The legendary K-Horn using altec 511B and 808-8a" ???

Thx

CM915 Power Amp Info

I recently acquired a CM Labs CM915 professional power amp and I'm looking for information about the amp. I believe it was manufactured in 1983. Is the 915 a special order amp? I read someplace that CM Labs took special orders for their amps. Any information and history of the CM line would greatly be appreciated. Did the 915 follow the 914, or was it produced alongside the 914?
I've attached a few photos.

Attachments

  • CM915_1.jpg
    CM915_1.jpg
    362.8 KB · Views: 193
  • CM915_4.jpg
    CM915_4.jpg
    383 KB · Views: 170
  • CM915_7.jpg
    CM915_7.jpg
    356.4 KB · Views: 175

MTM/ D' Appolito tweeter position, middle or to the side?

Quick question.

Making an MTM style T-line with 6" Tang band mids and 1" Tweets.
The Fs of the tweeters is 1,4kHz, so I don't know if I can make a lower crossover point than 2,8kHz?

Should I place the tweeter in between the mids or put the mids closer and the tweeter next to them?
IMG_20220327_224434.jpg


IMG_20220327_224533.jpg


The tweeter seems to have pretty optimal response at that width, when it's on the side, when I looked at it with a baffle simulator.
That would also get the mids closer together, but I have heard that the off-axis response will be unsymmetrical.

What would be better?

Unholy Alliance Phono Amp

Combining glass, sand and iron (I'll be using an MC step up), and various ideas picked up here. The basic schematic is from Dmitry (don't know if he posts here, but has some good stuff on his site): www.dmitrynizh.com/3a5-phono.htm.

The HV supplies are based on Salas' shunt reg., and the transistors in the filament supply are those recommended by Rod Coleman. Gyrator from discussions among Wavebourn, Michael Koster, Kenpeter, Revintage, Smoking amp, etc..

I still have to build the case work, so I haven't given it a listen. As shown, the response is within 0.3dB from 20Hz to 20kHz. I can tweak the network resistor values a bit, to get it even closer Channel to channel it's within 0.1dB over the entire range, if I match the tubes. (BTW, the Hagerman calculator seems off to me. I actually measured the Rp of the tubes in the circuit (which were very close to the values measured from the curves), so my calculations there are accurate, and I was a little suprised that my initial measurements were off at the 20kHz end by 0.75dB. When I calculated the time constants from the Hagtec calculator values, they were lower than the expected 75 and 3180us.)

The circuit values are as tested.

Sheldon

Attachments

  • 3A5 Phono.JPG
    3A5 Phono.JPG
    33.5 KB · Views: 2,117
  • 3A5 Phono Supply.JPG
    3A5 Phono Supply.JPG
    15.7 KB · Views: 1,992

Considering selling my F4

Was bought like 10 years ago. Factory built probably my Nelson Pass himself. Has been in continuos use since then. Now mostly displaced by an X25 and Vfet. Has its scratches by its continuous movements -none in faceplate- works like new. Exploring to sell it. Has original manual and box. I have not determined price yet because I have to check on shipping options which have to be by air.
Thanks for looking.

Marantz CD73 Philips CD303 improving CD-R playback

For all you who like the beautiful sound of TDA1540s but have trouble playing CD-R then this small mod might help playback.
This is specifically for the Marantz CD73 and Philips CD303 however experience shows that so many players from this era have the same decoder setup.

I've been playing around with these players now for some time, and can suggest many other changes to improve sound reproduction, and many things never to do even though they're on this site....

This focuses on the RF side on the top decoder board. People may suggest tampering with the mechanism however apart from a total re-cap I would highly advise against it.

This is for the SONY decoder board, the Philips board is described below.

Capacitors 22nf near the SAA7011 are nice big RF foil antennas, degrading the RF. Pull these out and swap them around (reverse the polarity) putting the high impedance on the inside where it should be. This is easy 5 minutes work.

Solder a cap (I used a 8.2pf mylar) to the top of the resistor (part 3552) next to the de-modulator SAA7011 on one leg(this also goes to pin 13 of the SAA7011) and the other leg of the cap to the cap (part 2655) that goes to the SONY daughter board..

Almost there... you might have to decouple the clock a tiny bit, maybe one or two turns anti-clockwise. This is the white screw thing next to the SAA7011. Be careful the screw thread is weak. Some SONY boards use a mismatch of components. If this is the case the cap can be soldered on the track side of the board.

This is for the Philips board, 2 bottom pictures:
This mod would be interesting to many owners of these CD players, not just the Marantz CD73 but Philips CD300, Marantz CD44, 74 ect. Pretty much any identical chipset.
Again 22nf foil Capacitors near the SAA7011 need swapping around (reverse the polarity) as described above. Yellow arrow.
Inside this Philips CD303 there is a resistor with a ferrite bead next to the 7010 Decoder. You need a 220pF cap to go from this resistor (not the bead side) and to RF ground.
Have a look at mine, there was a nice place to put it that makes it look factory. Red arrow.
This is where you play a CD with the top open and IF NEEDED carefully decouple the clock one or two turns anti-clockwise (green arrow). My suggestion is find a CD-R that is scratched and had no chance of playing before and put it in, when playing decouple the clock to improve playback. When satisfactory stop playback then press play. If the CD wont track initially then you have decoupled too much. Screw it back half a turn at a time and press stop and play again. Once it plays satisfactory then test the player with proper store bought discs to ensure all is good.
The second last picture shows the block diagram of the decoder board and the red arrows show the location to connect the capacitor. This will mainly help those who want to adapt this to a player that is not a CD73 or CD303.
The Last picture is a close up view of the Philips decoder board for easier reference. The Blue arrow shows the electrical connection of the capacitor.

While you're there why not a recap? I prefer Nichikon fine gold series. Especially the two that pass the audio to the OPAMPS. I have also found decoupling the DACs with 100nf WIMA caps to be an improvement also....

Hope this helps others enjoy the glory of these 14bit(noise shaped) players! Feel free to comment on results. 🙂

PYLsgWPPKA7cXUf4l5qmNOfuRmV0diSriVZjgfl82Tz6-cUgzI6z2GH6-xWZd1a8KIJ9hsHIJMIKCOaPgvJtLwXhuvWpwl4JCK_UIaCIMmWNFdakJraPquDJEN1CPMIKggtHclci=w1204-h903-no

BsSLy91KWhxw8visBNJpg3aF6x7M5y0ECG7XPwBboyI-6fFsWpHlG0ZhAUDy-MrZ5aHOXsDlx6PCHuEr1JW2zCVHKVJrtRSrs9zFc3VGxcSf4iY21NVRiNHce2kisi5YIj3AbSqZ=w1204-h903-no

9Qg7W9rTPui3j47031bHyuL9DxxXFMfBg8gPelpnCH-14XXzH_dxtX4S19GOQJyK9tbfOGh3wedfirNVN8X4DhNBmxoU8ms8XN5lbHF1AlF_W0W_vq9TbmZblpvGvrkQ88w1QQ_O=w1204-h903-no
597S7YS4Gq0emauRJXGswxwUrs0rAvhKk_HrWtNZF-Ynv05RZHtBA3XszGxZf0J1trWK6YBRSDXiSU6tDLSLoK2nGxY-vPFBhefOcZelTQ2FqUEIh1iktJj4ADr81lmQkguhoBCamfSRhU6S5PXkGaHDDNJoNv9yOXm7eImosiLaM88GzyYcUrIKpK2MZtBXdv3ECyDb7RcXB7zvIMoDNrzUOzD98Y88jDFgSBCMzg9CSlZyOY7ehsQvjdPqxXfReUb_7or-ywWy31XaHEPvu6EVBnA1a2PJ2P6acVeUfQVBovSTi-MpGCxdwhz4BWIRqlrQNdHvspe9-Sz0F6kgo2qggkqmOhWsu0fqwuqwN6Iw0pEIL-oBlJUrQq2SHq-hxnoZt4IKGXoe6p0SVMmU7p-6L55JgjvXvRajTWMPuIrfoy8GD_i0AmGQRIioSBJ1Zoe61sOPhP1Q3MkOmEnhd6qT2i9VGiOWLWXH4-GSHS31inOuzOw11PH1MGRzomCphHil0Ni6I7M084Wv-SG0kr8jYPDsA5ib8si4_MTDjDRbcx5bqVx0oaAZsjHtmIwpaGgiZlp09rShwNULc5V05b5sqYjVy0KisFeOiRU=w1204-h903-no
An externally hosted image should be here but it was not working when we last tested it.

Subwoofer wiring woes

Hi all,

I recently bought a 300w sub with a broken power board for 15 quid.

I stripped out the power board and the fancy low pass filter, frequency modulator, and volume control board out. Then bought an L7 MOSFET mono power board that supports 300-350 W at 8 ohms as well as requiring 2x 50 V in, this is exactly what the transformer outputs and what the driver requires.

I also picked up a 2M ohm potentiometer for volume control and a 100Hz or so highpass/lowpass filter (i always get it the wrong way round)

because it's a mono out board I'm having a lot of trouble trying to work out how to correctly wire it all?

Any help?

Finlay.


(https://www.ebay.co.uk/itm/221254643945?_trkparms=amclksrc=ITM&aid=1110006&algo=HOMESPLICE.SIM&ao=1&asc=20200818143230&meid=f1091f7470794e6eb76178fa92c156f5&pid=101224&rk=2&rkt=5&sd=224405663394&itm=221254643945&pmt=1&noa=1&pg=2047675&algv=DefaultOrganicWeb&_trksid=p2047675.c101224.m-1 link for power board)
(https://www.hifigear.co.uk/epos-els-subwoofer.html link to sub)

HM100X - Simple 100W power amplifier BR

Hello friends...

Here in Brazil we have a very active diy audio community and due to research I am bringing a new circuit for your enjoyment.

It is a simple audio amplifier, polarized with diodes, with an option for ground suspension of the input signal, 100W, full CCS and differential current mirror

Around here in Brazil we have a lot of bad circuits that are shared on the web that leave DIY people very frustrated when they set up and it doesn't work, so whenever I can I share new tried and tested ideas.

Here are some data measured on a bench

Power: 100W @ 4 Ohm
Sensitivity: 380mV
Input Impedance: 47kOhm
Frequency Response: 10Hz~191KHz @ 3dB
Damping Factor: 995
Simulated THD: 0.02% @ 1KHz (real life measurement will happen soon)


Schematic:
55614953fd630f1dfd0aee6b12d3c523.jpg


PCB:
8efc7c83457d52d50390f04011227f37.jpg


Prototype PCB:
08819ea2c744384156aefe4e6b91dc71.jpg


SCHEMATIC UPDATED: 08/17/21

🙂 I am a happy DipTrace user🙂
  • Like
Reactions: Zohaib Ahmad

Dipole midrange in a 3 way.

I have a three way loudspeaker with a dipole midrange. Is the sound emanating from the rear side of the midrange supposed to be reflected back to the listener or is it ideally supposed to disappear and never be heard by the listener? I asked as my loudspeaker position is not ideal as the left speaker is located where the rear of the speaker opens up to another room, while the right speaker is 2 feet away from the corner. No other positions is available at the moment.

Which Preamplifier is Suitable For Class A (Jean Hiraga 30 W or Pass Lab)

Hello Everyone,
I make Two channel Jean Hiraga Super 30 W Class A amplifier....
Just I am using this amp with Blameless Preamp. (Only Volume Control No Tone Control)
Sound is very Nice But on small Speakers "feel" lack of Bass ....
What is your idea about Preamplifier for Class A ? With Tone Control ? or without Tone Control.?
Which Other Preamplifier are suitable ..please suggest
Thanks In advance...
🙂 🙂

Operational amplifier AD623 is a good choice

The instrument operational amplifier AD623 directly replaces the single operational amplifier op27, and the effect is very good


I observed that the internal circuit of AD623 consists of three operational amplifiers, but in fact, it can directly replace single operational amplifiers such as 5534, 797 and op27

I wonder if there will be any other problems with this application

Actual Filament Current about 300Bs

Hello, I'm constructing a 300B Single Ended Headphone AMP for my friend. And I'v finished the design and test of a Filament Constant Current Source for DHTs, using the schematic based on the public version of Rod Coleman's Kits.

But now I have a severe problem that my friend has a pair of Takatsuki 300Bs on his present AMP, and it's hard for him to test the actual filament current by himself. My filament kits can only provide current higher than 1.3A due to the resistor values, should I change the resistor values for a lower minimum current?

Any actual filament current about 300Bs provided will be of great help, Thanks🙂
(Actual means accurate 5Volts on the pins of the tube)

Here are some pictures😏

IMG_20220329_110208.jpg

IMG_20220329_110312.jpg

My first speaker+amp build with Dayton RS100-4

Hi everyone !

I am new in this forum, and also in diy audio, so sorry in advance if there is a lack of technical informations/measures.

I would like to show you my first speaker build.
I must admit that after beginning to design a cabinet with speakerboxlite.com I found this article and chose to copy this design (for the technical part) since it was made with the full range drivers that I intended to use (the Dayton RS100-4).

My goal was to make small enough speakers with a small amplifier and a DAC to put on my desk and use them on my PC.
Since I didn’t like the design of the front panel with two ports, I changed the design a bit to cover them with fabric in a single slot.

For the amplifier / DAC part, I found the Up2stream Amp v3 from Arylic which turned out to be just perfect for me since it includes a DAC with Wifi, ethernet, bluetooth and usb inputs, plus a mini-jack analog input. It’s sold without a case, so I could do the design of my choice.

I have no measurements of the frequency response, but I can say that it was a big improvement over my Audioengine A2+ (It’s also not exactly the same size) and that I’m now just waiting for an opportunity to get into a new project.

I hope you’ll like it, well, at least the look since I didn't really design the rest of it ;-)

Some "not so nice" picture while it was made :

IMG_20210113_005108 (Grande).jpg
IMG_20210113_104805 (Grande).jpg
IMG_20210115_191747 (Grande).jpg
IMG_20210119_120133 (Grande).jpg
IMG_20210119_172225 (Grande).jpg
IMG_20210122_185812 (Grande).jpg
IMG_20210122_190632 (Grande).jpg
IMG_20210123_214134 (Grande).jpg


And some better photos made once it was finnished :

Brutal SoundSystem_01_20211213_0791 (Grande).jpg
Brutal SoundSystem_01_20211213_0800 (Grande).jpg
Brutal SoundSystem_01_20211213_0805 (Grande).jpg
Brutal SoundSystem_01_20211213_0813 (Grande).jpg
Brutal SoundSystem_01_20211213_0817 (Grande).jpg
  • Like
Reactions: stv

Pace SX-100 VS Hakko FR300/301

Hi,

Have been a Hakko 808 / FR300 user for over 15 years. Being in the UK, I used to deal with the excellent and friendly Dancap Electronics, which made everything so easy (one phone call, 24 hrs later the new tips / filters / etc arrived). A couple of years back, Dancap got bought out by HK Wentworth... Having bought from Dancap for years, I no longer had credit and was asked to pay for everything in advance. As of 2022, Wentworth have introduced a £250 MOQ. Although I use the FR-300 (have 3 Hakko desoldering machines, an 808, 471, FR300) as a job, the £250 MOQ doesn't sit well with me, as Wentworth are such a PITA to deal with.

The SX-100 is easily found at Farnell, and the tips are cheaper. I can get just about every part on 24-hour delivery. Obviously, it's pricier than a Hakko unit - but if I'm being forced to spend £250 to keep it going, I can put the Hakko stuff on Ebay and added to the £250 I'll have nearly as much as the SX-100 costs. The convenience of the SX-100 is light years better than anything Hakko, and the parts are less expensive, so the investment will likely be recouped on a year or two.

So, my question is, how do they stack up against each other? The FR300 works fine on 2-layer, but starts to become harder work on 4-layer. The SX-100 has more heat power, but does it have more suction? The best aspect to the FR300 is the power of the motor. The Hakko bench 471 doesn't have anywhere near the suction power of the FR300.

Will I regret going to the SX-100?

Thank you in advance!

The Aleph-X

We'll pick up the story in the middle.
I sent Nelson Pass a schematic back in December to ask if it qualified as an "Aleph-X" circuit. He made encouraging noises, but warned me that I’d have a problem with DC offset. Normally, I would have begun prototyping then, but a virus showed up on my PC and started corroding my stories and, sorry folks, but I had to save what I could of my stories. They make me money. So far, I’ve yet to figure out a way to make audio pay; at least not without going back into retail.
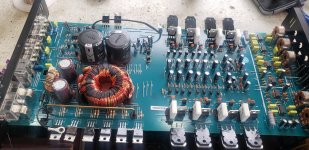
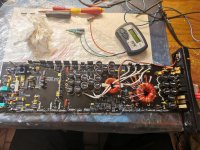
About a month ago I finally got to build a prototype. What you see is the result of my fiddlings, plus a nudge from Nelson. In particular, the very first thing I did after Nelson warned of DC offset was to draw a schematic showing two 1k resistors to ground, one at each output. I tried it, it didn’t work, and no value I regarded as reasonable at the time seemed to make any difference, so I abandoned the idea. Nelson suggested putting in grounding resistors on the order of 30 ohms, which nearly gave me a heart attack. <i>That</i> low? But it worked. I’d like to thank him for that hint, because I never would have gone back and reexamined the idea without a nudge. I had the front end worked out, which by itself will get rid of a fair proportion of the DC offset, but not all. Put in the resistors, and the thing suddenly becomes manageable.
I hereby release Version 1.0 of the Aleph-X.
A word about nomenclature:
--Nelson’s commercial version of the amplifier is called the XA200. I am specifically avoiding calling this an XA-anything, as I don’t want there to be any confusion about this circuit vs. the real thing. It accomplishes pretty much the same objectives, but I don’t know how close it is to what Nelson’s building. In short, don’t confuse the two. Don’t ask Nelson why he did the circuit this way or that. He didn’t. I did. It ain’t his fault. This is just me staying up late at night after I get home from work, trying things.
--I was sometimes referring to the circuit as the Mini-AX during my R&D. I’ve decided to fall back on my earlier name to avoid any confusion with the Mini-A that I did a couple of months ago. Besides, some wag would probably decide that if it’s a Mini-AX, then clearly it must be a hatchet, and I’ve had about all the ‘humor’ I can stand.
--When I say "X," I mean Super Symmetry. A bad habit, I suppose, and I got caught on this very issue in a recent thread, and although most of you will know what I mean when I say X, there is the possibility that someone sufficiently familiar with the Pass Labs product would point out that not all X product is "X." <i>Sigh.</i>
Acknowledgments:
This circuit is directly based on two active patents belonging to Nelson Pass of Pass Labs, 5,376,899 and 5,710,522. In a sense, any circuit built using information gleaned from either or both of these patents belongs to Nelson. Period. If he says desist, ours is not to question why. We desist. Immediately. In particular, this circuit is not to be built for commercial purposes. Nelson has to make a living, and this is his intellectual property we’re playing with.
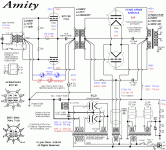
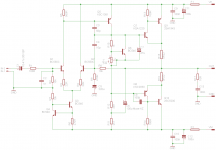
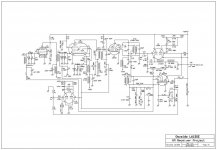
On to the circuit.
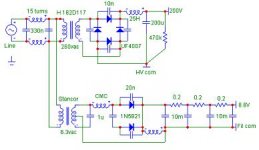
If you’re familiar with the Alephs, the schematic will fit like a pair of old, comfortable shoes. Everything is just about where you’d expect it to be. Well, almost everything. The input resistor network is the same as the Volksamp Aleph models. There are two other things about the front end that will catch your attention. One is the little resistor triptych that I’ve substituted for the usual 221 ohm Source resistor above Q6. Why? Well, that’s the absolute DC offset adjustment. It works by setting the DC voltage present at both of the output stage Gates. Since it’s common mode, i.e. the same current is fed through both sides of the front end differential, it amounts to zilch as far as the signal is concerned. The values I chose will give you a little over 10% play in the front end current, but I needed very little of that with the test circuit.
The other oddity about the front end is the way the signal criss-crosses over to the opposite side. That’s what makes this an "X" circuit. That’s necessary so that the feedback coming in via R16 and R30 will be of the proper phase.
I’ve added two things to the Aleph output stages that aren’t canon: The pots, V1 and V3, and the output resistors to ground. V1 and V3 serve any number of purposes, depending on your point of view. You can run your bias up and down to suit the amount of heatsinking you have on hand or for sound quality purposes. You can view it as a distortion-buster, in that an imbalance in drive between the sides will give you some zillionth of a percent distortion, and you can tune the sides to be in harmony with one another. And lastly, you can use them to zero out small amounts of relative DC offset between the sides. If you want to use them to set the bias, then replace them with a fixed resistor, that’s fine. For that matter, you can replace V1 with a fixed resistor once you determine the proper value. Any remaining DC will be equal across both outputs (like the SOZ, for instance), and the speaker won’t notice it at all. But make sure to at least start with a pot in there, as having 10 volts of DC offset will hamper the voltage swing at the outputs. Get it as close to 0V as you can before you put in a fixed resistor; don’t just assume the standard 221 ohm resistor will do the trick.
There are resistors on each output, going to ground. Nelson suggested 30 ohms. I’ve played with a wide selection of values and can assure you that if you get much higher than 40 or 50 ohms, the thing starts getting pretty twitchy. You can adjust the front end pot all you want, but it won’t stay put. If you use a lower value, it snaps into place quite nicely, but then you’re wasting valuable output power straight to ground, so it turns out that something around 30 ohms really is a pretty good compromise.
The resistors can be removed entirely if you want, but you’ll have to use a servo to tame the DC. I’ve worked one up—discrete, no less—and if enough people are interested, I’ll post that, too. For the time being, the schematic shows the purist way, sans servo.
One last thing, be prepared to fiddle with the values of R12 and R34 in order to balance the current source against the output. Turns out the value is sensitive to the thermal environment, and yours will be different from mine.
So what’ll it do?
Well, clearly, it’s derived from the Mini-A, which was (given enough current capability) a 10W amp. This is a bridged Mini-A, so it’ll do four times the output, minus a bit for the resistors grounding the outputs, call it about 37W or so. I’ve used .22 ohm resistors for the output MOSFET’s Sources, so it’ll do a pretty good job of servicing a 4 ohm load. If you want to actually double into 4 ohms, you’ll need to go a whisker lower. If you’re confident that your speakers are a level 6 or 8 ohm load, feel free to back off the bias current by putting in, say, .33 or .39 ohm resistors under the Sources. Since the first thing people did after I posted the write-up on the Mini-A was ask whether it would drive 4 ohms, I figured I would start there and let people back up if they wanted to.
If you want more power, you’re going to need to start doubling up on the output devices. That’s pretty easy to do, so I’ll leave that to the individual. (What, you thought I’d give you a full-blown XA200? You’re going to have to work for it.)
This is a more ambitious circuit than the Mini-A in many ways. It will, for one thing, require a more substantial power supply. The circuit, as drawn, will pull a bit over 4.5 amps. Think in terms of a 200VA transformer, minimum. Lots of capacitance is in order. In fact, you might go so far as to consider a regulated power supply. Nelson just published a nice paper on regulated supplies over at www.passdiy.com.
A word about parts is in order. While, strictly speaking, you don’t have to match the output devices for this amp, it’s not a bad idea. The closer the two sides are to behaving identically, the better performance you’ll get out of it, and the less trouble you’ll have with DC offset. That said, I managed to get rid of all DC with a set of unmatched IRF644s.
Which brings me to another, related, point. There’s been a lot of talk about matching parts in other threads. I know I had trouble getting IRF644s to settle down in the test rig—waiting as long as ten minutes before I got figures I thought I could live with. Funny thing...I got in some IRF044s for this project, stuck them in for testing, and the little fellers sat right down and behaved themselves in less than a minute. Clearly, there’s some sort of thermal thing going on here, but I’m still mulling it over.
I’d like to end by noting that I’ve been remiss in answering e-mail for a while, mainly because I only have so many hours in a day, and I needed every available waking moment to work on the circuit. I know at one point not too long ago, Joe Berry sent me a schematic of an Aleph-Xish kind of circuit. It wasn’t like this one, but by the second or third try he had the differential cross-over trick in hand, but nothing in place to handle the DC offset. I believe he was modeling the circuit, rather than building it. What he ever did about the DC, I don’t know, as he was one of the people I quit responding to ‘cause I just couldn’t afford the time. Sorry, Joe. I’m back among the living now, except that I’m so tired I can hardly see straight. Staying up late so much has taken a toll.
Maybe now I can get some sleep.
Except...I had this really neat idea the other day...

Grey

P.S.: I had a more elaborate write-up, but ran into the 10,000 character limit on posts. Bummer. Had to edit the thing pretty savagely to get it to fit. Apologies to anyone expecting puns and jokes like in the Mini-A write-up. There just wasn't room.

Attachments

14years of (nearly) daily use electrolytics which were overvoltaged.

Hi, I have used 40V 68 000uf caps on 43.7V rails for a 14 years. It was my daily background amp so it had around 20-35hours a week or total 25 000+ working hours. it was class A amp with lot of heat inside. I thought it was time to recap and maybe replace them with 63V rating. Measured them 8psc in series and capasistance were within spec (for a sngle cap) Epcos sikorel caps.


I had also accident when i wrongly soldered in 25V 220uf Nichicon KZ instead of 100V 47uf (same cap size) in 66V suply . I did noticed this AFTER 2 days (around 2-3 working hours) when after adjustments i decided to assemble amplifier completely.

having gone trought this all I can do is to recomend take manufacturers specified ratings with grain of salt. this definately looks like a scam to me (forcing customer to buy higher voltage cap=more expensive, by spreading wrong information)

Need p3a schematic for 2sC5200 2sa1943 pair

Dear friends I just need p3a rod Elliot amp schematic that uses 2sC5200 2sa1943 I have found on Internet many times but could not get good results I have some schematics downloaded from internet.. If there any need of changes so tell me. If any one have good working schematic than he can easily upload here ..
Thanks in advance ...
I have some schematics which one is better? 1st one or 2nd one?

Attachments

  • P3A_mod (1).png
    P3A_mod (1).png
    9.8 KB · Views: 294
  • Schematic.png
    Schematic.png
    39.2 KB · Views: 308

Anthem MCA5 Noise

My MCA5 has developed a crackling noise on a single channel (left main) recently. The sound to the speaker sounds like it's cutting in/out. I disassembled and checked all connections. Reassembled, and everything sounded just fine. But, a few days later the noise continued.

This amp is most likely the same design as the MCA50, but I've read that the MCA50 upped the rated power to 225 WPC vs 200 for the MCA5. They also increased heat sink sizing. I've owned the MCA5 for abotu 17 years and I've used it regularly for years. The only real difference lately is that I'm using the balanced inputs lately. For many years I used the coax inputs.

I have the tools and capability to replace PCB components, but I'm not entirely sure where to start. Any help would be appreciated.

Shoulder slung, waveguide, synth beamer

First-time poster, long-time reader. I have looked as deep as I can but I have not found discussions regarding a design in this direction.

In university in the 80s, I saw a performance where the artists left the stage with battery-powered units containing a small synth and an amplified speaker in the end of a 3-4 foot long acrylic tube about 4" in diameter. They bounced sound off objects and turned the whole auditorium into a moving sound environment. It was very cool. The idea of moving outdoors in a sculpture park, or industrial space, tiled tunnel, and creating soundscapes is compelling.

I am starting to build a more capable version and working through the theories of projected sound. The intent is to have a beam of sound. As this is an instrument and not reproducing existing sound, there can be color, naturally would like the sound as true as possible given the constraints.

I am starting to firm up the design directions. The system will run off a lithium-ion bike battery 48V 15A powering a 100W amplifier. The system will allow various synth options. This being said and the models below, I am not an audio expert and am very open to directions. The horns will be produced from either composite materials, carbon fiber or flax fiber, or thermo molded acrylic.

Horn designs with compression drivers seem best suited to this task. Conical shapes seem to intuitively beam more than flared end shapes. I have designed the length and throat diameter around the lower frequency of the driver 300 Hz, as well as the maximum manageable portable size. The horn in the images below is 1.14 meters and has a diameter of 0.36 meters. The taper is based on the linear progression of the length and the circumference being equal, with a smooth curve from 50.8mm at the mouth.

stratotron010.jpg stratotron011.jpg stratotron012.jpg stratotron009.jpg

The second design is based on a parabolic reflector. Based on systems used in museums for projecting into specific listening areas. The system would ideally be modular so that different waveguides could be fitted bayonet style. The dish is sized larger than the horn, but I am unclear on the approach here for sizing to frequency. The compression driver is piped forward and reflects from the rear-facing parabolic dome to the main parabolic dish. The intent is to direct waves forward in as tight a beam as possible and have them break up and reflect back from objects in the environment.

stratotron001.jpg stratotron003.jpg stratotron004.jpg stratotron005.jpg stratotron008.jpg

Thanks for your time!

Thoughts on driver measurement

Had a thought. It is a bit of a pain, and some times risky even when you think you have limited the sweep bandwidth, to test a tweeter directly on an amp to get the response and phase for crossover design, SOP is to add a blocking cap, but now you have a 90 degree phase shift in the phase measurement

Could one just plop the data into Excel and add 90 degrees to make a valid acoustical phase component?

Classe Audio CDP.3 CD Player Not Reading Disc

I have a Classe Audio CDP.3 CD Player that I picked up at a thrift store. It uses a Sanyo SF-P1 transport. It came with a number of issues. Most notably, there was no power making it to the transport and the display. Upon inspection, it looked like the transport board was the victim of a failed recap attempt. I found a deep scratch that had severed a number of the traces. I installed jumper wires to reconnect the severed traces. There is now power to the transport and display.

When I power up the unit, the CD drawer opens and closes as it should. When I load a CD, the lens moves into position, and the disk spins. However, the unit does not recognize or read the disc. There is no "disc error" message on the display (not sure if there is supposed to be with this unit). The display just reads zeroes. Sometimes, if you push the play button, you will see "Track 1" and the play arrow on the display for a second or two, but then the display goes back to zeroes.

This seems like a laser/lens issue. However, I am not sure how to test or confirm that. I do not see an obvious way to adjust or align the lens (i.e., there is no obvious adjustment/alignment screw). Also, given the problems with the transport board, I am not sure if there could be an issue there that I have not yet spotted that is leading to this problem.

What are your thoughts for troubleshooting? How do I test the lens function? Is there a particular connection from the board and/or component(s) on the board that controls this function and could cause this problem if the connection is severed or the component(s) is bad? I could simply look for a new lens unit (not sure if they are still available). However, I am concerned that the problem might lie somewhere else.

I appreciate your thoughts. Let me know what questions I can answer or info I can provide to help with the analysis.

The 5A6 - A Directly Heated 9 Pin Mini - Useful for Audio?

A while back, in my search for interesting oddball tubes, I came across the 5A6 which is a directly heated beam tube with a 9 pin mini base. I've attached the data sheet.

A search here and elsewhere came up mostly empty. There were a couple of references to it being used as a preamp tube, wired in triode, where it has a mu of 6.8. Links to a Japanese schematic were dead and not available via Wayback. If anyone has them saved, please post them.

It's apparently designed as an output tube for RF applications. I'm wondering if it can also be used as an audio output tube in beam pentode mode. If so, what load would work and what operating points would you recommend? It seems to run at low (150v) plate voltage.

Anyone know of any other directly heated 9 pin minis? This is the only one I've found.

Attachments

Quad 306 left channel very low output

My Quad 306 amp and quad preamp have provided many years faultless service with Proac speakers. Recently when switched on after 2 months out of service due to house maintenance, the left channel was almost in audible at even high volumes. I opened up the 306, got out the circuit and made the measurements shown at the points marked with rectangular and rounded end boxes. The amp looks undisturbedfrom new (Bought from the Canadian distributor) and the output transistors all have the same pink spots. The manual does not give the allowable tolerance values , but most were pretty close using a top of the line B+K meter.. I have an audio signal generator and a 4 channel Tek (100MHz) scope. With test speakers attached ( didn't want to risk Proacs). The signal generator was set to 800cps and output set to a level I could work with for a decent period and well within the max input signal. The sine wave at both inputs was the same and clean ( looked like no distortion), amplitude was 34 mV peak to peak. Sounded fine on right Channel and only just audible on the left. I checked the output of both channels and to my surprise found good clean sine signals at the SKs 3.2V peaked to peak on both outputs Both outputs showed approx 1mV offsets. My electronic is really from op amps on and I am pretty shaky on transistor although I did some EF86, ECC33 and KT 66 stuff as a kid. Help Please!

For Sale Stainless Steel M8 Spikes (8 pcs) for Audiophile Speaker Stands Custom Machined UK-made

These are audiophile custom machined out of solid stainless steel. Thread is M8 for many European floor-standing speakers. Come with adjustment nut and washers also made out of stainless steel.They are not audio jewelry like many that you see gold plated, alloy-based, etc., these are made to last and withstand heavy loads without bending. I have paid $110 for them. Price is $60 + shipping.

My loss is your gain.
IMG_6909 (1).jpeg
IMG_6911 (1).jpeg
IMG_6912.jpeg

Eminence B2S-A horn adapter WARNING

Take a look at this Eminence thread adapter - i just managed to ruin my NOS Selenium wave guides with these pieces of garbage. Look at the threads compared to another 1-3/8 18 TPI adapter i had laying around. The thread pitch is completely different !!! WTF. How is that even possible? I thought this was a good adapter reading reviews on PEs website, so I ordered a pair. After cautiously threading them a few turns and realizing things weren't right, I went to back it out, but it wouldn't budge. Lots of lube, cussing and praying later, I was able to remove it, but the damage is done. Just wanted to warn people here about it. Now I have to find a 1-3/8 18 tap in hopes of repairing my horn thanks to this horrible POS.

Attachments

  • 20220327_104541.jpg
    20220327_104541.jpg
    329.7 KB · Views: 163
  • Like
Reactions: indianajo

Use an Audio Interface as DSP Crossover to bi-amp, tri-amp

Howdy,

I'm on the road to tri-amping better. Right now, I've got an analog 2-way active crossover and a sub-amp hooked up speaker level off the mid-bass amp.

I want to protect my mid-bass woofers from very low frequencies, and I have the superstition that speaker level connection affects the performance of the mid-bass amp

In getting familiar with DSP products/options marketed for home stereo use, I began to wonder.... What is in fact the difference between for example a minidsp, or that category of product, and a full-bore audio interface designed for recording? If I need an ADC/DAC with on-board DSP... Isn't that an audio interface?

If I need at least 6 out to tri-amp, that's a pretty high price point market in DSP's. We're looking at 800, and all the way up to thousands. 800 will get you into a pretty freaking nice, entry-level-pro interface. I could get a used ferrofish 16/16 for the price of a 4/10 minidsp... They've got um that don't need to be computer connected to function as well, like consumer stereo DSP products.

So, why don't more people do this? I can't barely find any representation of this idea online, but it doesn't help that there's an actual audio interface brand called "bi-amp." Really messes with those googler results.

It seems like you can spend less money and get more features, and the ability to record in fantastic quality...

But can an audio interface run these filter processes, on the on-board DSP, zero latency? Not on the DAW? I don't know anything about like, computers, digital stuff, so I don't know the answer. I don't have one lying around to play with...

Wondering if anyone has the knowledges.

I'm ignorant enough that I don't know if this is just a bad idea, or standard practice.

Thanks and stuff,
A hack

Lowther Fidelio MkII

I am considering building a pair of speakers using a pair of Lowther PM2A’s. Having spent some time looking at various designs, which would meet my physical and visual requirements, the Lowther Fidelio MK II looks to be suitable. I do have some questions about the design and with reference to the drawings below, can anyone answer the following –

Location Ref A – What is the purpose of this channel?
Location Ref B – What purpose does this (trap?) serve?
Location Ref C – There is a square hole in this panel, what does it do?
Horn Construction - Is there anything to be gained by putting a radius on the sharp points?

Has anyone experience of using this speaker, it is difficult to get any info on the web? It does seem to have a reasonable low end response (50Hz) from what I have read. And how close to the rear wall does it need to be located?


Thank you,

What to look for in a multimeter

I am goign to need a good multimeter soon and would like to know what to look for. My application for it would be building, and later designing amplifiers.

So what things should I be looking for? How much DC and AC voltage and amperage should a multimeter be able to handle for this application?
What resistances should it be able to handle up to? And how accurate? Obviously the higher is better but how much tolerance is moderately acceptable?

What about capacitance checks? Worthwhile having? I noticed most of them only go up to uF range anyway.
Diode & Transistor checks? Any of them useful and/or used often by anyone?

I found one also that has temperature check. That seems good for measuring the heat of a heatsink roughly.

Relative zero function? Would that be worthwhile aswell?

Any help would be good. I will also post this to the Wiki, or if someone else wants to, could you direct me there.

Thanks
-Mike

Need Help Locating PCB Power and Audio Connectors

Hello--

I purchased the following from eBay recently:

https://www.ebay.com/itm/3335579667...rentrq:d153990117f0a45ac284f243fff69ba4|iid:1

There is a 2-Pin connection for power and a 3-Pin connection for audio.

Though the connection can be made by directly soldering wires to these pins, I'd prefer not to do that, as they are very small and there's a good chance I'll melt some of the plastic. As I am prototyping the circuit before constructing the chassis, I will need to solder - desolder - solder a final time.

My struggle right now is that I have no idea how to search Mouser to find the correct parts.

I've measured the port area and pin pitch and come up with the following:
Power
  • Approximately 5mm x 7mm
  • Pin Pitch 2mm

Audio
  • Approximately 5mm x 10mm
  • Pin Pitch 2mm

To measure the pitch, I measured the distance from pin to pin.

This seems like a decent candidate but the pitch measurement is 3mm:
https://www.mouser.com/ProductDetail/Molex/43640-0200?qs=HlEFOAM0q6UFEEdO4u/anw==

Another concern is, if I were to order the Mouser part above, how do I go about attaching the wire leads? Again, would prefer to order something with leads already attached, or at least a part which would offer a solder lug.

Thank you for any assistance provided!

Behind the hearizon ...

Hello small world out there!

For over a year I am waiting for the release of these drivers from LyeCo :

https://en.lyeco.com.tw/about-us.html

Several attractive drivers with good specs ... some of them similar to Dayton drivers some even potentially better!

So WHY are these not coming to market?

Any conspirancy against us DIY'ers?

Minimum order quantity (M.O.Q.) is around 300pcs only!

Btw - some month ago I was shocked by an advertisement in the LIS (Loudspeaker Industry Sourcebook , free for d/l) about the Fountek Neo RD1.0 ribbon tweeter (4th/latest generation) . This tweeter was offered for over a year here in germany for 33-35 Euro , nice price . But in the ad it was offered for $12 !!! (required MOQ - 1000pcs) Then the price has risen to double and nowadays Fountek appears to be sorta dead dead dead .....

It seems Taiwan needs some support because the Chinese Government wants to kill them politically .... if the US have a solid interest then this a chance to help the people/the workers over there!

Also - our audio hobby needs urgently a little refreshment!

kind regards - from the wood vampires with metal teeths 🙂

Bandpass queries for experts. Im building a bass van to support a sole trader startup.

So I have resources to build anything up to a 40k watt build with supercapacitor and lithium battery combination and having a hard time working out the electricals concerning different back currents from the power source from the amps between the different batteries for a start, but I’ll find help from some sort of electrician for that. Im already planning on finding a box design expert also to help me with air space and ports. What I have a question about concering my concept before I spend money is:

if I build a 6th order bandpass with the outer port on the B pillar wall of a van and build two separate ported enclosures on each side (so 3 drivers, one inside the bandpass).

Here’s the question: if the two ported enclosures on either side are ported into the side walls of the bandpass will it make sense? Or will it negatively affect the tuning of the bandpass? I’m thinking it would result in a kind of 6.5th and result in creating more than 2 peak frequencies from the bandpass. Or maybe it would be better to port the 2 side woofers directly into the cabin?

As you can guess I’ve not found anything researching this theory.

Please help trouble shoot REL Storm III

Hi guys,

I was just gifted a REL Storm III which I will use as a pair along with the one Storm III that I already have in my system. Please help me diagnose the problem with this new sub. I have very rudimentary knowledge of electronics. I am good with a soldering iron, can identify the components on a PCB, can use an ohm meter, but no more than that. I am hoping that I can be steered in the right direction and that the repair might be as simple as replacing a malfunctioning part. The problem:

All the functions and controls seem to work properly, but compared to my other Storm this sub‘s output is much much lower. In order to get equal volume from both subs at normal listening levels, this new sub’s volume control needs to be almost maxed out; while the good sub‘s volume control is set at approximately one third in its rotation. I use the high level inputs and connections to my tube mono blocs has been triple checked and are correct. I have swapped the subs to opposite channels with the same results; the low output follows the new sub.

Thoughts, suggestions? Thanks very much; it is appreciated.

Orion 2500D high pitched noise

Got, two Orion 2500Ds in, both with similar reports of a high pitched sound at the speakers, without input signal. Powered up both and confirmed.
Without audio, the amplifiers power up ok and the relay clicks on. There's an audible sound, it starts off around 1khz and slowly increases in freq until it stops. It takes roughly 3 mins before it goes away.
I found two threads below which seem similar but don't seem to have a resolution. I haven't poked around due to workload, but anyone has a solution to this?

https://www.diyaudio.com/community/...ng-orion-2500d-amp-high-pitched-sound.381353/

https://www.diyaudio.com/community/threads/orion-2500d-sound-like-horn-at-speaker.362443/

Rockford fosgate power 250.2 year 2005.

Helo everyone my name is Jon and I'm in the UK,iam having a little trouble with my amp and I would really appreciate some advice.iv had many Rockford fosgate amps from the late 90s to when I lost interest in around 2006, I currently have two punch 200xi DSM,1 punch 500.2 and this power 250.2 and all have been stored away properly in the shed untill recently when I got the audio bug again,a little info on this 250.2 it was blown in 2006 due to me dropping it down to 2ohm mono,I recently replaced the factory components to 3205's and correct gate resistors,put in 540's and 9540's for the outputs,checked every semiconductor and resistor,biased current both chanels to 4mA ,worked great sounded great used it on front components in my car,ran it hard and for a long time no problem until I bridged it 4 ohm mono to run a small 800w 4ohm sub and the amp went pop after about 5 mins with moderate volume,the sub was fine and the coil is fine,it blew 1 left side 3205' and the outputs on the right Chanel were shorted and the left side voltage regulator was reading strange numbers,and I suspect some source resistors as when I manually warm them up there values are all over the place they read fine cold,but around 0.04 to ,0.09 when heated up.the gate resistors read fine,i have a solder station but no scope,I do not have much money to spend on a hobby but if a cheap scope comes up I may treat myself, I have read Perry's online tutorial and when I get a laptop with windows and set up pay Pal I will buy his full tutorial as i have got a soft spot for Rockford fosgate ever since the 1990s when I was a teenager I have always loved there products and quality, there the only amps I will ever own or buy and I would like to learn more about them to buy and repair my own if need be in the future,if anyone has a spare moment can you advise me on other things to check with this amp,and could someone please recommend a substitute for my source resistors they are 0.03 ohm and a cannot find them anywhere or a equilivent,iam preparing an order at mouser for the semi conductors,please find attached photo of the board and the resistors they are 4band, black,orange,silver,gold.any help would be greatly appreciated
Kind regards
Jon

Attachments

  • IMG_20220121_211208.jpg
    IMG_20220121_211208.jpg
    536.9 KB · Views: 249

Location Specific Designs

I thought I'd play with this because (a) I have the parts lying around. (b) It requires calculations way above my pay-grade.

My spare room is 2.5 x 3m yet, remarkably contains a double bed. I long been of an advocate of that modelling my be helpful for benchmarks, and those building PA systems but speaker performance is largely dependent on location.

Long story short . . . I'm looking at one of those tall, skinny floor-standing speakers that were once all the rage, and it's all alone - useless without its partner, doomed to a landfill . . . or is it 48ltr box which, laid on its side slides neatly under a bed or can be tucked behind a sofa?

I've got a couple of 8" woofers lying around, a stereo TPA3116D2, and a 90w laptop power supply - so let's see what I can see. For the purposes of this project the cabinet must be ported, the drivers are the drivers, and the cabinet's volume cannot be changed. The port is the only tuning mechanism.

The software simulation of the cabinet is embarrassing, a disaster. But the software doesn't know the cabinet is performing in a room with an effective 250mm ceiling height. It kinda begs the question: if high were a company like Bo$e trying to create a niche market in under-bed subs, how would I tune my cabinets?

30hz in an 8 x 10 room is a struggle, 40hz with a ceiling height of 250mm is a pyrrhic endeavour but we can tune for +6db at 55dB and our customers will report that our under-bed systems have wicked, dirty bass.

Capacitor upgrade for TU-8500

Hi all!

I've just finished building my TU-8500 and it's awesome! But the DIY bug has definitely bit and planning to do upgrades in the future after shininess of my system wears off...

I've seen Mundorf Supremes recommended to upgrade the TU-8500, can anyone confirm if this is still true? Additionally, I've been looking at Mundorf's MCap Supreme EVO SilverGold Black SESG - does anyone know if the 0.47μf version will fit the TU-8500?

SOZ MINI

Who said you can't put the SOZ on a PCB?!? A few months back I decided to get in on the 'mini' craze and see if I could apply it to the SOZ.
Turns out, you can! I experimented by simply multiplying the power resistors x3. Ran this around 20VDC, and it sounded excellent; perfect for those desktop speakers.
For my incarnation that will be chassified, I opted to multiply by x2.5, giving 20R and 2.5R for the power resistors.
The plan is to use a 800VA 20V donut. This should give ~24VDC. Using TO-220 footprints all around, I've managed to keep the PCB rather small 5"x2" (127mm x 50.8mm).
The 20R disspiate slightly more than 14W, the 2.5R at 1.8W, and the fets at 10W, for a total of ~80W/channel @ 24VDC. You'll see attached the heatsinks (1 per channel) I'm using, picked up
a bunch of these, tested them out with power resistors up to 120W, you can leave your hand on them all day in the middle of summer! Also used these cool terminals, allows for easy
changes. Anyway, there you go....a desktop (mini)SOZ that dissipates 160W, well maybe it'll fit below the desk😛

-John

Attachments

  • term.png
    term.png
    14.7 KB · Views: 161
  • hs.png
    hs.png
    17.4 KB · Views: 144
  • soz4.png
    soz4.png
    240 KB · Views: 153
  • soz3.png
    soz3.png
    329.9 KB · Views: 161

Capmx and opamps

Is there a reason why certain opamp would respond better to psu changes aside from psrr?

I ask because when i introduce a darlington capmx to my preamp, between the lm317/337 reg and the output opamp, the amount of improvement varies depending on which type of opamp is used.

For ne5534 the change isnt that noticeable. Same tonal balance, slightly more bass.

For opa134, opa1641, tl071, the capmx has a dramatic effect- their sharp treble is replaced by the much familiar jfet 'fuzz'. That is the treble becomes round and along with that the bass is now prominent.

No doubt this needs to be perceived as an improvement. Im wondering why is it that these opamps are so much more receptive to the capmx than the ne5534 and if theres some complex interaction going on with their jfet input and the bjt capmx, or its just that they have lower psrr than 5534.

Extra K135 Mosfets soon available

I am striking a deal to purchase a lot of Mosfets. there will be around 6-9 extra K135 (2Sk135) Toshiba NOS Mosfets available @ $7.00 each if anyone has a use for some.

Or if you have some extra J50 (2SJ50) Toshiba Mosfets for trade. please let me know.

These are the TO-3 case Fets that are used in Soundcraftsmen amplifiers and one up from the K134/J49 used in the Halfer 200/220 amps and im sure many other amps used these.


Zero Cool 😀
  • Like
Reactions: 883bkong

Event project studio 5 monitor electronics problem

I'm not sure if this is the forum to post this on, point me if its not - I did not see 'powered monitors 'in the speaker section.
I was given a pair of Event project studio 5 monitors. There's a possibility someone tried to use them as bookshelf speakers with an amp (uh oh).
They have nice clean output but low volume. Tested with a line input (ipod) on high vol, attenuator least attenuating and volume knob on high, they're room listening loud but not so any one would say turn it down.
:(
Any guesses what the problem is, or how to troubleshoot? I looked for a shop manual/schematic with no luck. I'm guessing some input side component is fried. I'm electronics competent but no audio electronics expert.
thanks!

coax to analog boards after nanodigi help!?

Newbie in electronics, I'm not sure what I'm doing and would need some advice.

Here's the story:
I am currently using the nanodigi with 3 digital amplifiers (STA326) but plan to switch to analog amplifiers (TPA3255). In absolute terms I would have invested in an Okto Research dac8 PRO between the nanodigi and the amplifiers but for now I have to be content with a reduced budget.

I would have gone with multiple FIIO D03K (or similar ones) like in the "Elegant solution" in linkwitzlab if Amir (audio science review) had not demonstrated their limit in 48kHz and knowing that the output of the nanodigi is always at 96kHz so it's risky).

I also thought of using coax to analog diy boards but unfortunately, the existing ones (like this ones) would be complicated to integrate into a single box with the nanodigi itself.

So the solution I found is to use a coax to i2S converter board followed by an i2S to analog board.

For the coax to i2s board I selected 2 options :
- one based on a DIR9001 chip.
- and the other on an AK4118 chip.

For the i2s to analog, this one based on a ES9023 chip.


So I have a lot of questions, of which here are the first:
- What do you think of these choices? do they make more sense than using FIIO D03K dac, or is there a risk of having worse performance?
- Do you have other boards/solutions to suggest?
- What about power supplies? What do you recommend?
- What to do with the clock (master clock)?
- Am I making my life too complicated?😕😉

TSEII

Hello All;

It has been awhile, My original sse is still kicking ***, Thanks George!
I have a pair of psvane 300B tubes (yikes holy expensive batman)
any way, I have decided to scrap the 300b amp they were intended for,and my humble apologies for not going with a trusted Amp source in the begining.

I have down loaded the latest bom, schematic and pcb plan, read the forum notes, head is spinning.
My question(s) is, are, the bom list is this a specific list for a 300b tube? pp or se?
also some pt are mentioned, as I am a fan of edcore, is there a highly recommended pt from them that has worked in a build?

Thanks in advance.

9 x 56,000uf 50VDC large can caps used

Hello Forum - long time member here but haven't been around much lately. I hope all my old DIYA buddies are well.

Making room in the garage - stumbled upon some caps. There are 9 and I tested them a couple months ago with a cheap cap/transistor tester. Could do a lot better but it's better than nothing.

They'll be in a USPS Large Flat rate Box @ $21.50 + $60.00 for the caps. Paypal Friends and family.

$81.50 shipped - US only due to the USPS flat rate. Let me know if you're interested.

Thanks

Attachments

  • 20220327_141022.jpg
    20220327_141022.jpg
    312.7 KB · Views: 155
  • 20220327_141027.jpg
    20220327_141027.jpg
    351.1 KB · Views: 146
  • 20220327_141030.jpg
    20220327_141030.jpg
    321.8 KB · Views: 125
  • 20220327_141103.jpg
    20220327_141103.jpg
    205.2 KB · Views: 115
  • 20220327_141114.jpg
    20220327_141114.jpg
    217.1 KB · Views: 107
  • 20220327_141459.jpg
    20220327_141459.jpg
    237.8 KB · Views: 141

For Sale Two pairs of genuine Sony 2SJ18 and 2SK60

I am selling 2 pairs of genuine Sony 2SJ18 and 2SK60 taken years ago from a Sony TA-F7B and tested.

Price :
200 Eur for the pair of 2SJ18
200 Eur for the pair of 2SK60
350 Eur for the 2 pairs

Can be used for the new Papa's project : https://www.diyaudio.com/community/threads/diy-sony-vfets-os2-official-thread.384256/

Shipping worldwide - payment by Paypal between friends or wire transfer.

Attachments

  • vfet1.jpg
    vfet1.jpg
    516.5 KB · Views: 176

High (Audio) Quality AM Tuner

When I was a boy (now I’m 47), father some time said me that “se puede obtener buena calidad de un AM” (It is possible to get good audio quality from an AM receiver).

This tuner has been designed having in mind this idea, and an animus or spirit of to experiment some own ideas that I previously had in mind, and never before tested (by me) in a real circuit. Also, I used in it, materials recovered from the box of old stuff, most of them has been kept unused for more than a decade.

The first thing that I wanted to test, is an AM receiver with a RF amplifier stage, using a remote cutoff pentode, with the ferrite rod antenna (aerial) directly wired to the signal grid. Looking into my stock of tubes, I found an EF89 for the stage.

The gang condenser (G in the schematic) is triple equal sections made with brass sheets, at both stator and rotor plates, rescued from any Philips radio receiver.

The antenna (L1), the RF inter stage transformer and the oscillator coil has been designed following what is suggested in the Langford-Smith’s (LS) "Radiotron" book. The antenna I used is a rod saved from a discarded transistor radio, but rewind completely for this purpose using Litz wire, the last recovered from the inductor in wasted electronic ballast for fluorescent lamps. As I lack of characteristics or data sheets of the ferrites employed, a test coil has been made in each of them, and tested with a RLC digital meter.

RF transformer (L2) and oscillator coils (L3) use the same wire, but for them, I recycled the bobbin, the core and the magnetic shield from PC monitor horizontal width coil control.

The choused converter tube is an ECH81, the signal grid of the hexode is tied to the RF tuned transformer, and the injection grid wired together with the oscillator, which has the form of a tuned-grid tickler-coil (or Armstrong) oscillator, with series feed in both windings.

The RF and antenna coils have been calculated as is suggested in chapter 23 of the LS's book. Oscillator coil, padder and trimmers make use of the formulae at chapters 24 and 25, mainly from Section 3 of the last, in which the tracking between RF and oscillator method is described.

IF section follows those described in Chapter 26, but making use of standard double-tuned mutual-inductance-coupled transformers. The tube selected is a remote cutoff pentode type EBF89, which also includes a dual diode intended for the audio detection.

At the detector stage, start to flow my own ideas. First, the AGC line isn't derived simply filtering out the audio signal at the detector, in fact it has its own transformer (IFT3), rectifier and filter. More over, the filter isn't classic at all.

Audio signal is detected using both diodes, connected in a non standard manner. The AM signal is rectified, and no capacitors are found in the signal path to ground, because it generates audio distortion as is demonstrated by LS, and by S. Seely in his book entitled "Electron-Tube Circuits" (Pages 351 and the followings). The second diode cooperates to the signal detection, improving the rectification, acting as a shunt diode (Idea taken from the Seely's book, page 125, figure 7.4 and associated text). This way I gain more than 6dB of recovered audio respect to single diode detection with no extra components added.

Filtering out the RF signal is made in a similar way of those inductor input rectifiers, but at the cathode of a follower, then at lower impedances, I can use sane values of inductances and capacitors. L4, L5 and C15 forms a 3 pole
T filter, designed to a crossover frequency of about 10KHz. C14 bootstraps the grid circuit of the follower, and thanks to it, more than 4MΩ is viewed from the grid, so a small AC load to the detector circuit is offered, also improving audio recovered quality. The two 36mH coils are extracted from wasted cassette recorders. A 2KΩ potentiometer in the cathode circuit is the DC and AC cathode load and also acts as a volume control, and sound take off. The triode cathode follower is one section of an ECC82 envelope. An additional advantage is that audio output is made at low impedance.

The AGC section also includes ideas from other sources. A tap in the primary of the second IF transformer is coupled to a third tuned coil, in which normal rectification is done, thanks to one of the diodes inside the EABC80 triple diode-triode tube. The amount of signal transferred from one circuit to other is dependent of the value of capacitor C11 linking them, this way the AGC signal level can be adjusted independently of the audio one.

The DC from the AM signal recovered is filtered at the higher FI frequency by C19, but audio signals are still present in the load resistor R20, whose other end returns to a fixed voltage of -2.5V provided by a (provisional) NiCd battery, also performing other tasks in the circuit. Then, the minimum bias at the AGC line is -2.5V, sufficient to the tubes selected, whose cathodes are earthed directly.

Audio signals in the load resistor are removed in the next filter section that includes a double time constant circuit R19-C17 and R18-C18 (See the behavior of this network in the simulation below). The purpose of it is to let the AGC line some gain at frequencies between 1 and 10Hz, just that may occur when rocking the dial between strong and weak adjacent station’s signal; or fading. The 100KΩ and the 3.3µF mesh doesn't account for those quick variations, giving fast response to sudden variations of incoming signals. When the tuned station signal is stable, very low frequencies are filter out by this network as ordinarily. The voltage developed at the AGC line is directly feed to the IF and converter stages by means of a low time constant decoupling networks to the bottom of the grid coils (R1-C1, R3-C5, R6-C9). Relatively high capacitor values at these points ensure easy RF return from the grid to the cathode of each tube.

RF AGC has another difference from standard circuits. Minimum negative bias is injected to the grid of the RF amplifier, via the isolated diode in V4, also contained in the EABC80 envelope. But at its anode, also is added a positive current derived from the screen grid stabilized voltage, and whose value is selected via a preset, P3 and the 10MΩ resistor R21. Diode clamps this voltage at this point to the -2.5V level. When signal strength is sufficiently strong, then the negative current flowing trough R17 from the ACG voltage developed, overcomes the positive current, and then bias to the RF stage is correspondingly increased, as D4 goes cutoff (Plate goes negative respect to its cathode). This way, RF amplification is held at a maximum for lower signal levels, making better the signal/noise ratio of the stage. This idea is called "sinking diode" borrowed from the LS book, at page 1117, figure 27.38B and the explaining text at page 1108, and adapted to my circuit. This sketch also have been used in tube TV sets, I saw some schematics using this topology.

The triode inside the EABC80, the second one in the ECC82, the full voltage of the NiCd battery and the associated circuitry performs an adjustable and stabilized 105V supply to be used by the oscillator’s plate and the screen grids of the RF amplifiers, via a decoupling resistor and capacitor in each one of them. This way the voltage is kept stable at +105V and independent of the AGC and line voltage, improving AGC action.

Plates are powered from a +275V source, via a 1KΩ resistor R12, which limits current in case of a short circuit or overload when manipulating the board (still under development), and putting across it a voltmeter, the current drawn in milliamperes is easily read. C21 decouples this bus to ground. Similar resistor is inserted in the anode of the voltage regulator (R13), for the same reasons and C22 keeps this wire to earth potential for RF signal. Decoupling between stages is made by 2.5mH coils from PC monitors and .22µF caps to the earth bus.

A 1mA FS 42Ω permanent-magnet moving-coil milliammeter is used as signal strength meter (S-meter), and a VTVM is constructed around a second ECC82 V6 tube. The –11.5V via a zero pot is injected to one of the triodes, while the full AGC is feed to the other. The difference between them is converted to a current who deflects the needle of this instrument. It has been designed by me to ensure full scale with about -10V at the AGC bus, sufficient for receive a local powerful station without overloading the meter.

The full spread sheet is available upon request, in Spanish and in a txt
CP437 format, made with the edit.com from MS-DOS 7.10, this file also includes some ideas (some of them not tested or implemented yet), calculus, formulas, and sundry data collected from books, the Internet and from my own imagination.

Attachments

  • AM Receiver Project.JPG
    AM Receiver Project.JPG
    140.4 KB · Views: 1,417

Vibe Deep Space Box Bass 1

I have this amp, class G/H. All parts looks ok, but the amp idle in protect. Regulated PS is working, rail is shortly comming up, then protect again. Nothing in the manual about the blink code.. Maybe somebody has expirience with this amp?

Attachments

  • IMG_20200531_140929.jpg
    IMG_20200531_140929.jpg
    1,009.8 KB · Views: 215
  • IMG_20200531_140935.jpg
    IMG_20200531_140935.jpg
    947.2 KB · Views: 203
  • IMG_20200531_140939.jpg
    IMG_20200531_140939.jpg
    1,021.6 KB · Views: 204
  • IMG_20200531_140943.jpg
    IMG_20200531_140943.jpg
    973.2 KB · Views: 222

2.1 Integrated soundbar

So. What to give a dear friend as a Christmas gift?
She just bought a new house, invested in a 65" TV, and plays her music on a 20 year old, white plastic, Pioneer sound system...
Let's build her a soundbar?

She's allergic to boxes and wires, so it has to be discrete, how small can I get it, with a built in subwoofer?

Trying to limit the depth, I search long and well, until I found a 5-1/4 Peerless woofer, with a truncated frame, making it only 135mm wide on the narrow, this allows me to work with a depth of just 16cm for the cabinet.
Keeping it simple, my next search would be full ranges, reaching 20.000Hz, to avoid crossovers and tweeters, and ended up with a set of decent Dayton 3" drivers.
20220116_155402.jpg
20220102_115453.jpg

After a few weeks waiting, (and playing around in WinISD, starting building the cabinet, playing more with WinISD, I surrendered, accepting that I would have to omit any bass below 50Hz) the drivers arrived and I could start testing. The full-range drivers were quite easy, ended up with a sealed box of 3l on each side, the woofer a 6l, ported cabinet, tuned at 58Hz.
To make the (otherwise boring) cabinet slightly interesting, I decided to make the port part of the design, a standing "full height" slot port, located according to the to one side according to the ancient Greek "golden ratio", and I actually think it worked quite well
20220102_205512.jpg

The back wall of the whole bar is made as a "French cleat", this helps me save about 1cm in depth, as I do not need any fasteners/brackets, but lead to a challenge of sealing all internal walls towards the back with a gasket. Think it worked out OK, using the same foam tape as around the speakers... but suspect a slight leakage at high volumes... better tell her to keep the neighbours happy, and not krank up too much.
20220102_154949.jpg

This was the first time I made speaker grilles. 3mm MDF, magnets to hold it in place and contact adhesive for the cloth... Does not look too bad when fitted, but the backside is awful can someone teach me how to do this properly?
20220102_215644.jpg

Used the same amplifier board, as I did with my own living room setup, a 2.1 channel amp from Arylic.
This card is awesome for its size, with line in for the TV, bluetooth, and also built-in Spotify connect and Internet radio.
And with the built-in DSP, I was actually able to get the soundbars response within +/- 2 dB from 100 to 16.000Hz, and a small step down above, to make it less fatiguing. With appx 50W for the 4 ohm woofer, and 25-30W for each of the fullrange pairs, it is slightly too powerful for this setup, but I'm still very pleased with the result.
The bass plays well from about 50Hz, but maxes out at about 95dB, but I'd say that is adequate for a soundbar...

Parts list:
4x Dayton PC83-4 (each side coupled in series to 8ohm)
1x Peerless SDS-135F25CP02-04
1x Arylic Up2Stream AMP 2.1
10x 10mm neodymium magnets
12mm MDF
3mm MDS
Self adhesive felt/sound absorbant mat
Speaker cloth

A short timelapse, for those interested.

And the final result, mounted.
20220128_161040.jpg
20220128_161016.jpg

(you actually see the original Pioneer system... which is now removed ;o)
Projects by fanatics, for fanatics
Get answers and advice for everyone wanting to learn the art of audio.
Join the Community
507,921
Members
7,893,777
Messages

Filter

Forum Statistics

Threads
406,495
Messages
7,893,777
Members
507,921
Latest member
bedomes