
Couple of notes from last nights assembly:
Getting the small Yellow caps to "look" square on the brds is a PITA. VERY minor but still...
I used one of the screw terminals as a height gauge for the raised resistors. I turned it on it's back and touched the solder pin to the cap and rested the resistor on top. That gave me a "level" resistor to solder in.
I was going to put in IC sockets to change the opamp but then decided against it since this is a PROVEN design and it is designed around this opamp so it should never be changed unless it is damaged.
I had a scare moment when I "thought" I installed a resistor backwards... (JOKE!!!!!)
I cleaned the brds after the resistors and tiny caps. Then again after the regular caps and fastons. And finally after completion. I couldn't imagine waiting and trying a single cleaning after installing ALL the components.
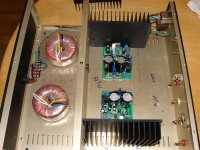
Toroids are Steve Dunlap 160VA 24-0-24-0 specials...
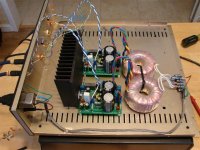
WAY OVERKILL on heat sinks.. This is a test only. In reality the LM3886 could be mounted to the Alm chassis with a "heat spreader" and be fine.
EDIT:
Steve @ Apex.jr
IEC input AC filter
Silver plated Tef___ insulated pwr wire. I put them in a SS braid for noise and abrasion resistance.
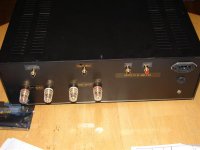
Round pwr switch (I LOVE THOSE!!!)
Output binding posts
I don't know where I got the RCA's. They might be Steve's, but I have nicer ones (from Steve) that will go on the mono-blocs.
Edit 2:
Chassis is Par-Metal Series 20. GREAT chassis for the money. Love the look with the 10mm Alm face plate. Vented top, sides and bottom allow for internal heatsinks... And the internal divider sections off the pwr supply section.
Getting the small Yellow caps to "look" square on the brds is a PITA. VERY minor but still...
I used one of the screw terminals as a height gauge for the raised resistors. I turned it on it's back and touched the solder pin to the cap and rested the resistor on top. That gave me a "level" resistor to solder in.
I was going to put in IC sockets to change the opamp but then decided against it since this is a PROVEN design and it is designed around this opamp so it should never be changed unless it is damaged.
I had a scare moment when I "thought" I installed a resistor backwards... (JOKE!!!!!)
I cleaned the brds after the resistors and tiny caps. Then again after the regular caps and fastons. And finally after completion. I couldn't imagine waiting and trying a single cleaning after installing ALL the components.
Toroids are Steve Dunlap 160VA 24-0-24-0 specials...
WAY OVERKILL on heat sinks.. This is a test only. In reality the LM3886 could be mounted to the Alm chassis with a "heat spreader" and be fine.
EDIT:
Steve @ Apex.jr
IEC input AC filter
Silver plated Tef___ insulated pwr wire. I put them in a SS braid for noise and abrasion resistance.
Round pwr switch (I LOVE THOSE!!!)
Output binding posts
I don't know where I got the RCA's. They might be Steve's, but I have nicer ones (from Steve) that will go on the mono-blocs.
Edit 2:
Chassis is Par-Metal Series 20. GREAT chassis for the money. Love the look with the 10mm Alm face plate. Vented top, sides and bottom allow for internal heatsinks... And the internal divider sections off the pwr supply section.
Attachments
Troy,
You probably know this but a warning. If you dont use the insulated washer and the insulator pad you will blow the chip.
For anyone that doesnt know:
The back of the LM3886 is tied to -V. So if it touches the heatsink its no big deal. If the heatsink touches ANYTHING that can touch ground you are screwed instantly. If a wire touches it, if you move the amp around and the sink touches the enclosure, etc etc. Mine are not insulated as I dont yet have washers. I have been very careful and lined my enclosure with electrical tape near the sink just in case.
BTW I have said it before but should restate it: I use CPU heatsinks. Pentium 3 or 4 size is fine. They get bathwater warm. These are seriously efficient speakers. If you are using Fostex or other high efficiency full range drivers I recommend these small sinks as a cost saving measure.
If you have less efficient speakers your sinks should increase in size accordingly.
Uriah
Yep, insulator requirement known.
Nothing mounted, just placed for pictures.
Have to go get wire, standoffs and whatever else from storage to actually assemble the units. Should be this afternoon if possible...
Oh and the obligatory LED!! Have to get that from storage also...
Nothing mounted, just placed for pictures.
Have to go get wire, standoffs and whatever else from storage to actually assemble the units. Should be this afternoon if possible...
Oh and the obligatory LED!! Have to get that from storage also...
Yes! Very important. Better be safe. I measured it and had perfect insulation with the nylon washer and silicon pad.udailey said:Great
So for those of you who will be putting a kit together please remember to check with your DMM between the tab of the chip and the heatsink after you install the insulator. If you get no connection then good. If you register ANY resistance, bad.
Uriah
Peter
marc brown said:Looks great Troy. Thanks for the pics.
What are the measurements on that Par-metal case?
You can get just about ANY size...
http://www.par-metal.com/20series.htm
As for THIS one... Hmm let me go measure..
Standard width for sure..
EDIT:
I went measure..
Face plate is 16.25 " wide x 5.25" high
Front to back is 16"
Internal height is 5"
Internal width is 15.75"
Apparently I have the large 5" high chassis:
20-16165"B" with divider. I have used the handles too if needed.
Just to keep this straight in my mind.....
If you are using a metal case, or can in any way have the heatsink touch any other metal, or ground, insulate.
If I use a wood enclosure, with a heatsink that cannot touch anything but the wood, no need for insulator? ( or use it any way just to be sure? )
John
If you are using a metal case, or can in any way have the heatsink touch any other metal, or ground, insulate.
If I use a wood enclosure, with a heatsink that cannot touch anything but the wood, no need for insulator? ( or use it any way just to be sure? )
John
troystg said:
As for THIS one... Hmm let me go measure..
Standard width for sure..
Thanks Troy. I was mentally using yours to lay out my amp and just needed some measurements to document.
mightym said:Just to keep this straight in my mind.....
If you are using a metal case, or can in any way have the heatsink touch any other metal, or ground, insulate.
If I use a wood enclosure, with a heatsink that cannot touch anything but the wood, no need for insulator? ( or use it any way just to be sure? )
John
It's still a good idea to insulate it in a wood case, unless you never plan on using a tool inside the case, like a screw driver or something (not likely in the DIY world). It's very easy to touch a V- rail (heatsink) to something it should not touch.
I would insulate anyway. I almost killed it one day testing with the DMM while the amp was on. A spark flew from my probe to the heatsink. If you ever have it on and have the case open I figure thats a danger to the chip if its not insulated. Any wire that you are moving around is liable to kill it even if it just gets close enough to the sink to arc. I had no idea it was this sensitive til I built this one, but I have killed other LM3886 because of not insulating when I should have been.
Uriah
Uriah

udailey said:
BTW I have said it before but should restate it: I use CPU heatsinks. Pentium 3 or 4 size is fine. They get bathwater warm. These are seriously efficient speakers. If you are using Fostex or other high efficiency full range drivers I recommend these small sinks as a cost saving measure.
If you have less efficient speakers your sinks should increase in size accordingly.
Uriah
A pentium 4 heatsink is about 3"x3" so for "normal" speakers, one of
these heatsinks cut in half should suffice for my 2 channels.
The sink in question is 5.5" x 7.5" x 1.25"
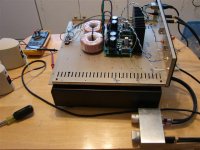
The kits work perfectly...
Well the kits were definitely NOT the issue...
They sound fabulous and I knew they would just like the last ones..
One thing to note is that they do NOT work on a 1/4 amp fuse!!! I replaced it with a 5 amp and all is well.
Remember this is a test case and they will be rebuilt in mono-bloc amps. But sound very nice even with the cat 5 signal wire, Sony 5-disc player and the loose mounting.
- Status
- This old topic is closed. If you want to reopen this topic, contact a moderator using the "Report Post" button.
- Home
- Group Buys
- my_ref revC group buy (Mauro Penasa LM3886 design)