
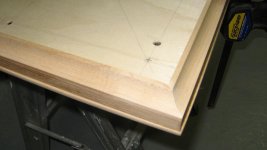
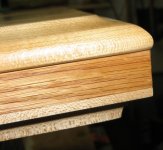
Algar_emi said:Detailed view of the side. Very good finish
That's beautiful, very nice indeed!
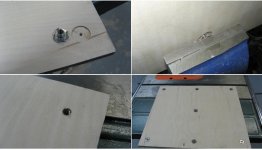
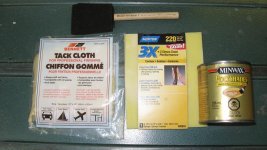
Some asked what that I used to finish my turntable. Right from the start I'm telling you that I'm not expert in wood finish, quite the contrary. Every time I do a job, there is always room for improvement and it is never perfect. I don't have access to any fancy paint room or paint gun, so my job is always done by hand. I never learned from an expert and I can be perfectly wrong. Anyway here my own recipe.
1) Sand it with a small hand orbital sander (I use a DeWALT sander) with 120 grade sand paper. Since I always use almost perfect wood to start it, it always needs minimum sanding. I never clean the bare wood with a damp cloth because it brings the wood fibers up and it is more difficult to sand after. Always keep the wood dry.
2) Then when it is nice to my touch, I clean it with compressed air, then I clean it thoroughly using a "Tack Cloth", see image, to remove all trace of wood dust.
3) The I apply "MINWAX" Polyshade Stain & Polyurethane varnish product using a foam brush.
4) Once the first coat is dried, I sand it using a 220 grade sanding sponge, see image, clean it with the Tack Cloth again, then apply an other coat of Polyshade varnish.
5) I repeat the process 5-6 times until I see and feel no improvement.
Too give you an idea, I used the same foam brush (I clean it using paint cleaner between applications and let it dry), Tack Cloth and sand sponge for all the coats. I'll also use only this small can of varnish for the turntable and the platform.
Voilà A nice a durable finish in just a few evenings.
1) Sand it with a small hand orbital sander (I use a DeWALT sander) with 120 grade sand paper. Since I always use almost perfect wood to start it, it always needs minimum sanding. I never clean the bare wood with a damp cloth because it brings the wood fibers up and it is more difficult to sand after. Always keep the wood dry.
2) Then when it is nice to my touch, I clean it with compressed air, then I clean it thoroughly using a "Tack Cloth", see image, to remove all trace of wood dust.
3) The I apply "MINWAX" Polyshade Stain & Polyurethane varnish product using a foam brush.
4) Once the first coat is dried, I sand it using a 220 grade sanding sponge, see image, clean it with the Tack Cloth again, then apply an other coat of Polyshade varnish.
5) I repeat the process 5-6 times until I see and feel no improvement.
Too give you an idea, I used the same foam brush (I clean it using paint cleaner between applications and let it dry), Tack Cloth and sand sponge for all the coats. I'll also use only this small can of varnish for the turntable and the platform.
Voilà
A nice a durable finish in just a few evenings. Attachments
Algar_emi said:Some asked what that I used to finish my turntable. Right from the start I'm telling you that I'm not expert in wood finish, quite the contrary. Every time I do a job, there is always room for improvement and it is never perfect. I don't have access to any fancy paint room or paint gun, so my job is always done by hand. I never learned from an expert and I can be perfectly wrong. Anyway here my own recipe.
1) Sand it with a small hand orbital sander (I use a DeWALT sander) with 120 grade sand paper. Since I always use almost perfect wood to start it, it always needs minimum sanding. I never clean the bare wood with a damp cloth because it brings the wood fibers up and it is more difficult to sand after. Always keep the wood dry.
2) Then when it is nice to my touch, I clean it with compressed air, then I clean it thoroughly using a "Tack Cloth", see image, to remove all trace of wood dust.
3) The I apply "MINWAX" Polyshade Stain & Polyurethane varnish product using a foam brush.
4) Once the first coat is dried, I sand it using a 220 grade sanding sponge, see image, clean it with the Tack Cloth again, then apply an other coat of Polyshade varnish.
5) I repeat the process 5-6 times until I see and feel no improvement.
Too give you an idea, I used the same foam brush (I clean it using paint cleaner between applications and let it dry), Tack Cloth and sand sponge for all the coats. I'll also use only this small can of varnish for the turntable and the platform.
Voilà
That's brilliant, simple yet effective, and eventhough the job is time consuming it's well worth the effort.
Your varnish technique is fine,with the exception of the Polyshade one-step product.I was told that this type of varnish was designed mostly for convenience.The actual two-step stain and varnish is superior.Here is why,since the stain is mixed with polyurethane it doesn't really soak into the wood but stays on the surface.I guess for a turntable it really doesn't matter much.because it won't wear down like say a wood floor.
Best aproach I was told is 1.apply wood conditioner let soak for 15 minutes then wipe,within the next two hours got to next step,if two hours lapse repeat this process 2.stain and let soak for 15 minutes,then wipe and let dry for 6 hours 3.repeat stain as before and wipe,let dry for 8 hours 4.now it is ready to apply urethane .And yes a sprayer for finish coat is better.I've seen a guy many times do clear laquer on furniture with a spray gun.
Regards
George
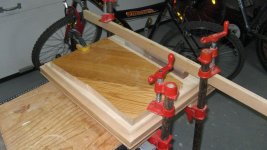
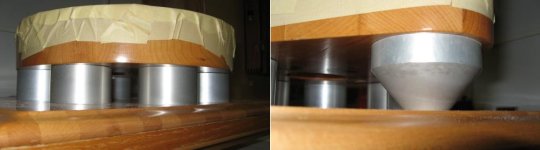
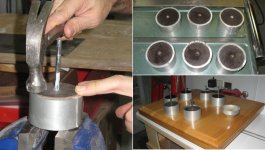
Built the table risers today. They are aluminum cylinder, perfectly sanded to be the same high and levelled. Then there is a silicone sealed cap made of birch plywood, covered with a loaded bitumen sheet. The cylinder is filled with lead pieces and dust, then all packed together using liquid wax (paraffin). Finally, it is plug with an other cap while the was is still hot. Took a day, here the story...
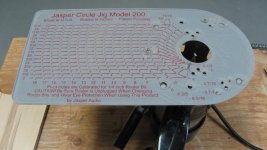
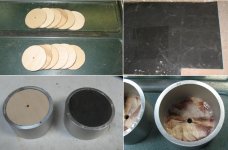
First, I needed a cap that fit tight inside the riser cylinder. Problem was that a hole saw didn't give me a perfect fit cap. I needed something more accurate than 1/8" hole saw step. I used my trusty Jasper Circle Jig that I got from Parts Express some years back. It can produce circle up to a 1/32" step, very accurate.
First, I needed a cap that fit tight inside the riser cylinder. Problem was that a hole saw didn't give me a perfect fit cap. I needed something more accurate than 1/8" hole saw step. I used my trusty Jasper Circle Jig that I got from Parts Express some years back. It can produce circle up to a 1/32" step, very accurate.
Attachments
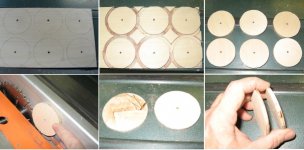
Then I mounted the first cap on each riser, press fit, then covered with a layer of loaded bitumen, and sealed from the inside with a silicone seal. The bitumen layer is almost flush with the riser edge and will compress once assembled with the table.
Attachments
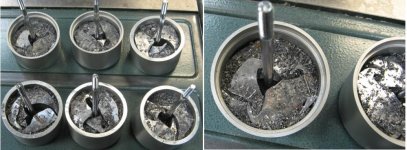
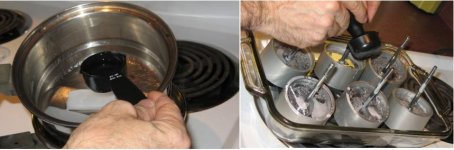
While the wax was still hot, I cap the tube with an other press fit cap with bitumen. Before the wax was really solid, I remove the bolts. Voilà, six lead loaded risers, one day later, and the final result.
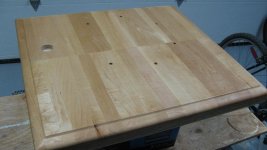
The armboard riser is just press fit into the base plate and simpler. There is a cap on the larger section with a silicone seal, then fill with lead dust, and seal again with silicone.
The armboard riser is just press fit into the base plate and simpler. There is a cap on the larger section with a silicone seal, then fill with lead dust, and seal again with silicone.
Attachments
Thanks. I'm getting closer to completion. Now, next step is to add some more lead to the table base. This is why it is covered with protective paper on some pictures. Time to drill again. It will be very heavy, already it is difficult to lift the table base and the risers 
- Status
- This old topic is closed. If you want to reopen this topic, contact a moderator using the "Report Post" button.
- Home
- Source & Line
- Analogue Source
- My DIY Teres Turntable