Well, it seems like a simple subject, but it not. It is a long and difficult road to take, see my thread on the motor controller. There is some interesting links by Mark Kelly. Motor, pulley and platter are a complete system and need to be address together.
http://www.diyaudio.com/forums/showthread.php?s=&threadid=98045&perpage=25&highlight=&pagenumber=1
After two Group Buy I knows more that I wanted to when I started my original TT project. Much simpler to buy a used one
http://www.diyaudio.com/forums/showthread.php?s=&threadid=98045&perpage=25&highlight=&pagenumber=1
After two Group Buy I knows more that I wanted to when I started my original TT project. Much simpler to buy a used one
Clio09
Are you the one from Audiogon? Do you have the Scheu Premier table?There is a group buy going on right now for the Teres bearing,come and joint if you are interested.
Algar-emi
Today I stopped at the Metal Supermarket store (I am not sure if you got them in Montreal) to ask for the price of brass 1/2" plate,aluminum 1/2" plate and copper 1/2" plate.I will know tomorrow the prices for 20"x16"x1/2" plates.If they are within my budget I will use them for a plinth sandwich construction along with maple,stainless and the damping sheet you mentioned before.
Also I might need your help with my incomplete controller,the IC's are not on yet .
Regards to all
George
For those that are interested,I got prices for metal plates for my plinth, from the metal supermarket located on Dixie road,just north of Brittania Road in Mississauga.
Brass 20"x16"x1/2" $400
Aluminum 20"x16"x1/2" $144.95
Copper 20"x16"x1/2" $579.95
Yes they are a little expensive but still cheaper than buying from Mcmaster.com.Anybody happens to know another source for metals,also what could I use for damping?
Kind regards
George
Brass 20"x16"x1/2" $400
Aluminum 20"x16"x1/2" $144.95
Copper 20"x16"x1/2" $579.95
Yes they are a little expensive but still cheaper than buying from Mcmaster.com.Anybody happens to know another source for metals,also what could I use for damping?
Kind regards
George
Check this link out for damping
http://www.audiomn.org/ASMB-10-062.pdf
Although the table is an empire 208, it had a metal base similar to what you are thinking about. Check out the pictures under the base of the top plate to see how they did it.
Hope this helps. I still have to finish my DIY turntable with Algar's/& Kelly's motor controller but will use layers of baltic birch instead of aluminum. Hope yours turns out fantastic.
Cheers
FM
It is probably better to use aluminum (and cheaper) than brass.
Brass has a tendency to rings like a bell. Aluminum if used more often to damp, as used in a few loudspeakers construction.
Also 1/4 inch as I used is probably enough as well, 1/2 inch would be very heavy to move around. My own base plate is already killing me just to move it. A constrained construction of different materials is probably also better to kill vibration, so the 1/4 inch is ok I guessed.
I got my metal from Métaux Solutions in Montreal (www.metauxsolutions.com).
They used to be part of the Metal Super Market network but not anymore. Years ago I bought a 4 X 8 sheet of 1/4 aluminum, cut in two 4X4 pieces. It was much cheaper than to buy pieces now and then. I'm still using it today.
An other solution (that I used in the past) is to get a used plate from a scrap metal dealer. Since the plate will be covered with other layers, it appearance hasn't to be perfect.
Stay tuned for more pictures. I worked on the table base this past weekend. I added some more lead as suggested by some member. I installed 7 weights of 600gr each, for a big total of 4.2Kg of lead (or 9.25Lbs). Now the base fell very dense indeed")
Brass has a tendency to rings like a bell. Aluminum if used more often to damp, as used in a few loudspeakers construction.
Also 1/4 inch as I used is probably enough as well, 1/2 inch would be very heavy to move around. My own base plate is already killing me just to move it. A constrained construction of different materials is probably also better to kill vibration, so the 1/4 inch is ok I guessed.
I got my metal from Métaux Solutions in Montreal (www.metauxsolutions.com).
They used to be part of the Metal Super Market network but not anymore. Years ago I bought a 4 X 8 sheet of 1/4 aluminum, cut in two 4X4 pieces. It was much cheaper than to buy pieces now and then. I'm still using it today.
An other solution (that I used in the past) is to get a used plate from a scrap metal dealer. Since the plate will be covered with other layers, it appearance hasn't to be perfect.
Stay tuned for more pictures. I worked on the table base this past weekend. I added some more lead as suggested by some member. I installed 7 weights of 600gr each, for a big total of 4.2Kg of lead (or 9.25Lbs). Now the base fell very dense indeed
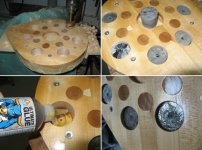
This is step by step the addition of some more lead to the turntable table. I dig 7 new holes into the table. Harder to do this time with such a big drill bit. I had prepared since a long time these lead weights, 600gr each. They fit perfectly into the holes. Then I pour some polyurethane glue into it. This glue expands and fill all the void around the lead weight. It makes sure than these heavy weights won't drop from the table, or move into the hole. The final result on the last picture. Seven lead weights, solidly glued into the table base awaiting the wood cap.
I installed 7 weights of 600gr each, for a big total of 4.2Kg of lead (or 9.25Lbs).
I installed 7 weights of 600gr each, for a big total of 4.2Kg of lead (or 9.25Lbs).
Attachments
Total weight before the latest addition was 4.3Kg + 4.2kg of addition = 8.5Kg total + the risers + the base plate...
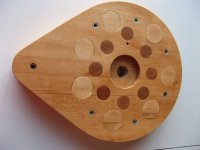
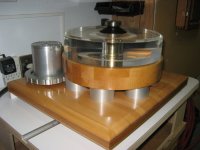
Here the final result. Caps are made of slice of birch plywood. I redid the varnish on bottom for an uniform finish. You can see very well the bolt inserts for the risers.
Here the final result. Caps are made of slice of birch plywood. I redid the varnish on bottom for an uniform finish. You can see very well the bolt inserts for the risers.
Attachments
This is the kind of plinth,I am trying to copy.
http://pic6.audiogon.com/i/c/f/1230763811.jpg
Regards
George
http://pic6.audiogon.com/i/c/f/1230763811.jpg
Regards
George
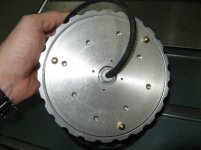
Final touch, the platform bottom feet, Black Diamond Racing Cone installation (see http://www.vxm.com/21R.14.html).
First I cut brass screw to get just a 1/4-20 threaded rod that I screwed into the cone using removable locking thread fluid.
The three cones can be mounted at seven different locations into the plinth using the steel threaded inserts that were installed into it (there is one in the middle as well).
First I cut brass screw to get just a 1/4-20 threaded rod that I screwed into the cone using removable locking thread fluid.
The three cones can be mounted at seven different locations into the plinth using the steel threaded inserts that were installed into it (there is one in the middle as well).
Attachments
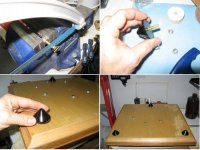
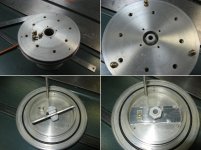
Making of the Motor Pod. Images top to bottom, left to right.
1) First build the three adjustable brass feet and drill/Tap the pod base to receive them. We can see there is a hole to plug in the Pod base. I'll use it to run the motor cable.
2) Closer view of the cable strain relief connector and the brass feet installed.
3) Showing the parts used to plug the hole and hold in place the cable strain relief conn.
4) Parts installed, ready for the next step.
Attachments
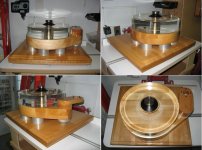
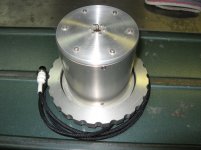
Lead loading installation. Again images clockwise left to right.
1) Drill/Tap to install the two SS screws used to hold the lead weight. The weight was prepared to fit into the Pod tube and leave enough clearance for the motor.
2) Lead weight held firmly in place using the two screw. A bigger hole in the middle was drilled to receive the cable.
3) Weight and Pod tube installed. I forgot to mentioned that the tube was first cut to length so the motor pulley will be in the middle of the platter.
4) Preparation to receive the paraffin wax. A pen is used to plug the center cable hole.
5) Paraffin was poured inside to seal the lead. Center hole is left open.
6) The motor cable is run inside the pod from the bottom and soldered to the motor.
Final Pod weight 4.2Kg. It won't move around.
Attachments

- Status
- This old topic is closed. If you want to reopen this topic, contact a moderator using the "Report Post" button.
- Home
- Source & Line
- Analogue Source
- My DIY Teres Turntable