The F5 I was referring to was with 3 output pairs
The limiting factor is the number of output devices you have.
40W/mosfet is the absolute most power I would want to put through them continuously.
With 24V rails thats 1.66A
As an experment you could run your amp with 1A then have a listen, 1.3A then have a listen, and if your fearless 1.6A and have a listen.
If you want to go more extreme you will need to parrallel the output with another pair (2 mosfet pairs).
Last edited:
Melon Head--thanks for clarifying, about the three output pairs.
I'll probably sit at 1.3 amps for now, per Papa Pass's original specifications.
As I get more experienced (and adventuresome), I may try the F5X or cascoding in my next iteration.
Again, thanks for all your help and insights....
P.S. Where you located, in Aussie-land? I spent almost two years in the South Australia outback, in Woomera and "the Alice".
Fair dinkum on 'yer.... Ken

Man, I have been listening to Schubert's Symphony # 8 ("Unfinished") over and over today, and I am simply BLOWN AWAY by the transparency and soundstage of my finished F5. It's as though I'm hearing this composition for the first time. Mesmerizing!
I think I am in audio-euphoria...... (which is even better than auto-erotica!)
Just had to pass that along. There. I feel better now.
I think I am in audio-euphoria...... (which is even better than auto-erotica!)
Just had to pass that along. There. I feel better now.
dave_gerecke;2510700 Only advantage I can see is that audio-euphoria can last longer!:D Dave[/QUOTE said:Ahem...... speak for yourself, Dave!
"I think I am in audio-euphoria...... (which is even better than auto-erotica!)"
Only advantage I can see is that audio-euphoria can last longer!
Peace,
Dave
Reminds me of Woodie Allen exiting the orgasmatron in the movie "Sleeper" (on TCM yesterday).
All, some photo updates to my F5 build. In reality, I've been enjoying my F5 in an "open chassis" configuration for the last few weeks, so I've been concentrating on "cabinetry" and a minor mod to my 1970-era Weston VU meters.
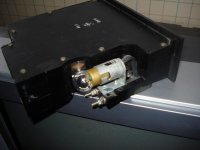
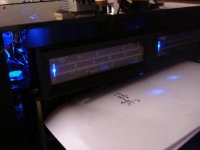
The first pic shows the original 5W incandescent lamp installed in one of the VU meters. This lamp illuminated a slit aperture and lens on the side of the meter case, which in turn hit a small mirror mounted on the meter movement. From there, the lightbeam was projected to the rear of the VU meter face. (Pretty nifty, huh?). In the second pic, I have replaced the lamp with a 0.5W (5 vdc, 100 ma) blue LED and limiting resistor. The LED has roughly the same "directed illumination" as the original lamp, but without the current draw and heat generation. The only tricky part was getting the LED in exact alignment with the slit aperture to maximize the display on the meter face.
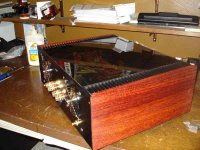
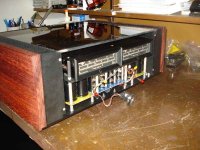
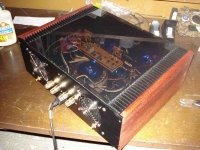
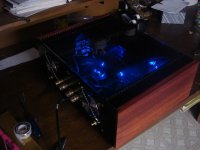
The next photos show the amp side panels. These were made of African padauk hardwood, to closely match the rosewood side panels on my other amps and tuners/pre-amps. I finished these panels with a Watco oil-based cherry wood stain. The top of the cabinetry is a 1/4" thick piece of Bronze acrylic plastic (Plexiglass, by brand); the heatsink baseplates were machined to permit the Plexiglass to installed flush with the heatsink top fins.
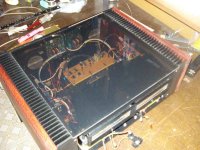
Because of the side panels, the heatsinks are recessed inward on the amp chassis. I use two 90mm 120 VAC shaded-pole induction motor fans to create an airflow internal to the main amp chassis, and then the air flows through channels milled into the base of the heatsinks (lower edge of the heatsink baseplates), and then upward between the heatsink fins and side panels. Since my amp heatsink temps (and MOSFET temps) are somewhat dependent upon the fans, I have installed thermistors into the two heatsinks, and constantly monitor temps. I presently have the thermistor "alarms" set for 50 degrees C, and they have yet to trip. The two fans are run off mains voltage, but through a 600 ohm dropping resistor--this drops fan speed measurably, and also significantly reduces fan blade noise. I currently have some minor fan noise, but I suspect once I finish the cabinet (front panel) this will muffle the remaining noise.
Another pic shows the two VU meters, and the display provided by the 0.5W "projection" LEDs. These displays are easily visible in all lighting conditions, and are kinda spectacular in a dimmed room.
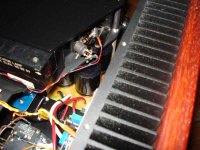
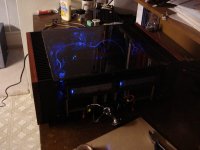
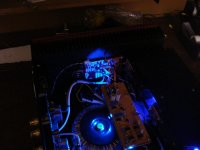
Other pics show the amp "illuminated". I figured to "go for the bling" (for now) and added three small 5MM blue LEDS to the underside of my vector board controller, to highlight the inside of the amp......and besides it justified the use of the Plexiglass top plate.....!
Enjoy. Again, if you have questions or comments, please fire away.
I'm stil undecided about the front panel. I do a lot of race car fabrication, and I think a twill-weave black carbon-fiber front panel would be sexy, but the Front Panel Express solution (either clear or black anodized aluminum) are also appealing.....
Ken
The first pic shows the original 5W incandescent lamp installed in one of the VU meters. This lamp illuminated a slit aperture and lens on the side of the meter case, which in turn hit a small mirror mounted on the meter movement. From there, the lightbeam was projected to the rear of the VU meter face. (Pretty nifty, huh?). In the second pic, I have replaced the lamp with a 0.5W (5 vdc, 100 ma) blue LED and limiting resistor. The LED has roughly the same "directed illumination" as the original lamp, but without the current draw and heat generation. The only tricky part was getting the LED in exact alignment with the slit aperture to maximize the display on the meter face.
The next photos show the amp side panels. These were made of African padauk hardwood, to closely match the rosewood side panels on my other amps and tuners/pre-amps. I finished these panels with a Watco oil-based cherry wood stain. The top of the cabinetry is a 1/4" thick piece of Bronze acrylic plastic (Plexiglass, by brand); the heatsink baseplates were machined to permit the Plexiglass to installed flush with the heatsink top fins.
Because of the side panels, the heatsinks are recessed inward on the amp chassis. I use two 90mm 120 VAC shaded-pole induction motor fans to create an airflow internal to the main amp chassis, and then the air flows through channels milled into the base of the heatsinks (lower edge of the heatsink baseplates), and then upward between the heatsink fins and side panels. Since my amp heatsink temps (and MOSFET temps) are somewhat dependent upon the fans, I have installed thermistors into the two heatsinks, and constantly monitor temps. I presently have the thermistor "alarms" set for 50 degrees C, and they have yet to trip. The two fans are run off mains voltage, but through a 600 ohm dropping resistor--this drops fan speed measurably, and also significantly reduces fan blade noise. I currently have some minor fan noise, but I suspect once I finish the cabinet (front panel) this will muffle the remaining noise.
Another pic shows the two VU meters, and the display provided by the 0.5W "projection" LEDs. These displays are easily visible in all lighting conditions, and are kinda spectacular in a dimmed room.
Other pics show the amp "illuminated". I figured to "go for the bling" (for now) and added three small 5MM blue LEDS to the underside of my vector board controller, to highlight the inside of the amp......and besides it justified the use of the Plexiglass top plate.....!
Enjoy. Again, if you have questions or comments, please fire away.
I'm stil undecided about the front panel. I do a lot of race car fabrication, and I think a twill-weave black carbon-fiber front panel would be sexy, but the Front Panel Express solution (either clear or black anodized aluminum) are also appealing.....
Ken
Attachments
WOW! That is a work of art! Very nice job CanAm!
From looking at the color scheme, I think either the black carbon fiber, or black anodized aluminum would look the best. Somehow the clear anodized just doesn't seem like it would fit. But that's my opinion, which is less valuable than MBE.
Peace,
Dave
From looking at the color scheme, I think either the black carbon fiber, or black anodized aluminum would look the best. Somehow the clear anodized just doesn't seem like it would fit. But that's my opinion, which is less valuable than MBE.
Peace,
Dave
Thanks, guys, for the kind words...... This was a fun "winter project"--too cold to work on cars in the garage, so the F5 kept me busy in the warmer basement....
I'm "not fully settled" on the blue LEDs in the amp's interior. Because of them, I'm having urges to hand a mirrored "disco ball" and strobes in my listening room.
(P.S. If you are too young to know what a disco ball is, please don't embarass me by asking me....!)
I'm "not fully settled" on the blue LEDs in the amp's interior. Because of them, I'm having urges to hand a mirrored "disco ball" and strobes in my listening room.
(P.S. If you are too young to know what a disco ball is, please don't embarass me by asking me....!)
I'm "not fully settled" on the blue LEDs in the amp's interior. Because of them, I'm having urges to hand a mirrored "disco ball" and strobes in my listening room.
(P.S. If you are too young to know what a disco ball is, please don't embarass me by asking me....!)
Sounds like a medical condition of the 70's.
Peace,
Dave
Re: "Sounds like a medical condition of the 70's"
Exactly..... Caused by wearing bell-bottom double-knit pants that were too tight....!!
So that's how they got the mirror polish!
- Status
- This old topic is closed. If you want to reopen this topic, contact a moderator using the "Report Post" button.
- Home
- Amplifiers
- Pass Labs
- Another F5 build--beautiful music, different drummer