I just started reading that yesterday to be honest with you.. I'll try to keep the dumb questions to a minimum.
This is a nice hobby! I have build many diy amps. My first one was the LM3875 from Audiosector (Peter Daniel) it was a very good feeling to know you build it.
After a while a member told me if I liked the sound of these LM chips, I would love the class A/B discrete amplifier ( IC's free)...and He was right!!! since then I did never go back to IC's amplifiers. Enjoy your amp, because in the future you will have the need to "explore" in another designs and classes. I say this because if you think you will stop with this amp...you are wrong
. it happen to me and many other members here.Oh believe me....there will be more! I have received bits and pieces of random orders and as fate would have it.... half of it was either completely wrong or the shipper didn't complete the order. Waiting is the hardest part of all.
I believe I am going to try and source out more parts from the U.S. to keep the waiting to a minimum. The closer I get to the end the more excited I get. I can't wait to get this build to sing!
Patience is the key here
I believe I am going to try and source out more parts from the U.S. to keep the waiting to a minimum. The closer I get to the end the more excited I get. I can't wait to get this build to sing!
Patience is the key here
My last amp took me a month to finish it . I ordered parts from 5 different companies, but it was all worthy. I wish I could order from just one company
it is not so cheap to build your own amp, I spent almost $700 for my amp just in parts. i guess with that money I could bought an used commercial amp, but it will not feel the same way when you build it and you know it is "unique" since nobody has the same one like yours. Beside I had so many good commercial amps that it was time to build my own one. Before my diy amp I had a Bryston B60 that sounded wonderful,but after I build my amp I sold the Bryston...yeah that good.
PS: if I did not have my diy amp...I would kept the Bryston B60 for sure!
. I ordered parts from 5 different companies, but it was all worthy. I wish I could order from just one company it is not so cheap to build your own amp, I spent almost $700 for my amp just in parts. i guess with that money I could bought an used commercial amp, but it will not feel the same way when you build it and you know it is "unique" since nobody has the same one like yours. Beside I had so many good commercial amps that it was time to build my own one. Before my diy amp I had a Bryston B60 that sounded wonderful,but after I build my amp I sold the Bryston...yeah that good
.PS: if I did not have my diy amp...I would kept the Bryston B60 for sure!
Well you have one up'd me... I have never owned an amp other than for car audio. I've got around 200 wrapped up in this and I still have some parts coming. Looking at around 400 realisticly before it's all said and done
It's alright though..... I was told that I would not be able to do it. I can't wait to see the look on their face when they see and hear it. Gonna be b-e-a-u-t-i-f-u-l !
It's alright though..... I was told that I would not be able to do it. I can't wait to see the look on their face when they see and hear it. Gonna be b-e-a-u-t-i-f-u-l !
well things are progressing slowly but, progressing none-the-less. I finally received the second kit and try as I may I can't quite get all 10 lbs in this 5 lb. box so I had to come up with a more classic square box. This whole trial and error thing can get a little un-nerving at times. Oh well.
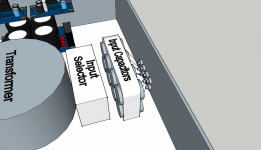
Going back to input caps... is what I have in the picture correct or should there just be one at each amp board. I believe what I am showing is wrong but, I just want to make sure.
Going back to input caps... is what I have in the picture correct or should there just be one at each amp board. I believe what I am showing is wrong but, I just want to make sure.
Attachments
Last edited:
well things are progressing slowly but, progressing none-the-less. I finally received the second kit and try as I may I can't quite get all 10 lbs in this 5 lb. box so I had to come up with a more classic square box. This whole trial and error thing can get a little un-nerving at times. Oh well.
Going back to input caps... is what I have in the picture correct or should there just be one at each amp board. I believe what I am showing is wrong but, I just want to make sure.
Try to put the input selector,volume "as far" as you can from power Transformer, remember that any noise coming from inputs will be amplified
it is one input cap per channel (ground inputs do not need one).
Try as I may, I can't get everything to fit without interference with each other. I have decided to listen to the veteran builders here and build a bigger case for everything to go in and sacrifice the one I have now to provide me with the heat sinks. This should give me a more professional appearance and layout of the components. I appreciate everyone's guidance and advise. It should be wrapped up soon.....I hope!


Hey Fab -
I went the other way with my enclosure and decided to go bigger (16 x 12 x 4) from the get go, since I wasn't quite sure of what my final design would include. I'm still not sure whether or not I'll include a preamp - maybe even a DAC board and another tranny. But, I'll have the space if if I need it.
My chip-amp is using the LM4702 which is class AB. So, needless to say, it includes a fairly good size heatsink attached to it. I was thinking I would just install the amp/HS vertical in my enclosure (as suggested by bcmbob) since it is well vented. Now I'm thinking I may try and hang the HS out the back of the enclosure, but that will involve a lot more case mods than I may want to put up with. We'll see. My enclosure is coming from NJ (Par-Metal), while I'm still waiting for more parts from China. I've had real good luck dealing with an eBay vendor over there, who's been working with me when I'm not sure exactly what I need. However, since they're 13 hours ahead of NY, I have to stay up till midnight just to communicate!
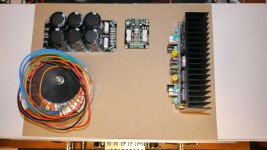
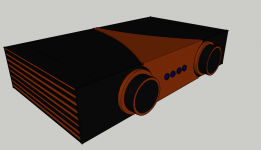
Shown below is my current thinking for the internal layout, but that may all change once the case shows up and I can see how much trouble it'll be to hang the HS outside the case for a better cooling. I can't wait to get started on the construction. It's all fun!
I went the other way with my enclosure and decided to go bigger (16 x 12 x 4) from the get go, since I wasn't quite sure of what my final design would include. I'm still not sure whether or not I'll include a preamp - maybe even a DAC board and another tranny. But, I'll have the space if if I need it.
My chip-amp is using the LM4702 which is class AB. So, needless to say, it includes a fairly good size heatsink attached to it. I was thinking I would just install the amp/HS vertical in my enclosure (as suggested by bcmbob) since it is well vented. Now I'm thinking I may try and hang the HS out the back of the enclosure, but that will involve a lot more case mods than I may want to put up with. We'll see. My enclosure is coming from NJ (Par-Metal), while I'm still waiting for more parts from China.
I've had real good luck dealing with an eBay vendor over there, who's been working with me when I'm not sure exactly what I need. However, since they're 13 hours ahead of NY, I have to stay up till midnight just to communicate! Shown below is my current thinking for the internal layout, but that may all change once the case shows up and I can see how much trouble it'll be to hang the HS outside the case for a better cooling. I can't wait to get started on the construction. It's all fun!
Attachments
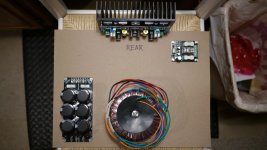
It's not clear from that picture, but the front of amp is the bottom of the image. I should have labeled my cardboard bottom plate template! If I move the amp module to the back so the HS can hang out the back, there'll be plenty of room to do just that. I always figured the x-former would be up front, but with that new configuration, I can put the PSU up front too. I also want to try and balance the weight so the thing won't list to one side or the other when lifted. With the amp module and x-former in the middle it solves that problem.Redjr What about putting the other boards in front of your amp board/heatsink and the transformer in the front. It would move your sound path away from the transformer and shorten your wire runs from power supply to amp etc.
The downside to the x-former in the middle front is the space on either side may be limited for other modules I have yet to decide on. One side will be the PSU module. I just need my enclosure to get here! I had the factory custom punch the back plate for an IEC power connector and paint (anodize) it black for me. That costs me a couple of days. Decisions, decisions.
Edit - See photo with proposed configuration. Should leave plenty of room for other modules.
Attachments
Last edited:
Thanks for the suggestions guys.... So far the case is 14 1/2"w X 9 1/4"d X 3 3/4"H. I'm working on a matching case for the power supply at the moment. The main case is housing the amp boards, input selector, coupling caps, and possibly a DAC. I'm also a little worried that the physical size of the heatsinks I have are not up to par so, I've been digging around the local resale shops and flea markets for donar parts. I was able to come up with a couple XLR jacks, some vintage knobs and some round feet at the local market. Pawn shops are next
I'm still waiting on some parts to come in from over seas at the moment so that has given me time to play with the welder
I'm still waiting on some parts to come in from over seas at the moment so that has given me time to play with the welder
Redjr I had a similar problem with deciding where to put my heat sinks. I used walnut for the sides of my amp so I couldn't put them there. And I didn't want to keep them inside the enclosure so I had to hang them of the back. Bad thing was I had already finished the basic "box" of my enclosure. I bit the bullit and went back and re-engineered the back half of of the enclosure. I recessed the heatsinks to line up with the wood sides. This left me just enough room for the iec, rcas, and the binding posts. It was a pain but it was worth it. You could place your heatsink in the middle and have a binding post and rca on either side for a balanced look. Or your binding posts on one side and your rcas and irc on the other. Its no joke that most people spend most of their amp building time on the enclosure, I definitely am.
Attachments
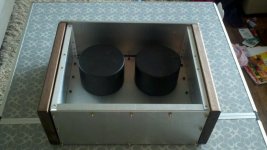
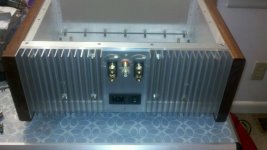
This is what I've come up with so far...... It should suffice. I've been looking at the photo archive from various internet photos.
Very nice!
Redjr I had a similar problem with deciding where to put my heat sinks. I used walnut for the sides of my amp so I couldn't put them there. And I didn't want to keep them inside the enclosure so I had to hang them of the back. Bad thing was I had already finished the basic "box" of my enclosure. I bit the bullit and went back and re-engineered the back half of of the enclosure. I recessed the heatsinks to line up with the wood sides. This left me just enough room for the iec, rcas, and the binding posts. It was a pain but it was worth it. You could place your heatsink in the middle and have a binding post and rca on either side for a balanced look. Or your binding posts on one side and your rcas and irc on the other. Its no joke that most people spend most of their amp building time on the enclosure, I definitely am.
As an old planner by trade, I don't like to leave anything to chance! So I'm probably 'over-anal' about my design and trying to get it just right. You know what they say, "measure twice, cut once". It goes without saying that spending the right amount of time with upfront planning will pay dividends in the end result.Hopefully my case will get here soon, so I can have a physical object to work with and see how things will best layout. I really like the idea of the HS on the back, but it will involve more cutting, trimming, aligning, etc to get it to work, but I may be up for the challenge!
I know I took the easy way out with preferring to buy modules that just plug-n-play, but my first experience at building an amp in the mid-70s with discrete components ended in disaster. No insurmountable disaster, but without the resources we have today like the web, and since I was real newbie, without any kind of budget, I put the whole thing in a box and gave up. Wish I still had that box, because the design was a Tiger amp from Southwest Technical Products (can't recall the exact model). All I was using from them was the PCB. Remember them? So now in semi-retirement I find I have the time and means to re-pursue this fun hobby. Apologize for the trip down memory lane.
- Status
- This old topic is closed. If you want to reopen this topic, contact a moderator using the "Report Post" button.
- Home
- Amplifiers
- Chip Amps
- 3886 Ebay kit Build