Regarding bracing, I guess it's just another of those things that you overthink at first. Fast forward some years and you probably make it a little bit simpler, thinking more along the lines of "sturdy enough for forces in directions so and so" rather than "moah is probably squaredawesomeness^57 times pi !!!11oneoneONEexclamationmark!".
Yeah, I definitely overthunk that one last night, trying to make matching curves on a part i will NEVER EVER see!
At least I got all the maths done so this second one is gonna fly by like a champ - then bed time.
Whooooole load of progress made on this last night and hopefully tonight (if I can stay awake, I'm nodding off but I have just made a sweet coffee and jammy granola)
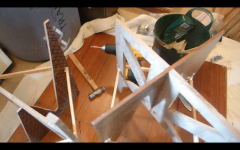
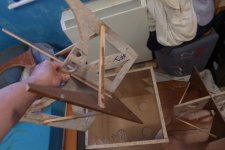
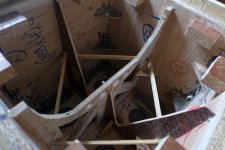
Braced teh brace. Fun times.
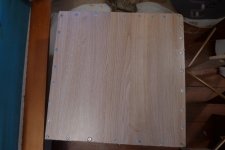
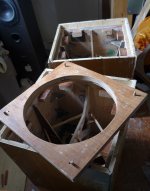
Made up one box.
Took a while, but it always does teh first time. The interior brace is removable. 8 corner braces, 2 per edge. I'm probaby gonna have to do that to attach the 7mm internal braces.
Just about to make box 2, and with all the knowledge from box one (the guinea pig) this should go faster!
Oh and I braced my braces. Why? I don't know. Just seemed a good idea to have plenty stiffness.
Ohh..... Also got some grilles. Not sure if I'm gonna use 'em, but cats and subs do rather freak me out.
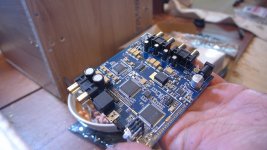
Oh and I also bought a miniDSP HD
It's what I need in my room to have multiple setups for different speakers, full line level RCA outputs etc, all good. and learning and applying a function to all the extra buttons on my remote will be kinda cool
The 2x4 will be used in the bedroom to take care of that sub, probably the same amp but in bridged mono 800w of POWWAAAAHHHHH
Pics below
Braced teh brace. Fun times.
Made up one box.
Took a while, but it always does teh first time. The interior brace is removable. 8 corner braces, 2 per edge. I'm probaby gonna have to do that to attach the 7mm internal braces.
Just about to make box 2, and with all the knowledge from box one (the guinea pig) this should go faster!
Oh and I braced my braces. Why? I don't know. Just seemed a good idea to have plenty stiffness.
Ohh..... Also got some grilles. Not sure if I'm gonna use 'em, but cats and subs do rather freak me out.
Oh and I also bought a miniDSP HD
It's what I need in my room to have multiple setups for different speakers, full line level RCA outputs etc, all good. and learning and applying a function to all the extra buttons on my remote will be kinda cool
The 2x4 will be used in the bedroom to take care of that sub, probably the same amp but in bridged mono 800w of POWWAAAAHHHHH
Pics below
Attachments
There are people that are quite good at turd polishing. It's a hobby I have no intention to pursue, but an actual thing, and an art in it's own way.
I would not bother making new boxes, they seem good enough for the intended use. They will be further strengthened when you glue(?) on the floorboards on the outside.
Just glue the braces and such together and you're good to go.
If you have not decided on connectors yet, my vote goes to Speakon, it's awesome stuff. Not only better and more stable connection, but also slightly easier than the regular connectors to mount.
Nope, I'm gonna leave the turd polishing to people who actually can't afford to do this, not people who are just cheap, like me.
Glue and screw!
Unfortunately I've already got some simple terminals, you know the type, box with spinning things to squish wire into that you have to cut a little hole in the box for.
Oh lord, I hope I can do that on the bottom of the box! I do NOT want to be making those jig saw cuts in the side of a freshly covered glued and screwed almost finished project. I suspect I will though.
They will be further strengthened when you glue(?) on the floorboards on the outside.
Glue and screw!
...my vote goes to Speakon, it's awesome stuff. Not only better and more stable connection, but also slightly easier than the regular connectors to mount.
Unfortunately I've already got some simple terminals, you know the type, box with spinning things to squish wire into that you have to cut a little hole in the box for.
Oh lord, I hope I can do that on the bottom of the box! I do NOT want to be making those jig saw cuts in the side of a freshly covered glued and screwed almost finished project. I suspect I will though.
Fair bit more progress recently - no time to post pics though.
It's almost entirely the result of starting out the first half of the project with no beautiful TABLE SAW.
FIRST TIMERS!!!! A MESSAGE!!!!!
UNLESS YOU ARE GOOD AT QUICKLY CUTTING STRAIGHT LINES WITH WHATEVER YOU GOT, FACTOR THE COST OF A TABLE SAW INTO YOU FIRST SUB BUILD!!!!!!!!
TRUST ME!!!!!!
So much time spent re-doing panels that were a couple mm to thick here, a little off there, had a bump there or here or wherever.
Trust me NOOBS. I was one of you. I still almost am, except now I'm a NOOB with a TABLE SAW. And, I'm sad to say, that makes me a much better box maker than your average NOOB
Inner monologue:
 (jjams, stop being smug about your table saw, it's not even a fancy amazing one. It was cheap for gods sake.)
It's almost entirely the result of starting out the first half of the project with no beautiful TABLE SAW.
FIRST TIMERS!!!! A MESSAGE!!!!!
UNLESS YOU ARE GOOD AT QUICKLY CUTTING STRAIGHT LINES WITH WHATEVER YOU GOT, FACTOR THE COST OF A TABLE SAW INTO YOU FIRST SUB BUILD!!!!!!!!
TRUST ME!!!!!!
So much time spent re-doing panels that were a couple mm to thick here, a little off there, had a bump there or here or wherever.
Trust me NOOBS. I was one of you. I still almost am, except now I'm a NOOB with a TABLE SAW. And, I'm sad to say, that makes me a much better box maker than your average NOOB
Inner monologue:
(jjams, stop being smug about your table saw, it's not even a fancy amazing one. It was cheap for gods sake.) ....Just glue the braces and such together and you're good to go....
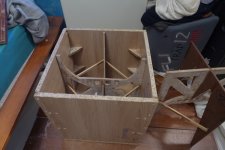
Come on man, you know I'm still overthinking bracing - I'm totally gonna make a few triangles to attach that major huge inner brace into the box...
Sorry
Well well well... It's been ages since I've posted here. to It's usually been a case of "ok one more stage and I'll stick a couple pics LESSONS HAVE BEEN LEARNED!!!!! They've become far too much work for the quality of finish they'll have, and they're possibly finish-able today, if we ignore the miniDSP 2x4 HD U bought to replace the standard 2x4, so it can. Silicone went in two days ago so that's the last worry. They are, in a word:
OVERCOMPLICATED.
KaffiMann - I believe you warned me of that!
I'le polished the turd as best as I can and have learned a LOT.
Heavy as all hell too, especially considering the drivers aren't on yet.
I had a huge list of lessons bur I'll replace them with just one:
-Be damned careful with that close window shortcut. There's a chance you'll go too for with it and lose a lot of postings!
They mainly boiled down to - Keep it simple. Have a day off every so often. Buy the Right materials to begin with, and DO NOT try and lift what you can only just lift. Keep things together in one place, not a flight of stairs away from your primary tool. First box? Accept imperfections. Plan everything beforehand. Don't forget to eat. Frequently used drill bits will snap - especially pilot hole bits. Some wood is more prone to splitting than other wood. Cut and leaky fingers make typing hard. Just get on with it. Your social distancing GF two rooms over the way can hear hammering at 03:00. Remember to sleep. KEEP IT SIMPLE!!. First project, just build one, you'll learn all these lessons without having double the feck-ups. Making a video of the process will slow you down, but breaks it up a little, which is nice. Buy all the tools you'll want BEFORE starting. Make note of which way blade can angle and fences can be set up. Don't try and free hand loads of of stuff as a last ditch resort, theres always another ditch. Screw audits are boring, Just buy more than enough screws.
This is now my bible. I'll no doubt have forgotten a couple things, bur yeah, that's the gist.
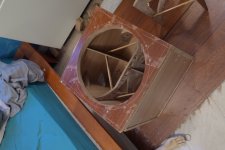
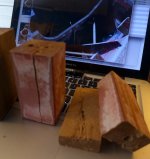
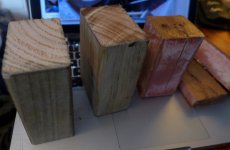
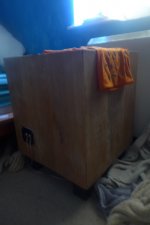
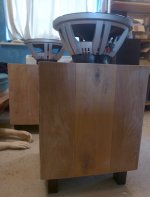
Have some pics of overcomplicated suboptimal boxes that vary from the plan quite a bit. Note the feet, even the good ones were useless so I got some pressure treated stuff from my mother (who' been adding things for us to her weekly shop so is about fairly regularly).
At least they may give you a bit of a WTF? giggle
OVERCOMPLICATED.
KaffiMann - I believe you warned me of that!
I'le polished the turd as best as I can and have learned a LOT.
Heavy as all hell too, especially considering the drivers aren't on yet.
I had a huge list of lessons bur I'll replace them with just one:
-Be damned careful with that close window shortcut. There's a chance you'll go too for with it and lose a lot of postings!
They mainly boiled down to - Keep it simple. Have a day off every so often. Buy the Right materials to begin with, and DO NOT try and lift what you can only just lift. Keep things together in one place, not a flight of stairs away from your primary tool. First box? Accept imperfections. Plan everything beforehand. Don't forget to eat. Frequently used drill bits will snap - especially pilot hole bits. Some wood is more prone to splitting than other wood. Cut and leaky fingers make typing hard. Just get on with it. Your social distancing GF two rooms over the way can hear hammering at 03:00. Remember to sleep. KEEP IT SIMPLE!!. First project, just build one, you'll learn all these lessons without having double the feck-ups. Making a video of the process will slow you down, but breaks it up a little, which is nice. Buy all the tools you'll want BEFORE starting. Make note of which way blade can angle and fences can be set up. Don't try and free hand loads of of stuff as a last ditch resort, theres always another ditch. Screw audits are boring, Just buy more than enough screws.
This is now my bible. I'll no doubt have forgotten a couple things, bur yeah, that's the gist.
Have some pics of overcomplicated suboptimal boxes that vary from the plan quite a bit. Note the feet, even the good ones were useless so I got some pressure treated stuff from my mother (who' been adding things for us to her weekly shop so is about fairly regularly).
At least they may give you a bit of a WTF? giggle
Attachments
 Some good points there! Looking forwards to the end result.
Yep, these have been the bane of my life for lack of those two things - Keep it simple, stupid, measure twice, cut once.
Really, I just need to be better at woodworking, and work out things like how to 45° cut on the opposite side of the way the saw adjusts (fence and extension is on the right, saw tilts to the left). They're all hand sawn so MASSIVE imperfections there, And, well, everywhere else too now I think about it. Having the wrong materials too, yikes that complicated things!! All salvaged wood mid covid19 lockdown vs waiting a while and just buying thick mdf? I'd probably have made them in no time with the right materials and some KISS.
This speaker building thing will be a journey of, as you say, whittling away at the f*ups project by project until I'm more or less good enough to present a pair of speakers or single subwoofer and proudly say - I built them!
It'll be a while
^Unfortunately these are a little too big to hide well!! Ahh, at least they'll be in my audio cave room rather than the living room or bedroom. Only I will be constantly reminded of my first project's ultra goofy construction, not the GF or anyone who comes over!!
I suspect when I smooth over corners with the sanding machine it'll start to look a little nicer. Still goofy/gappy/filled etc, but a little less obvious!!!
I suspect when I smooth over corners with the sanding machine it'll start to look a little nicer. Still goofy/gappy/filled etc, but a little less obvious!!!
Last edited:
I may gave gone too far.
Got quite some work to do with the miniDSP 2x4HD. First off post sub output Then an experiment (perhaps an RCA splitter to make it a new input? No ideal).
First off, find somewhere to put them. Second find some songs, third, tune tune tune tune tune tune tune tune tune, and EVENTUALLY make REW work using the .cal file for the mic incluuded in the DSpeaker Anti-Mode 8033 Cinema (which basically cured my downstairs setup, to my ears anuwaus!) and get even more techy.
One step at a time though!!!!
This is the right time to be doing such things as the whole house is being slowly GF introduced (well, we'd have her stuff already if she wasn't under orders to hide). Everything is changing though so all good!
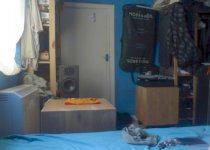
I don't know how exactly I'd measure the weight..... hangling luggage scales perhaps? They're HEAVEY. Today is my first full free day to mess about putting them somehwere other than the end of the bed (this room will no longer be a bedroom but a sort of audio / small projects workshop).
Wish me luck!
Got quite some work to do with the miniDSP 2x4HD. First off post sub output Then an experiment (perhaps an RCA splitter to make it a new input? No ideal).
First off, find somewhere to put them. Second find some songs, third, tune tune tune tune tune tune tune tune tune, and EVENTUALLY make REW work using the .cal file for the mic incluuded in the DSpeaker Anti-Mode 8033 Cinema (which basically cured my downstairs setup, to my ears anuwaus!) and get even more techy.
One step at a time though!!!!
This is the right time to be doing such things as the whole house is being slowly GF introduced (well, we'd have her stuff already if she wasn't under orders to hide). Everything is changing though so all good!
I don't know how exactly I'd measure the weight..... hangling luggage scales perhaps? They're HEAVEY. Today is my first full free day to mess about putting them somehwere other than the end of the bed (this room will no longer be a bedroom but a sort of audio / small projects workshop).
Wish me luck!
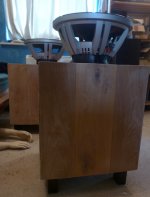
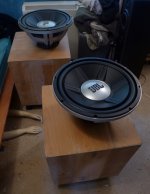
Just to thank everyone for their help, update folks that I did indeed create a pair of giant 15" subwoofers, and thank everyone for their help again!
miniDSP is still being tweaked but I'm gonna take that slow. Get used to the sound, mess about, get used to the sound, repeat. I'm getting there. Certainly so far I'm achieving the "didn't know there was a sub, sounds like it's coming from the mains" thing.
I'm using one as a pure 20-30hz room rumbler.... And the other (nearer) as reinforcement to my somewhat bass-light Monitor audio Bronze 2's (my first bookshelves, on sale, can't resist a bargain) slowly rolling off to 80hz ish. A smidge of old pillow stuffing in both.
The finish... Imperfect. Very imperfect. And they're HUGE. I've a couple bits and bobs to tart them up a bit though, so maybe they'll end up looking OK.
I feel like I'd rather like a smaller 8-10" woofer between the speakers to take care of the punchier stuff that the second sub is currently working on, and - If possible, run the two 15's off a single 400w channel. Is this possible?
Anyways - thanks again, and again, and again. Lots of lessons learned. If anyone spots a noob over-planning their first sub build - point em a PM my way and I'll talk them out of reinventing the wheel
Few pics below....
So yeah, your help was greatly appreciated. Couldn't have done it without you lot!
Attachments


Next project... Perhaps learn REW, or take the arm and replacement cart from my cheap as feck weighs 1kg, and swap it into a tarted up gemini direct drive 1200 clone (weighs a ton) and see if it's possible to remove a phono stage from an old amplifier and insert it into the 1200 clone
Oh and to answer the thread title question - I think I found it. Most expensive thing by far is the miniDSP 2x4 HD (£200!!!!) as it had to come from The USA with all the customs charges etc.
Not including screws and drill bits and the like, I'm at £450. Sounds pretty good for £450.
Oh and to answer the thread title question - I think I found it. Most expensive thing by far is the miniDSP 2x4 HD (£200!!!!) as it had to come from The USA with all the customs charges etc.
Not including screws and drill bits and the like, I'm at £450. Sounds pretty good for £450.
Last edited:
- Home
- Loudspeakers
- Subwoofers
- UK subwoofer building - Where's the value at?