Mirror silk please.
Here.
Attachments
Here.
Thanks
Attachments
Hi,
Damn you are an amp whipping machine !! Bham bham bham one after the other,They just keep coming ! I wish I was atleast 1% of you on this.
Anyways on a more serious note,Please do a complete analysis of the amp,Soundstange,Dynamics and all you know.
I want to build a reference Amp to test all my DIY speakers,So please do elaborate on all the aspects.
Regards.
About 8%. I'll try to finish it tomorrow
Damn you are an amp whipping machine
!! Bham bham bham one after the other,They just keep coming ! I wish I was atleast 1% of you on this.Anyways on a more serious note,Please do a complete analysis of the amp,Soundstange,Dynamics and all you know.
I want to build a reference Amp to test all my DIY speakers,So please do elaborate on all the aspects.
Regards.
Hello. I have built this amp AX9 based on schematic i post.Are threre any updated part values?Can i use 22uF instead 10uF for the cap at pin number 5 of opamp to extend low frequency responce?
Attachments
Thanks
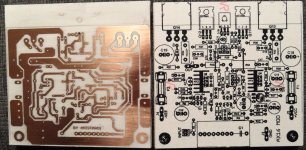
U have amazing skills at home made PCB's. Looks as good as the factory made. Especially the silk that u are able to get is wonderful.
reg
Prasi
AX16 Singing!
Hi Guys,
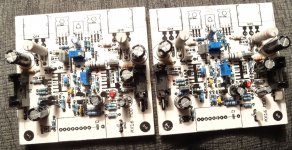
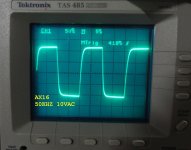
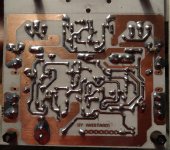
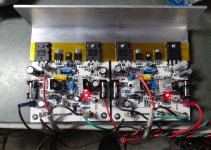
It's singing! You may notice in the picture that I didn't put the 100n caps on top of the boards. I was running low on 100n film caps so I decided to use X7R SMD caps on the bottom right next to the elco caps they were decoupling. Worked great and was very easy due to the tight layout.
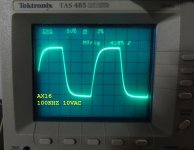
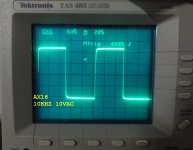
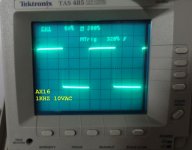
I have only listened to it through my test speakers so far but it sounds very good so far. I'll hook it to my big A/B setup tomorrow and give a more detailed report. I'm posting some pics of some square waves for your enjoyment.
Blessings, Terry
Hi Guys,
It's singing! You may notice in the picture that I didn't put the 100n caps on top of the boards. I was running low on 100n film caps so I decided to use X7R SMD caps on the bottom right next to the elco caps they were decoupling. Worked great and was very easy due to the tight layout.
I have only listened to it through my test speakers so far but it sounds very good so far. I'll hook it to my big A/B setup tomorrow and give a more detailed report. I'm posting some pics of some square waves for your enjoyment.
Blessings, Terry
Attachments
-
 AX16 CLIPPING.jpg93.9 KB · Views: 434
 -
 AX16 100KHZ.jpg93.6 KB · Views: 403
 -
 AX16 50KHZ.jpg97.6 KB · Views: 439
 -
 AX16 20khz.jpg92.8 KB · Views: 1,842
 -
 AX16 10khz.jpg97 KB · Views: 1,878
 -
 AX16 1KHZ.jpg87.5 KB · Views: 1,986
 -
 AX16 foil side..jpg740.9 KB · Views: 2,246
 -
 AX16 SINGING.jpg608.1 KB · Views: 2,430
Hi,
Thanks for the report,Looking forward to the complete analysis.Please be as elaborate as possible when posting your findings.
Regards.
I have only listened to it through my test speakers so far but it sounds very good so far. I'll hook it to my big A/B setup tomorrow and give a more detailed report. I'm posting some pics of some square waves for your enjoyment.
Thanks for the report,Looking forward to the complete analysis.Please be as elaborate as possible when posting your findings.
Regards.
Hi Guys,
It's singing! You may notice in the picture that I didn't put the 100n caps on top of the boards. I was running low on 100n film caps so I decided to use X7R SMD caps on the bottom right next to the elco caps they were decoupling. Worked great and was very easy due to the tight layout.
I have only listened to it through my test speakers so far but it sounds very good so far. I'll hook it to my big A/B setup tomorrow and give a more detailed report. I'm posting some pics of some square waves for your enjoyment.
Blessings, Terry
Q1 and Q5 should thermally couple, Q2 and Q4 too.
Q8 and Q9 is safe without heatsink, but add a small heatsink is cool
The bias current is about 110mA.
Part type recommendation:
C2, C6 and C7 is ceramic NP0/COG or silver mica.
C1 and C8 is MKP.
The 1/4watt and 1/2watt resistor is metal film, but choose high quality for R13 and R15.
R32 and R33 is low inductance type.
I wait the A/B result....
Seems these things should have been mentioned BEFORE I built it. It is what it is now.
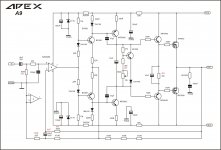
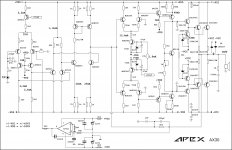
Is this AX16 an APEX design? It is in APEX thread and named a typical APEX name but I don't see where Mile posted anything about it.
It is Apex design: http://www.diyaudio.com/forums/solid-state/164093-100w-ultimate-fidelity-amplifier-568.html#post4543840
Seems these things should have been mentioned BEFORE I built it. It is what it is now.
I'm sorry. You are too fast for me...
That link doesn't work but I did a search and now I see that the AX16 is just the AX14 with two transistors added to form a protection circuit. However, you removed those two transistors so what you have presented here is a modified AX14 which I had already built and tested. Looks like you removed a few parts and added a trimmer to adjust the offset. I don't recall the original having any offset issues I will have to read back through my build.
- Home
- Amplifiers
- Solid State
- 100W Ultimate Fidelity Amplifier