Home Depot Diffusers
I made 4 of these diffusers and mounted them on the back wall. Each is 8 feet tall and 35 inches wide. Thus, the diffusers combine to cover 12 feet of the 19 feet width of my back wall. The wider, taller the diffuser, the greater the diffusion, but the area directly behind your sitting position is the most important as Bwaslo suggested.
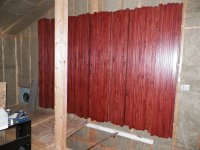
As I described earlier on, I added 1 1/2 inch wide, 3/,4 inch thick wooden pieces, each with a 1/2 inch wide, 3/8 inch deep channels down the middle of them. This makes these diffusers what Tim Perry calls Leanfusers, diffusing higher in frequency. I also modulated the various individual panels by varying their height off the back wall. This modulation helps to improve diffusion down below 1000 hz.
I did take some pictures and at some point I will post them.
I made 4 of these diffusers and mounted them on the back wall. Each is 8 feet tall and 35 inches wide. Thus, the diffusers combine to cover 12 feet of the 19 feet width of my back wall. The wider, taller the diffuser, the greater the diffusion, but the area directly behind your sitting position is the most important as Bwaslo suggested.
As I described earlier on, I added 1 1/2 inch wide, 3/,4 inch thick wooden pieces, each with a 1/2 inch wide, 3/8 inch deep channels down the middle of them. This makes these diffusers what Tim Perry calls Leanfusers, diffusing higher in frequency. I also modulated the various individual panels by varying their height off the back wall. This modulation helps to improve diffusion down below 1000 hz.
I did take some pictures and at some point I will post them.
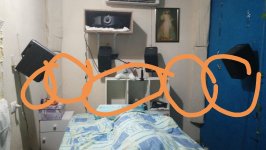
Space is a limiting factor in my case, the width of my back room is 2.4 meters, i'd like to make 5 120 x 87 cm diffusers, original width, half length. They will cover my back wall and most of the side wall aswell, i'll attach a. Messy picture.
My back wall isn't flat and parallel to the front wall, it's angled to the inside with around 20 cms difference from start to finish.
Thought about placing the diffusers in random angles(it's the only option really, would that be problematic?) , using 2 in the corners, one in the middle of the back wall, 30 cms to the front, and 2 facing one another at the side walls(not really parallel) they'll bs 2.5 to 3.5 meters behind the listeners head so the created a nice ISD gap,it's a LEDE room, thanks for your help
Attachments
One issue with using MDF is that you have to rip all the pieces that you need. So while the wood may be cheaper, it likely will take more time, and whether it is cheaper or not depends on how you value your time.
Another issue with MDF is that the dust is a whole lot worse for you than wood dust. Wearing a respirator is required.
The pieces that Bwaslo identified are precut to the dimensions needed. At the big box hardware stores in the US, you can purchase the lowest quality pieces and get away with it by culling through the entire stock to pick out the best pieces. You can get pretty good quality wood by doing this. I used more expensive finished pieces for the most outward, surface pieces to have a better looking product. After I had put the original diffusers together, I added the smaller pieces on top of that to adapt the simple diffusers to leanfusers to broaden the frequencies enhanced by the diffusers. If I knew that I was going to add the surface leanfuser pieces, I probably would not have purchased he finished pieces and would have saved some money.
One downside of the cheap big box store wood pieces is that the sides are rounded instead of clean cut. After I had glued the stacked pieces together with the finished pieces on top, I ended up ripping the sides of the pieces to line up better to avoid a rougher inner wall down in the cavities of the diffuser. If you rip the MDF, you will have the same size width for all pieces from the start.
The softness of the material matters since softer materials absorb more of the sound. This may or may not be a big deal since you need to balance your whole room anyways. If the diffuser absorbs more, then use less absorption elsewhere in the room. Pine is pretty soft, but it is improved by coats of polyurethane. MDF may have a firmer surface than pine, but since I used polyurethane on mine, it likely compensated for this difference.
Pine does have some grain which can enhance the appearance of the finished product. But this requires finish sanding that I did very little of. Pine does not absorb stain very well, so I made mine pretty dark, but it is for a home movie theater in addition to an audio room, so I want darker colors for less light reflection. I was able to choose an interesting stain color for the diffuser to get the color I wanted. MDF has no personality (grain), but you can paint it to look nice.
Well, those are my thoughts....
Thank you for the replies guys, and for the design bill!
Using 10 mm mdf for the backboard and 18 mm mdf for everything else, i was able to make 5, half length ones(122x87 cms)
Costing 75 dollars in total for everything, and they even cut everything for me so i didn't have to deal with dust.
They are a bit heavier though that's correct.
I'll post some. New pictures and measurements in my room once they're installed!
Attachments

Zallou3 They look great!
You mentioned hammer and nails, but did you also glue them? I worried that with higher sound volume levels, these diffusers would start to buzz if they were not glued together. I glued each piece to each other, and then used adhesive when I attached them to the wall. It may be too late to add glue at this point t0 yours though.
If you have multiple panels across the back wall, you should modulate the panels so that they are at different "heights" off the back wall (not heights off of the floor). Tim Perry, who is the original brainchild of these, modeled these using an acoustics program named AMFG Reflex. It showed that if multiple panels are mounted on the back wall, all at the same height off of the back wall, that the diffusion coefficient is not that good (worse than a single panel would indicate. The diffusion coefficient is much improved if you modulate them. In my case, I made my middle panel 2 inches off the back wall by mounting them over 2 inches of XPS. The next two panels on either side of the middle panel were mounted directly on the back wall (on the studs). I divided the fourth panel into two pieces and mounted each over 2 inches of XPS at the very outside of the panels, at the same height as the middle panel.
So why did I choose the modulation pattern that I used? Tim sent an e-mail out about a diffuser design that Cox/D'Antonio created that Perry thought would be great. The leanfuser used a different pattern than this Cox/D'Antonio design, but I could emulate their design by modulating the panels the way I did. I think that the Cox/D'Antonio modulation was more like 3 inches of height difference off the back wall, but I had to use 2 inches because mine are mounted above a stairway and raising their profile any further would start to create an overhead issue with people coming up the stairs. Also as the amount of modulation increases, the distance that you must sit from the diffuser increases which places the listening position further away from the back wall and more into the middle of the room, which is not desirable for my situation.
Interesting information Retsel, thanks for that. Let me clearly understand, you are talking about putting an extra 2 inches behind the middle panel, extending it out 2 inches more from that wall it's mounted on?
I am considering alternating panels on the wall, where there is one panel (basically 35 inches of width) followed by 35 inches of absorption, that repeats the entire wall.
Do you think that would be effective? If so, should any of those panels be pulled 2 or 3 inches off the wall?
I'm actually considering doing this for all 4 walls of a live performance room with corner traps in the corners. The objective would be to create a really nice sounding room that is a fairly lively but not too much. So I'm trying to control the reverb time and standing waves a bit, while diffusing enough to keep it from being too dead.
I might have to just build it and see how it sounds, if it's too dead I can add more diffusion panels where the absorption spaces are and vice versa if it's too lively. My gut tells me it's more likely to be deader than I want, but not sure and that would actually be easier to fix as I would just put the diffusion panels right over the absorption panels.
Thanks, gabo
Last edited:
Hey Gabo, first thanks for your guitar demonstrations with diffusers - it was revealing in the most powerful way. I see that you are from Michigan, where in Michigan (I live in Ann Arbor).
A good review of modulating diffusers can be found on Tim Perry's website:
Acoustic Diffusers: Design, Optimization & DIY Diffuser Blueprints
The more modulation of different panels means that you would need to sit further away. The last example on Tim Perry's website (100 cm deep) would be solely for a large, or at least a very deep room. I have seen some pretty alarming claims about how far from a diffuser one should sit to avoid some comb filtering effects. I have heard reports of people sitting much closer without any noticable effects. Ethan Winer, who is an acoustics expert of sorts maintains that the listening position should be at least a foot away from the diffuser based on each inch depth (off the back wall) of the diffuser. So if the highest point of the diffuser is 5 inches higher than the lowest, or deepest, point, then you should sit a minimum of 5 feet away. I think that this is a good rule of thumb for the minimum practical distance.
As far as your question about whether the back wall should be only diffusion, or mixed with absorption. I do not know. Most acoustics experts say that the back wall is the best place for diffusion. In my case, I am using widerange drivers in waveguides, so the back wall is THE most surface in my room. I went with a single large diffuser there based on most recommendations. But even conventional speakers, which are more omnidirectional, tend to place more energy towards the back wall then the side walls, and would likely benefit more with diffusion on the back wall. If, though, you must sit closer than the minimum recommended distance for diffusion, then use absorption.
The key goal is to first clean up bass nodes, then avoid early reflections that will muddy the sound, and then to have an acceptable RT60 or RT30 for a good sounding room depending on your taste. I think that there are many ways to get there. Although as audiophiles we still seek the "best" means of achieving this. The Blackbird studio is probably the most extreme, with 2d diffusers covering both walls and parts of other walls as well. Supposedly, the absorption caused by 2D diffusers balances well with the diffusing aspect to provide a "perfect" listening environment, even if the room visuals are so different and hard to get accustomed to.
After the large diffuser on my back wall, I am struggling with what to do with the ceiling and side walls - the front wall (behind the speakers) will be "dead end," with a curtain covering a set of storage shelves. I am hoping that the curtain along with the things stored on the shelves will provide good absorption and perhaps some bass diffusion. Maybe BAD panels for the side walls and BAD panels for the ceiling mixed with 2d diffusers (or 1D diffusers in mixed directions). I am also considering, as an alternative to BAD panels and additional diffusion, wooden slats mounted over the exposed insulation, which would provide some diffusion, and some absorption. Supposedly, diffusion on either side and above the listening position is another ideal place for diffusers.
If you do research on this and come to come conclusion, please report back.
Ah, thanks for the comments on the video. I just did that as a quick test for myself and was so impressed with it I uploaded it to youtube! I'm not a guitar player as is clearly shown there ")
I live in Bellaire, if you come "up north" to Short's, give me a shout and I'll meet you for a beer. Although these days that requires a reservation at Short's!!
I've very familiar with Ethan Winer, I've read a lot of his stuff. Very practical and good information from him. I've also been to Tim's site a number of times, but do need to go study that info more.
For the room I'm talking about, it's not a listening room, so there are no speakers or back/front of room. It's a live recording room in a new studio I'm helping build. The control room is full blown acoustic treatments with little diffusion, it's mostly absorption as it needs to be pretty dead.
But the live room is a bit interesting. You don't want that to be dead like a listening room and you'll have instruments, singers, etc. at variable places around the room. But you also don't want standing waves and you don't want wild echo's or flutters. You want a nice even decay that sounds good when someone stands in there and sings. So this will be a "live" recording room.
Yes, first job is to trap the corners and deal with the larger modes. We'll probably also trap most of the ceiling. From there it's about creating a nice sounding acoustic room. The room isn't huge, about 20'x14' or so, but big enough to keep most things around 5' or so from a diffusion panel.
I haven't started working on the room yet, we'll put in things and see how it sounds and adjust as we go. That will also be interesting. I can use REW to look at things, but it's really more about playing some music and listening and recording a few things. I'm not sure you can apply the results you get from things like REW the same as for a listening room. You wouldn't want to run REW on your shower, but many great vocal recordings have been done in shower stalls!!
gabo
At least in my (limited) listening tests, the distance from the diffusors isn't so critical as it's often said to be. Sure, being just 1ft from one doesn't do much but even 2ft from one is still much better than 2ft from a bare hard wall! Nothing magic happens at 5ft, it's probably the kind of thing that it just stops improving much when you get more distant than that. In all cases, it will be better than would be a bare flat hard wall, I'm pretty certain.
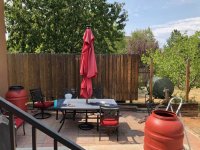
My daughter called last night to see if I wanted some wood. They wanted to take down 1 section of fence. Here is the blank spot where the fence was.
I'll be using the destressed looking cedar wood to build Depot Diffusers that will be doors for the 5x5 IKEA Record shelf behind my listening position.
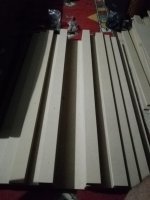
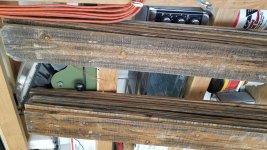
Here is a pic of the wood. When I get it ripped down to size I'll have enough for 2 panels and those 2 panels will fit the shelf with an inch open in the middle between them.
The original plans call for .70" thick 1x3 and my wood is .50" thick so I have to makes some adjustments to get the prescribed profile.
I'll be using the destressed looking cedar wood to build Depot Diffusers that will be doors for the 5x5 IKEA Record shelf behind my listening position.
Here is a pic of the wood. When I get it ripped down to size I'll have enough for 2 panels and those 2 panels will fit the shelf with an inch open in the middle between them.
The original plans call for .70" thick 1x3 and my wood is .50" thick so I have to makes some adjustments to get the prescribed profile.
Attachments
- Home
- General Interest
- Room Acoustics & Mods
- Making easy DIY "Depot" sound Diffuser panels, step by step