take a look to their website : PCB Prototype & PCB Fabrication Manufacturer - JLCPCB
Still no progress... This is the opportunity to play with something similar to the uC, like a "Blue Pill" stm32 board. I have installed the latest version of CubeMX IDE et have performed the LED blink mastery.
However, I wonder if it would make sense to start with the Stm32duino way to benefit from the arduino libraries.
JMF
However, I wonder if it would make sense to start with the Stm32duino way to benefit from the arduino libraries.
JMF
Hi,
I'm starting to track my ideas and inputs in a Github Wiki : Home * jmf13/NeatAmpTAS3251 Wiki * GitHub
I'l try to record there reference inputs, ideas, and finally code.
I give a try to stm32duino, as we should not need "advanced" functions. I will try to prototype with a "blue pill".
If I understand well, stm32duino allows to create custom boards, which would fit with the NeatAmp uC.
JMF
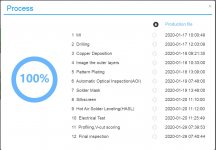
JLCPCB has manucatured the board. It has been shipped today. Normally expected to take 2-3 weeks to arrive, but may still be delayed by the virus episode.
However, it moved forward.
In parallel, I have started to work on the arduino sketch, on a BluePill, with a small state machine, to control the different pins on a Master board. Still very preliminary...
JMF
However, it moved forward.
In parallel, I have started to work on the arduino sketch, on a BluePill, with a small state machine, to control the different pins on a Master board. Still very preliminary...
JMF
Closely following this project. It has come a long way already. Quite an advanced design for your first PCB. Way to go!
Trying to decide between TAS3251 and TAS5825M for casual listening with bookshelf speakers. Hand assembly favors TAS3251. Despite the TAS3251 datasheet application "Bookshelf Stereo Systems", one wonders if the 5825 is better suited for low listening levels. Pointless speculation in lieu of TI EVMs I guess.
Trying to decide between TAS3251 and TAS5825M for casual listening with bookshelf speakers. Hand assembly favors TAS3251. Despite the TAS3251 datasheet application "Bookshelf Stereo Systems", one wonders if the 5825 is better suited for low listening levels. Pointless speculation in lieu of TI EVMs I guess.
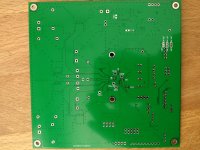
Here they are. Nice work from JLCPCB. Some pictures just out of the box. Somehow rewarding to see the physical result of this up to now rather abstract work.
Time now to order the remaining components and ship to who has booked boards and are still interested.
JMF
Time now to order the remaining components and ship to who has booked boards and are still interested.
JMF
Attachments


Good news AIM65 ")
You are first on the front line. I'm locked down from tools I need to work along you. However I will try to help (or follow for the software).
I imagine that you will head the pure STM32 way. Correct ? With HAL layer ?
Maybe you are interested with the CubeMX file. Let me know.
JMF
You are first on the front line. I'm locked down from tools I need to work along you. However I will try to help (or follow for the software).
I imagine that you will head the pure STM32 way. Correct ? With HAL layer ?
Maybe you are interested with the CubeMX file. Let me know.
JMF
Yes, I wont use STM32Duino.
I'm now switching from Atollic to CubeIDE and I use the HAL. CubeMX setup has been done, and 'blink' is running ok.
This project is now more a sotfware project than a hardware project and I think I'll take some time to get acceptable result. I'm currently working on the analysis and will start to write parts of code next week.
Chris
Makes sense
I think that many usefull information can be gathered from that project, for tha start-up sequence and volume management:
GitHub - chipdipru/N7DAMP-digital-power-amplifier-TAS325-x-2-quadro-: Подключение двух усилителей мощности TAS3251
When do you intend to solder the TAS3251 on the board?
JMF
I think that many usefull information can be gathered from that project, for tha start-up sequence and volume management:
GitHub - chipdipru/N7DAMP-digital-power-amplifier-TAS325-x-2-quadro-: Подключение двух усилителей мощности TAS3251
When do you intend to solder the TAS3251 on the board?
JMF
Thanks, I’ll have a look but I prefer to have my own learning path even if it takes some time, as I’m not a software guy.
I’m currently reading Qm.n format definition and parsing PPC3 output file. That seems pretty easy to handle: no continuous I2C write but register by register write.
TI Biquad Calculator (TIBQ) is interesting too, that could be useful to embed a basic tone control within the software of the on board MCU; that should feasible by managing 15 BQ coefficients.
Still a lot to read and understand…
That should be possible indeed. The biquad format is Q5.27, which mean 5 integer bits, 27 fractional bits (32 total).
What you do to load a custom biquad without PPC is:
-Calculate your biquad coefficients (Cookbook formulae for audio EQ biquad filter coefficients)
-Normalize them so that A0=1
-Convert to Q5.27
-Bitshift so that you have 4 bytes instead of one 32 bit value.
-Go to the book and page of the biquad (for details see 8.3.7.6 in the datasheet)
-Start a burst/sequential write at the register of the biquad:
[device address] [register] [A1_1, A1_2, A1_3, A1_4........... B2_4]
This can be done before booting or just during runtime.
You could do all the calculation steps on a computer and pass the actual I2C register writes, but if you want tone-control its easier to let the board handle it.
Example: a clock-wise rotary encoder turn incremenents the gain of a shelf filter, new coefficients are calculated and written to the device.
Last edited:
Update
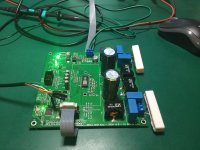
As the software is now well advanced, it’s time to test if some sound is produced by the amp !
All the parts are now soldered (c17 and c9 were too close of the TAS, I had to remove them while soldering the TAS). Next step consist to be able to write the configuration into the TAS to get basic confirmation of operation.
Currently the software provide:
A first sound test is expected this week, but as lockdown doesn’t mean less professionnal work, there's no garantee on delay…
As the software is now well advanced, it’s time to test if some sound is produced by the amp !
All the parts are now soldered (c17 and c9 were too close of the TAS, I had to remove them while soldering the TAS). Next step consist to be able to write the configuration into the TAS to get basic confirmation of operation.
Currently the software provide:
- The main structure to handle the events
- A serial monitor to handle commands
- A Ymodem file downloader
- A parser to handle the content of the files with TI Pure Path Console 3 format; I’ll later add a custom format to easily load biquad coefficient calculated without ppc3.
- A basic management of preset (uploaded) memories of process flow and of filtersets which will allows to easily change behaviour of the amp on the fly : without having to upload a file. 6 process flows and 6 filtersets are available for now.
- TAS loader of config and filtersets stored in memory Exception handling : TAS errors and power supply watchdog
- On board management of basic process flow parameters : mono/stereo; Left/right swap; volume control
- Direct console to I2C write (same as in ppc3)
A first sound test is expected this week, but as lockdown doesn’t mean less professionnal work, there's no garantee on delay…
Attachments
- Home
- Amplifiers
- Class D
- [design log] Neat 2x170W I2S in, I2C controlled, integrated DSP amp (TAS3251)