Well, i took a look and thought, I don't understand much of this.
The language is difficult to follow for sure...............
It seems its about a pivot arm with a parallelogram on the end, i cant see the point of it!
Mike
Another interesting patent: "a unique tone arm assembly for a phonograph arranged and designed to maintain the stylus tip in contact with the sound track at the point of tangency throughout the length of the sound track".
Nothing new under the sun.
Nothing new under the sun.
Re: Reply to thread
Google it under the patent number or the inventor's name (Adam N. Rosenberg).
There are photographs of the manufactured arm on a table.
It was done around 1980 and basically moved the stylus up and down (not in an arc) as viewed from the side. i.e. no error due to a pivoting cutterhead and a master disc with warps.
The error from an arcing tonearm was covered in Villchur's AR turntable articles in Audio magazine, Sept. 1962. With a 9-inch arm, mounted so that the arc rises from zero (no warp), the error is negligible.
It isn't "nothing new", it's old!
Andy
Last edited:
Google it under the patent number or the inventor's name (Adam N. Rosenberg).
There are photographs of the manufactured arm on a table.
Andy
I cannot get the photos or diagrams, only the descriptions................
Re: your message today
Mike,
Try Adam N. Rosenberg, tonearm, or The LOCI Tonearm , at vinylengine dot com.
Andy
The takeaway from all this is that you don't want any tilt of the pickup as viewed from the front. This can happen with offset tonearms, a point in favor of straight arms. It can be minimized with careful design, but it affects the tracking and audio picture very little, unless the disc has many bad warps.
Thanks Andy, i found it now thanks, i see how he was using the paralelogram, but linked to a conventional pivoting arm, his aim is quite different to what we are doing with the Radial arm, anyway interesting to see it thanks!!
Mike
Working on the LC prism (Thanks Carlo for sharing the design).
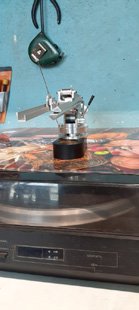
Ortofon vms works well but not with this Z1, wondering how can I get it balanced (the stylus should be aligned well with carriage)
Video with Z1
BTW, any tips to attach animated GIF?
With limited tool I couldn't make accurately enough, so I went with the prism shape carriage (actually three L glued together) to avoid the tilting issue, with cartridge tail up very slightly I finally get stabilized. It also helped by loosing the holding screws as much as possible to let ballpen tips moving freely (thanks Mike for the tips), meanwhile barely keep the structure in place not falling apart (I hope can improve further).
Attachments

Last edited:
With limited tool I couldn't make accurately enough, so I went with the prism shape carriage (actually three L glued together) to avoid the tilting issue, with cartridge tail up very slightly I finally get stabilized. It also helped by loosing the holding screws as much as possible to let ballpen tips moving freely (thanks Mike for the tips), meanwhile barely keep the structure in place not falling apart (I hope can improve further).
Looks great, how does it sound? mike
Hi Mike, it’s a step up from original LTA at #4241, sounds very agile and fluent.
Does it track everything well, do you have a test record for comparisons?
If it tracks well and sounds good it seems you should be on a good course.
people note particularly low background noise and bass performance alongside that, have you found those?
mike
I may be doing wrong as if the carriage is freely balanced on the track then I can hardly avoid the tilt effect, so with X shape carriage I use front weight to force tail up (there is very little play) to avoid carriage swing (depends on record condition).
If the gravity centre of the cartridge is at the further back then the front force needs to be high this increases the friction.
IMHO it should be resolved by the agility of ballpen point bearing while I am restricted by skill and tools.
If the gravity centre of the cartridge is at the further back then the front force needs to be high this increases the friction.
IMHO it should be resolved by the agility of ballpen point bearing while I am restricted by skill and tools.
Last edited:
I put a tiny drop of 3-in-1 oil on the ballpen tip as I feel the film is a bit sticky.
Here is in action.
LC with Victor Z1
Here is in action.
LC with Victor Z1
Sorry for the delay 2a3Set, i am trying to built a turntable from zero and missed the last posts.
The LC Prism was born to use an horizontal double vee just to avoid any possible tilting. But this needs a construction much more difficult than the T-shaped used on LC2. Mine was taken sawing longitudinally a square bar+ a long blueing and sanding process. That tilting on video maybe it's due an excessive play; try also to bring the cartridge as close as possible to the rail - that lever may increase somehow the friction of the carriage.
On LC 2 the balancing must be dynamic, i.e. taking into account the effect of the stylus drag. But once done, no more problems at all.
On LC3 you've only to counterbalance cartridge weight. The stylus has to be on the radius, the rail position set accordingly. On description and drawings posted at time there are also considerations on how to give some springiness to pentips. I try to detail drawings and photos to avoid to others the mistakes that I had to go through during the project.
carlo
meanwhile congratulations for the realization, not easy to end up an LC with "limited tools".
I love the 2a3 sound, i've built a 300b, but 2a3 it's even better
Thanks Mike, I haven't tried ceramic or others, will be next step of fine tuning.
Thanks Carlo, I am using avvt mesh plate 2a3 to drive lowther front/back horn, small power big sound") . Mike shared your tips about ballpen bearing, I made mistake glued to the structure, will find correct size tube, and "spring load" the bearing using cushion from soft rubber o-ring.
. Mike shared your tips about ballpen bearing, I made mistake glued to the structure, will find correct size tube, and "spring load" the bearing using cushion from soft rubber o-ring.
My current carriage is 105mm length, this barely can run across the record before the roller balls hit the end (much higher friction after that), is that because the friction of sliding is too high, or should I increase the carriage length as an easier workaround (making arm tube longer)?
Regards
Wei
Thanks Carlo, I am using avvt mesh plate 2a3 to drive lowther front/back horn, small power big sound
. Mike shared your tips about ballpen bearing, I made mistake glued to the structure, will find correct size tube, and "spring load" the bearing using cushion from soft rubber o-ring.My current carriage is 105mm length, this barely can run across the record before the roller balls hit the end (much higher friction after that), is that because the friction of sliding is too high, or should I increase the carriage length as an easier workaround (making arm tube longer)?
Regards
Wei
In a non recirculating the balls travel half that of the cart, and RIAA standard defines a tracking race of about 95 mm, mute grooves included. So 2x 47,5 races = 95 net + stoppers
Possibly is better to leave some space between the two races but here the rail length is limited by its base. (on mine - distance from platter spindle 225mm 9" TAs)
That said my cart is 115 mm, and i got no problems of friction even on inner grooves, where balls may go against their stops.
An useful advice is to bring the cart back to the first groove slowly rolling on its balls, to be sure they returned at their starting point (outer stoppers). A simpler gesture after some LPs.
ciao - carlo
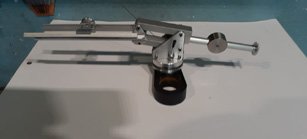
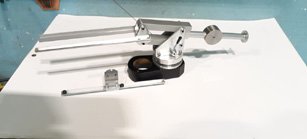
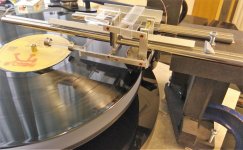
After numerous variations, the easiest to make and the best sounding variation, two balls on the front rail and a roller on the rear rail.
Attachments
After numerous variations, the easiest to make and the best sounding variation, two balls on the front rail and a roller on the rear rail.
Wow, loads of work I know, i have done lots of variants, somehow those pics have not come up well at all, can you please post some others?
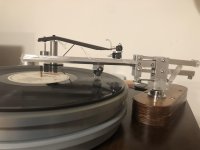
At the moment i use the paralelogram on the cart and polished stainleess steel rails, two tubes for each and 6mm ceramic balls, two on the front, one on the back.........
Actually these solutions are quite similar......but different, GREAT!! - good work.
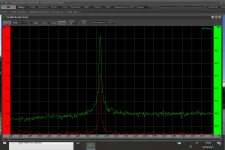
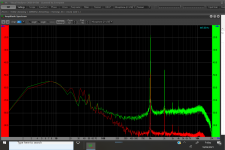
My measures look like this attached now
Attachments
- Home
- Source & Line
- Analogue Source
- DIY linear tonearm