Addressing the spirit of proper negative feedback:
In post #353 you'll notice that I HAVEN'T paralleled R4 with a 5pF cap. I tried it once, but didn't like the sound (too bright, shrill, I think). Anyway, If I were to run a 10k input resistor (which always makes the amp sound dull), perhaps it would sound correct if I were to add the cap across R4. They balance each other out?🙂
In post #353 you'll notice that I HAVEN'T paralleled R4 with a 5pF cap. I tried it once, but didn't like the sound (too bright, shrill, I think). Anyway, If I were to run a 10k input resistor (which always makes the amp sound dull), perhaps it would sound correct if I were to add the cap across R4. They balance each other out?🙂
carpenter said:If I were to run a 10k input resistor (which always makes the amp sound dull), perhaps it would sound correct if I were to add the cap across R4. They balance each other out?🙂
As far as I understand, all about the 5pF is to compensate the
excessive top harmonic frequency phase sfift happening in the
high frequencies - hardly caught by ear antenna, I think.
Right, that 5pF is only doing something up very high, beyond our hearing. Double check your value though, 5pF is not a typical cap. And 5pF is good for N.P.'s circuits where he's using a 47K R... You are bypassing a 440K R?
R4 is now 100k, and I'm running two 10pF in series. I just remember the amp sounding harsh with the addition of the caps. That's why I took them out.
The amp sound unbelievably good in its current configuration. I was just pondering for the sake of learning something new.
Thanks guys.🙂
The amp sound unbelievably good in its current configuration. I was just pondering for the sake of learning something new.
Thanks guys.🙂
This topic is a little off-beat, but I thought I'd throw it out there anyway.
I purchase a neat little 40 watt soldering iron the other day. The label says it's manufactured in China. Anyway, when I was soldering with it today, I noticed that my wrist was occasionally tingling beneath the anti-static wrist strap. I connect my strap to the grounding orifice in the wall outlet. Perhaps this is a no-no, but it's the closest thing to ground that I can think of.
Now, this tingling only happened when I was touching the solder in my hand holding the roll of solder while soldering. It wasn't a jolt, just a tingle, kind of like a nine-volt battery on salty skin.
I decided to measure the voltage coming off the soldering iron, cause surely this must be the voltage source.
Turns out there's 56 volts between the iron and ground! Perhaps, this explains why I've been losing fets along the way--the gate only tolerates 20 volts, I believe.
Question of the day: Is there a technique for attaching a ground to the soldering iron? I'm reluctant to just connect the sheath directly to ground without some form of resistance.
Comments anyone?
I purchase a neat little 40 watt soldering iron the other day. The label says it's manufactured in China. Anyway, when I was soldering with it today, I noticed that my wrist was occasionally tingling beneath the anti-static wrist strap. I connect my strap to the grounding orifice in the wall outlet. Perhaps this is a no-no, but it's the closest thing to ground that I can think of.
Now, this tingling only happened when I was touching the solder in my hand holding the roll of solder while soldering. It wasn't a jolt, just a tingle, kind of like a nine-volt battery on salty skin.
I decided to measure the voltage coming off the soldering iron, cause surely this must be the voltage source.
Turns out there's 56 volts between the iron and ground!
Perhaps, this explains why I've been losing fets along the way--the gate only tolerates 20 volts, I believe.Question of the day: Is there a technique for attaching a ground to the soldering iron? I'm reluctant to just connect the sheath directly to ground without some form of resistance.
Comments anyone?
never use non-grounded iron ; fets are not important,your life is ; that's serious problem ith this iron-leakage through isolation ; just trow it
IMO the soldering iron is defective, you should not have voltage at the tip. The heating resistor or cable is making electrical contact some place.
I would suggest you buy an iron that has a transformer to isolate mains and that the tip can be grounded through a tap someplace on the handle.
John, buy a good temp regulated iron, you do enough work to justify it.
I would suggest you buy an iron that has a transformer to isolate mains and that the tip can be grounded through a tap someplace on the handle.
John, buy a good temp regulated iron, you do enough work to justify it.
Learned something new and wonderful:
Choky turned me on to Apex Jr.--a wonderful diyer's candy store--where I got a great deal on 4.7uF caps. They're a buck a piece and as big as my thumb!
They filled in the lower mids nicely, with absolutely no graininess. The only problem was the lack of sparkle in the upper register. I.e., cymbals, chimes and the like. A friend of mine helped me to acquire 4 Sonicaps rated at 1uF to bypass the Apex Jr. caps. They're a very affordable boutique cap.
What an amazing transformation. All the other caps I originally used made the amp sound a bit bright. I'm hard of hearing, so I didn't mind, but everyone else winced from time to time.
The Sonicaps gave the upper end the perfect blend of dampening and transparency--sort of reminds me of dampening factor in a bass amp. Cymbals have reduced sibilance now. This creates the effect of realism.
The trumpets in Pink Martini's "Hold on little tomato" are so smooth now. This must be that "liquid" quality that the tube guys are always mentioning. I can't get enough. Wow.
You can get the Sonicaps online at Sonic Craft.
Anyway, there you have it. Hope it helps someone's amplifier.
John🙂
I am really interested in your developing the sound.
What a diy passion!
By the way, do you know what the output impedance of your x-over is?
What a diy passion!
By the way, do you know what the output impedance of your x-over is?
Thanks Babowana.
I'm not certain what the output impedance is on the x-over. Maybe I can find it in the unit's literature.
Now, as smooth as those Sonicaps sound, I still need a bit more zip on the very top-end--my high frequency hearing is poor. Across the four input caps, I inserted 0.22uF caps from Russ White's cc ccs x bxls kit and--voila-- there's the highs.🙂 I really must get that preamp constructed.😉 It certainly has some nice pieces.
John, for measureing output impeadance... I think if you load it down with a resistor to the point of 1/2 the unloaded output voltage, that load is approximately your output impeadance
Check out post #211. Does that schematic of my x-over's output offer enough info to tell the output impedance? I was thinking it would be 100k, but then again, I'm just such a newbie at this stuff.
carpenter said:Check out post #211. Does that schematic of my x-over's output offer enough info to tell the output impedance? I was thinking it would be 100k, but then again, I'm just such a newbie at this stuff.
you can count on 300 ohms,approximately (twice 150 in series)
That make a lot more sense than 100k! What was I thinking? Output impedance must be lower than anticipated input impedance of following stage. Jeez...
I began reading my electronics book... after sticking my foot in mouth. There seems to be some rather complex--for me at least--formulas involving loop gain, etc. Boy, this stuff ain't easy.
I began reading my electronics book... after sticking my foot in mouth. There seems to be some rather complex--for me at least--formulas involving loop gain, etc. Boy, this stuff ain't easy.
Zen Mod said:
you can count on 300 ohms,approximately (twice 150 in series)
Following your train of thought, I would have thought that the 150 ohm resistors were in parallel to one another, thus giving 75 ohms out?
carpenter said:
Following your train of thought, I would have thought that the 150 ohm resistors were in parallel to one another, thus giving 75 ohms out?
they are in parallel-when signal on + and - leg (or on xlr,whatever) is in phase........and-that's never .

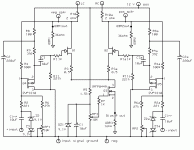
I'm breadboarding the following design: a jfet version of the ZV7-T. It doesn't have the buffers on the breadboard, yet. But the center portion of the schematic is up and running.😀
Stock, right out of the box, there's only 13mV of offset.🙂 🙂 🙂 which is good considering that I have no adjustment device.
Man, this thing sounds great! It's getting that wonderful warm sound. The best part is that I don't have a blow-torch sitting on my work bench. I sandwiched the jfets between a pair of 1.5" x 2" x 4" heatsinks. After 15 minutes, they're barely warm.
I'll adjust the schematics to reflect what my operating voltages are. Right now, I'm anxious to hook up a horn.😎
John
Attachments
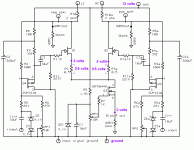
Here's a few voltage readings:
Also, it's worth mentioning, I am using an air core inductor which has 2 ohms per leg.
Looks like I'm going to be purchasing a bunch of Grey Rollin's jfets when I get back to work. You got to love it!
If my math is correct, this is about a four watt amplifier, and perfect for 110db 1w1m horns.🙂
Also, it's worth mentioning, I am using an air core inductor which has 2 ohms per leg.
Looks like I'm going to be purchasing a bunch of Grey Rollin's jfets when I get back to work. You got to love it!
If my math is correct, this is about a four watt amplifier, and perfect for 110db 1w1m horns.🙂
Attachments
- Status
- Not open for further replies.
- Home
- Amplifiers
- Pass Labs
- ZV7-T (transformer)