Hi Jan, You will be delighted with the case. They are made really well and he included the RCAs which are good quality. I saw your case and I think it is the same. I want another one for my goldmund clone I will be working on next.I added the extra caps and moved the rectifier to improve the bass a bit and keep the ac the other side of the heat sink. I replaced the op-amps with burr brown 4562's. Not sure if that made any difference. It sounds very good, but I will be hyping it up and selling on ebay to finance the goldmund project. Regards Barry
uploads
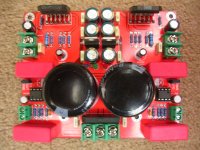
That's a beautiful case and great layout, wiring, workmanship, etc. Is this the $80 EBay case?
Only $48 but $65 postage, so $113 altogether. My Goldmund kit arived today, so I expect yours will be with you soon Linuxguru. Can't beleive the value for money with this one. If I bought these parts in England they would cost hundreds. Well i'm off soldering all day. Regards Barry
I have one of those Yuanjing 3886 Gainclones from ebay. Some things I have noticed from it's component's. On those 10000uF capacitors reads Rubycon USR 105C, but as USR series is 85C only, they seem to be fakes. Also couldn't find Wima MKP4 1.8uF from datasheet, only 1.5uF and 2.2uF, so they are probably also fakes. Makes you wonder if there are more fake parts in it. Haven't try amp yet, as I don't have PSU for it.
I did notice some were fakes so I guess the ic's are also, but it sounds very good. Unfortunatly the real companies are losing revenue and the amp might not last long!
I am using a LM3886 PCB from ALLEPARTS on Ebay. The price is $7.99 for 2 amp boards and a power supply board, including shipping. It is excellent quality. I just use a star ground and connected the ground of the board to the star point. No hum. Silent.
They also offer 2 preassembled amp boards that are preassembled for $30 shipped. That's if you don't want to roll your own. Those boards use the TF package and overall parts quality is very good.
They also offer 2 preassembled amp boards that are preassembled for $30 shipped. That's if you don't want to roll your own. Those boards use the TF package and overall parts quality is very good.
Yes, they are the boards I used on my first gainclone and I was very pleased with the results. Someone told me they used fake parts too but i'm begining to think this is all dreamland as what would be the point in investing all that money to make fakes that sound and behave like the originals. We have to remember that they (the Chinese) can buy these parts in bulk for peanuts. I just assembled my goldmund clone and am just awaiting the power transistors from Farnells to finish.
HI GuYS ,thanks for the thread.Had bought one of these modules before seeing all this ! Havnet tried it yet but i am prempting some issues so order new op amps and quality input caps to see if I can hear difference. I am planning a 3 amp, 3way speaker system which may have two of these in depending on how it sounds.
Hope so!! now I think I may go for 3 of these units.I was going to build a TDa7625 amp for tweeters from the bits of my faulty dvd midi system (it has a nice toroid as well) but by the time Ive added new PSU module I may well of just bought another cheapy add mod it! There are some posts that suggest the gainclone is best served with an op amp!
Maybe i can keep this thread going for anybody using this opamp/3886 unit.
Maybe i can keep this thread going for anybody using this opamp/3886 unit.
I think that many of these super cheap units are assembled using faked components (ie falsely branded) and recycled parts.
There is a huge cottage industry in the developing countries recycling western electrical equipment.
Admirable of course unless it poops itself the second time you switch it on.
Still at these prices you can afford to experiment.
There is a huge cottage industry in the developing countries recycling western electrical equipment.
Admirable of course unless it poops itself the second time you switch it on.
Still at these prices you can afford to experiment.
Only $48 but $65 postage, so $113 altogether. My Goldmund kit arived today, so I expect yours will be with you soon Linuxguru. Can't beleive the value for money with this one. If I bought these parts in England they would cost hundreds. Well i'm off soldering all day. Regards Barry
Link to that Goldmund kit ? Ok found it ... last one ,huh ?
Last edited:
Hi a.wayne, I did have the last one, but maybe he has more now. It's Jim's Audio I think.
There are a lot of people talking about fakes, but my first gainclone was built about 2 years ago and still going strong. The Yuanjing has been running full pelt for a couple of weeks and sounds great. All the parts look real and perform superbly. I hope the goldmund is the same. I tend to think it will be.
There are a lot of people talking about fakes, but my first gainclone was built about 2 years ago and still going strong. The Yuanjing has been running full pelt for a couple of weeks and sounds great. All the parts look real and perform superbly. I hope the goldmund is the same. I tend to think it will be.
Hey Linuxguru ,you seem to be a guy interested in improvements rather than spouting biased opinion ,good on ya mate!
Further to your previous mod suggestions (that applied to pdb version) I have uploaded some photos of the ready built module.It would be great if you could offer similar advice eg ground lift for this amp.Reasons why would be appreciated so we can all learn!
Further to your previous mod suggestions (that applied to pdb version) I have uploaded some photos of the ready built module.It would be great if you could offer similar advice eg ground lift for this amp.Reasons why would be appreciated so we can all learn!
An externally hosted image should be here but it was not working when we last tested it.
An externally hosted image should be here but it was not working when we last tested it.
An externally hosted image should be here but it was not working when we last tested it.
An externally hosted image should be here but it was not working when we last tested it.
Attachments
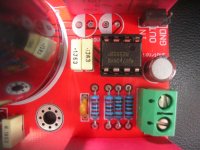
Thanks for the pics - I compared it closely with mine, and they're very similar near the NE5532 socket. The placement and orientation of some components has changed, but the circuit is logically identical.
Here are the mods to the input buffer:
1) Locate the 22k resistor between the non-inv input and ground (this is next to the small RF suppression cap). Disconnect it on the ground side and diagonally bridge it over the adjacent 22k resistor, and connect it to the 10k resistor (exactly as I posted earlier).
2) (optional) Instead of 22k resistors, use 47k for both the input side and the adjacent feedback resistor. That changes the gain of the input stage to 5.7 from 3.2, which I found more useful for certain signal sources, including portable MP3 players and the like.
3) The orientation of the 10uF DC-blocking cap on the NFB side has changed - this is probably what led to the confusion (it has been rotated by 90 degrees). Remove the cap, and replace it with a 10 ohm, 1W resistor (metal oxide or whatever may be lying around - the value isn't critical, anywhere from 2.2 to 22 ohms should work. Try to use the same value for both channels).
Here is the critical part: This ground-lift resistor is mounted vertically. One lead is going to be bent over, and the resistor will fit into the same footprint as the cap that was removed. ** This bent (exposed) lead will face the input connector on your board **. That is, the exposed lead will connect to the trace that leads to the 10k resistor in the feedback network.
The exposed lead is the lifted ground, and both the input resistor from the non-inv input, as well as the 10k resistor from the inv input of the the op-amp are grounded at this net. Check your soldering carefully when this done.
4) The shielded ground of the shielded cable from RCA input socket (at the cabinet) is removed from the ground of the (adjacent) input connector and attached (soldered) to the exposed lead of the 10 ohm ground-loop breaker (lifted ground).
(This is a kludge, but it can't be helped. There's no way to route the newly-created lifted-ground to the adjacent input connector - the ground on the input connector is connected to the ground plane on both sides of the PCB. Maybe you could remove the input connector and painstakingly separate the ground pad from the ground plane with an Exacto knife on *both* sides of the PCB, and then put a small jumper between the lifted-ground and the ground pad on the input connector. I'll leave that to you - it's messy because of a large copper area between the pad and the ground plane on the solder side.)
That should do it - check and re-check all joints carefully for shorts and continuity before powering on.
Be carefull as these boards do vary, attempted the linuxguru mods (post #34) resulting in a horrendous screeching hum and one knackered speaker!(Boards are cheap ................................speakers expensive!)Thanks for the pics - I compared it closely with mine, and they're very similar near the NE5532 socket. The placement and orientation of some components has changed, but the circuit is logically identical.
Here are the mods to the input buffer:
Have now bypassed the 5532 totally and soldered some GENUINE Wima's and output is pretty good!
Rgds BITF
Great thanks linixguru (especially since you've had to repeat yourself!).I will have a go at that in a couple of days.Its odd time for me to get into this as ironically im recovering had ear surgery to restore partial hearing loss! I have order some new input caps and opamps to try so want to keep that section.
Also linuxguru which is best to use volume pot on the jumpers or on line level signal and what values would you recommend.Ultimately im aiming to build 3 way active crossover setup.WOuld the op amp area be necessary then on this board? Ive also put my name down for the REvC group buy and hope to use on the the amost important midrange.
Also linuxguru which is best to use volume pot on the jumpers or on line level signal and what values would you recommend.Ultimately im aiming to build 3 way active crossover setup.WOuld the op amp area be necessary then on this board? Ive also put my name down for the REvC group buy and hope to use on the the amost important midrange.
Also the second (fake)wima.is this treated as a second input cap so should be upgraded or does it have another function?
.
Also linuxguru which is best to use volume pot on the jumpers or on line level signal and what values would you recommend.Ultimately im aiming to build 3 way active crossover setup.WOuld the op amp area be necessary then on this board?
I used it on the jumpers, and it worked ok with a 100k dual gang pot. You might want to try a 47k or similar to reduce noise. You can bypass the op-amp completely if you've got sufficient signal level at the input. Regarding the (possibly fake) Wimas, they're probably worth upgrading - I've tried Siemens MKL and Pilkor MKP X2 caps at this location, and they work well. Various other choices are possible here - Bennic, Auricap, etc.
Hi Linuxguru, Have you received your Goldmund yet. When you get it can you answer my questions I emailed to you. I would be very grateful. Especialy the extra caps. I have been swapping the op-amps in the Yuanjing and have decidied I can just make out a better case for the burr brown's 4562. I tried about 5 different types but by time I could get to hear the results I had forgoten what the last one sounded like so there can be little difference. I would be interested in what anyone else finds. I haven't tried singles on dogs. There might not be room!
- Status
- Not open for further replies.
- Home
- Amplifiers
- Chip Amps
- "Yuanjing" Gainclone 3886 - eBay amazing value ?