Something I have been meaning to do, put down in words and pictures how to work with surface mount components. This is a technique I developed years ago when SMD first appeared and we hadn't the luxury of re-work stations etc.
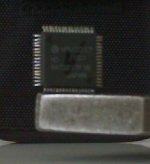
These pictures show how to remove a "postage stamp" I/C. Timewise it would take me around 6 or 7 minutes to remove.
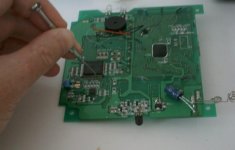
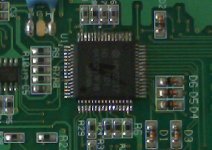
First picture shows the tools used. Nothing special, just a good iron and braid and a jewellers screwdriver that fit well between the legs of the IC.
These pictures show how to remove a "postage stamp" I/C. Timewise it would take me around 6 or 7 minutes to remove.
First picture shows the tools used. Nothing special, just a good iron and braid and a jewellers screwdriver that fit well between the legs of the IC.
Attachments

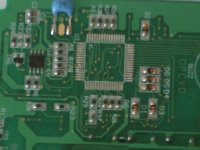
This shows how to apply the braid. Use a hot iron, I used a large tip as you will see, and don't be afraid to even "apply" a little fresh solder to help it wick up into the braid. You will never "unsolder" the legs this way, just quickly remove excess solder.
Attachments

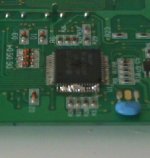
Using the jewellers screwdriver. Carefully ( I fitted a smaller tip in the iron for this) heat the print directly in front of the first leg and at the same time with the driver between this leg and the adjoining lever gently to "break" the bond. Do this for all the legs-- takes minutes thats all.
Attachments
Job done. Remember this was a re used IC and the pins were not perfectly straight. In reality it looks pretty good, and a new part should be virtually idestinguisable from a factory fit.
So if you are wondering how to get that OpAmp out. Now you know 🙂
I should add that a lot of parts are glued as well. No problem. Just be 100% sure ALL the legs are free and either prise off or "grip" with pliers and twist.
So if you are wondering how to get that OpAmp out. Now you know 🙂
I should add that a lot of parts are glued as well. No problem. Just be 100% sure ALL the legs are free and either prise off or "grip" with pliers and twist.
Attachments
🙂 Nobody ever wondered how to work on SMD without the proper gear.
Actually I had nearly forgotten about this thread so thought I would bump it back so it doesn't fall off the end of the world. It was either that or go for the most number of views without a reponse 😀
Actually I had nearly forgotten about this thread so thought I would bump it back so it doesn't fall off the end of the world. It was either that or go for the most number of views without a reponse 😀
Thanks for sharing.
Removing SMT devices is certainly a challenge.
Other techniques that have worked for me is the use of a hot air gun instead of a solder tip. The risk of damage is lower. The problem is that you can blow off a small chip cap if one is not careful!!
The components are becoming smaller and smaller, and my vision keeps getting worse and worse.
Hi Fernando,
I think a lot comes down to what you are most comfortable with, and what works for you. Never tried the hot air gun.
I remember whan we got the new PACE rework station, and all the attachments 😀 😀 Never seen so many ruined PCB's. Guy's would heat an I/C with the special bit's fitting all round the chip ( you could smell the board frying ) then "twist and hope" usually with all the print coming off. Horrendous.
The worst thing I find is plated through via's.
All good fun 🙂
2 things I do.
I solder the 4 corner pins first and check all pins are aligned correctly before proceeding.
I always clean the board after soldering.
My eyesights going as well so I invested in a couple of high power magnifying glasses to check between the legs for solder threads.
Andy
I solder the 4 corner pins first and check all pins are aligned correctly before proceeding.
I always clean the board after soldering.
My eyesights going as well so I invested in a couple of high power magnifying glasses to check between the legs for solder threads.
Andy
It is difficult to remove SMT with an iron. Parts tend to become the sacrificial sort, not to mention the PCB too. 
I'd like to try the hot air method myself. Looks good from the YouTube videos. 😀
I really liked the JBC Tools equipment, but the cost is well beyond my budget. I'll just have to keep eyeing the Aoyue units from China. Other members have indicated they aren't bad. Especially when $300 USD or slightly less gets you a full rework station. 😉
Tagging the corners first is sound advice. It's tough luck if you change a 200 legged part and find it's 90 degrees out. It has been known 

Sure is. I think all engieers are a bit mad really. When that happened we either stood the board up and whacked it with a golf club, or connected it to 240 VAC and switched on from round the corner. Which never failed to remove the part 😀

😀 😀 We have done far worse than that. Like the Philips video in the sink playing with the water rising. That was good. And you wouldn't believe what you can do with a PL509 some araldite and a variac. Or sucking water up into a CRT with the "pip" just cracked.
Definitely bonkers.
Definitely bonkers.
NanoFrog said:It is difficult to remove SMT with an iron. Parts tend to become the sacrificial sort, not to mention the PCB too.
I'd like to try the hot air method myself. Looks good from the YouTube videos. 😀
I really liked the JBC Tools equipment, but the cost is well beyond my budget. I'll just have to keep eyeing the Aoyue units from China. Other members have indicated they aren't bad. Especially when $300 USD or slightly less gets you a full rework station. 😉
I just got a budget smt solder station, for less money than that. I gave it a mini review on my website. It's the Kada 852D and although it has some flaws, it appears to do its job...
- Home
- Design & Build
- Parts
- Working with SMD. How to do it without specialised tools.