Originally, I was thinking I would still have 2 screws from the baffle to the wall between every driver so the wave shape would be that much less of an issue. These braces would just be interspersed (perhaps like you say). But maybe I don't need so many screws... I could use these every 2 or 3 drivers for a total of 11 or every 3 or 4 drivers for a total of 7. 7 should be enough across 28 drivers I think. And it reduces the impact to interior volume comparatively.
The picture makes it clearer, for some reason I was thinking you meant smaller pieces on the edges rather than a brace with a driver cutout.
Another thing to consider with the number of fasteners is how well you can seal the baffle to the wall junction. As you will have no separate enclosure, without enough fasteners you could end up with leaks.
Another thing to consider with the number of fasteners is how well you can seal the baffle to the wall junction. As you will have no separate enclosure, without enough fasteners you could end up with leaks.
Yes, that was the previous post to the brace idea. The thinking there was that instead of a full brace, it would just be a tube with a 45 angle cut at one end to mate up with the wall opposite the baffle. And there would be one for each of the 54 screws that would pull the baffle into the corner. But I think the full brace with driver cutout makes much more sense since it would actually support the baffle better so it will be stiffer, it reduces the risk of standing waves inside, and it reduces the number of holes I need to drill through the baffle.
I'm not sure that the braces will mean that you need less screws through your baffle. You need to find some way to seal tight the baffle edge to the wall junction. If your wall is using gypsum board there will be some flex in it and local pressure from more screw points is usually the best way to overcome it.
If you can screw straight into a stud it would probably be better but most stud timber isn't that straight either!
If you can screw straight into a stud it would probably be better but most stud timber isn't that straight either!
There will also be neoprene at the edge to help with the seal and isolation to some degree. And the drywall in this area of the house is layered against a plywood shear wall so it won't flex as much. Even if I go every three or four drivers (or every 9-12 inches), two screws pulling hard against the wall a couple inches away from the edge should be more than enough to keep the seal. The screws will be going through 3/4" plywood (and maybe also a stud in addition to drywall).
There will also be neoprene at the edge to help with the seal and isolation to some degree. And the drywall in this area of the house is layered against a plywood shear wall so it won't flex as much. Even if I go every three or four drivers (or every 9-12 inches), two screws pulling hard against the wall a couple inches away from the edge should be more than enough to keep the seal. The screws will be going through 3/4" plywood (and maybe also a stud in addition to drywall).
Let the final impedance plots tell you the story. You can get a lot of info out of those.
Use whatever you think is best. For me I would want a screw each side at least every two drivers to ensure a good seal. It is a lot easier to drill a few holes while the baffle is on the bench being made. Trying to add them in after because your impedance measurement showed you had a leak?
Ok, here's another idea on the design.
Instead of the braces with the driver cutouts, I'm thinking about having furring strips that would support the baffle along the entire length of the baffle. These strips would be 45 degree triangle cross section and would screw to the walls. The baffle would in turn screw into the furring strip. The overlap with the baffle would be ~ 2.5" and obviously would run the full height of the baffle. I would have butyl between the baffle and the strip for constrained layer damping.
This is a pretty simple design. Positives are that it's easy to make and install, guarantees the seal, stiffens the baffle, and there's the CLD effect. I still plan on using the MLV probably screwed to the drywall behind the baffle.
Downside is that it reduces the interior volume. But eliminating the braces makes up for some of it. Not sure if I should use just a little butyl rope between the baffle and the furring strip or maybe a 2" strip?
Thoughts?
Last edited:
A side question... does anyone have any recommendations for how to screw into concrete? I have a small section of foundation in one corner that I will need to screw the furring strip to. Probably just a few of these would do the trick?

A side question... does anyone have any recommendations for how to screw into concrete? I have a small section of foundation in one corner that I will need to screw the furring strip to. Probably just a few of these would do the trick?
Ramset Australia
These are popular for anchoring firearm safes in Australia. It is an expanding sleeve anchor.
The other way is to use a threaded rod in a chemical adhesive with a nut and washer to hold down, like used in starter bars and steel framing.
Ramset Australia
Definitely overkill, even a wall plug and a standard screw would work depending on the strain being placed on it.
Yah, I might even just try to use what I have on hand. I only need one or two screws toward the bottom to cover about 6 inches where it overlaps the foundation. So hammer drilling a hole for a couple wall plugs might be just fine to your point.
all my house is made of concrete Need to survive earthquakes and hurricanes!). So, I've got to deal with this all the time.
For small jobs, we use these plastic anchors that are sturdier than regular wood anchors (the white one on the bottom right:
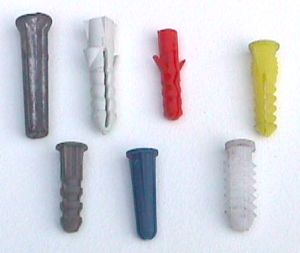
For half way there jobs, steel screws offer a better hold:
For stronger hold, we have various sizes of concrete anchor bolts, like these:

For small jobs, we use these plastic anchors that are sturdier than regular wood anchors (the white one on the bottom right:
For half way there jobs, steel screws offer a better hold:
An externally hosted image should be here but it was not working when we last tested it.
For stronger hold, we have various sizes of concrete anchor bolts, like these:
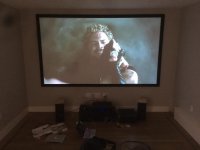
I love projectors... I wouldn't go back to TVs anymore.
I hope you have some sound absorbing panels planned for those parallel walls.
I hope you have some sound absorbing panels planned for those parallel walls.
Indeed. The room is super lively right now. Planning on three ~2'x4' canvas photo covered panels on the left wall. And a big set of drapes covering the French doors on the right.
Any suggestions for drape material or suppliers?
Any suggestions for drape material or suppliers?
Yep, those canvas photo like wesayso did are a great idea.
For drape, the heavier, the better.
Dedicated cloth stores that sells from rolls are great, but you might even get lucky going to HomeDepot or even Wallmart!
For drape, the heavier, the better.
Dedicated cloth stores that sells from rolls are great, but you might even get lucky going to HomeDepot or even Wallmart!
I bought way to much MVL for my speakers. What if I just hung what's left over in strips in front of the french door? I wouldn't be allowed to keep it there all the time... but for when I go into theater mode or critical listening mode, I could just take it out from a closet and hang it over a mini french cleat or something I can hide over the trim.
- Home
- Loudspeakers
- Full Range
- "Wall-integrated" corner loaded line array with Vifa TC9 drivers