Peter,
i have to say this.
Watching your photo sessions is more interesting than
watching Tool Time. Do you wear flanell shirts all the time
and your stage name is "Al" ? 🙂
Wombat
i have to say this.
Watching your photo sessions is more interesting than
watching Tool Time. Do you wear flanell shirts all the time
and your stage name is "Al" ? 🙂
Wombat
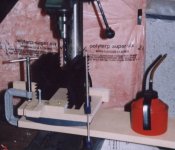
This was how I prepared the first of the 12 heatsinks, marked and centre punched TO-3 holes, use wood blocks to make a jag.
Line up the first hole with the drill bit then clamp down the jag securely, drill this hole for all 12 heatsinks first, then proceed to line up the second hole and repeat drilling, but if the hole is not line up properly or the jag moved then all 12 heatsinks would be spoiled. Any better suggestions for future projects?
Line up the first hole with the drill bit then clamp down the jag securely, drill this hole for all 12 heatsinks first, then proceed to line up the second hole and repeat drilling, but if the hole is not line up properly or the jag moved then all 12 heatsinks would be spoiled. Any better suggestions for future projects?
Attachments
Member
Joined 2002
Member
Joined 2002
Jason,
That was the picture I took while I was making the JLH amps. The amps are completed now. This is just to get more ideas for future projects and prepare myself better. One day may be I can do some DIY products as good looking as Peter's products, who knows.
That was the picture I took while I was making the JLH amps. The amps are completed now. This is just to get more ideas for future projects and prepare myself better. One day may be I can do some DIY products as good looking as Peter's products, who knows.
Member
Joined 2002
I did post a couple of pictures in the JLH class A thread within solid state. Sorry that I do not know how to include thread's link here.
SOMETHING ELSE.
Peter,
If ever you lack inspiration,
Ain't that something?
Ciao,😀
Peter,
If ever you lack inspiration,
An externally hosted image should be here but it was not working when we last tested it.
Ain't that something?
Ciao,😀
nice job!
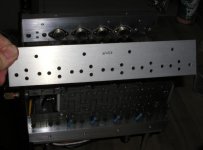
...so the router does work, and I notice you didn't even use a metal cutter, just the standard router bit. With the thin material, it looks like the cutter didn't get too hot, as I don't see any sign of smearing. Did you 'climb' mill that, or just cut in whatever direction? Also, did you adjust the speed or use cutting fluid at all? Or did you just let er rip at full speed? 😎
How would you feel about using the same technique on 1/8" or 1/4" material...
whoa, this thread is growing fast!
nice job to you too, fdegrove!
Chris ma:
I use something called a centre drill to start holes. It's a common tool used for lathe work and the like. Basically, it's a short, stubby drill without flutes cut all the way up the shaft, so it's very rigid, and doesn't wander if you have your work clamped and the drill press isn't sloppy in tolerance. The tip is shaped like a countersink drill, and then there's a very small (maybe 3/32") tip which is just like a regular 3/32" or so drill bit.... I'll have to take a picture so you can see what I'm talking about, but if you start holes with this, and then switch to the fill size drill, they'll always be exactly where you want them, and they'll drill true and round. Let me take a pic, and I'll post in a few minutes.
Member
Joined 2002
i have some thing close to that to use my product i open the door and put my plate of food into it and turn it on to time 3:00 some times the time varrys.
now if i put a plate of food onto that one will the plate touch the caps.. LMAO just kiddin
what kinda caps are those. they look like they came froma micfrowave oven..
now if i put a plate of food onto that one will the plate touch the caps.. LMAO just kiddin
what kinda caps are those. they look like they came froma micfrowave oven..
Member
Joined 2002

Re: nice job!
I had to 'climb' mill that, otherwise it was pulling the piece. The cutter didn't get hot at all and I didn't use any fluid. I don't like those fluids because they are so messy. The speed was intermediate. I think I could use the same technique on 1/8" thickness, not so sure about 1/4".😉
hifiZen said:...so the router does work, and I notice you didn't even use a metal cutter, just the standard router bit. With the thin material, it looks like the cutter didn't get too hot, as I don't see any sign of smearing. Did you 'climb' mill that, or just cut in whatever direction? Also, did you adjust the speed or use cutting fluid at all? Or did you just let er rip at full speed? 😎
How would you feel about using the same technique on 1/8" or 1/4" material...
I had to 'climb' mill that, otherwise it was pulling the piece. The cutter didn't get hot at all and I didn't use any fluid. I don't like those fluids because they are so messy. The speed was intermediate. I think I could use the same technique on 1/8" thickness, not so sure about 1/4".😉
Member
Joined 2002
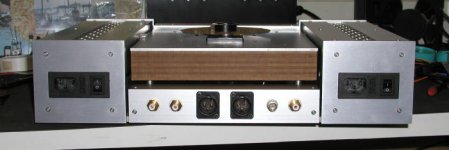
opps for got to mention them xlrs are only temporary but im stull using xlrs for my psu.. and NO i wont get them mixed up when my alephs are done.. ill make sure i dont hehe 80 volts to my alephs inputs will kill them hehe..
j.
j.
Re: SOMETHING ELSE.
I got all the inspiration I can handle.😉
fdegrove said:Peter,
If ever you lack inspiration,
I got all the inspiration I can handle.😉
Attachments
Off subject, sorry folks
Peter,
What power cord you have in mind for your nice CD-pro? I was in Brack today the sales rep show me a Cardas power cable for A/B test, it really may a big difference.
Peter,
What power cord you have in mind for your nice CD-pro? I was in Brack today the sales rep show me a Cardas power cable for A/B test, it really may a big difference.
I noticed too that power cords make difference. How much was the Cardas? I do my own cords from speaker cable ( I believe it's Audioquest type 4, I have some old stock). Incidentally power cord made big difference in a DAC, however in a transport, not that much. But the supply in a transport has CLCLCRCRC filtering, the one in DAC doesn't.
- Status
- Not open for further replies.
- Home
- Design & Build
- Equipment & Tools
- Useful tools and techniques