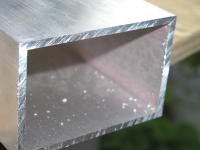
More metal cutting
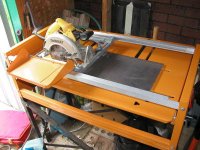
For anything that doesn't fit my mitre saw I'm using that setup. I bought that table long time ago at Canadian Tire and although desined for wood cutting it works great with metals. I'm using 7.5" circular saw which can slide above the table. I clamp aluminum pieces to the table. I was cutting 1" thick aluminum pieces as well as 2" thick heat sinks without a problem. When a piece is thicker I do two or three runs to complete the cut. Don't forget about the safety glasses.😎
For anything that doesn't fit my mitre saw I'm using that setup. I bought that table long time ago at Canadian Tire and although desined for wood cutting it works great with metals. I'm using 7.5" circular saw which can slide above the table. I clamp aluminum pieces to the table. I was cutting 1" thick aluminum pieces as well as 2" thick heat sinks without a problem. When a piece is thicker I do two or three runs to complete the cut. Don't forget about the safety glasses.😎
Attachments
Flux
All,
recently fell i love with using flux. For desoldering and butchering. It did never appeal to me that i have to add solder to a solder joint i want to clean from solder. Just to ensure thermic contact and to add flux.
So i bought a can of non-halogenic flux. I apply just a few drops on any SJ i want to open and desolder, mostly using a conductive Soldapullt DS017LS desolder pump (this very model !!!) or solder wick. And flux. Works better than using solder.
Solder dispenser: i like the Weller ones, leave the hands free and the mouth, too (i can hold a torch between my teeth if needed). Nevertheless have to try out said solder dispenser. Thanx, HPotter!
Cleaning the iron: i have a ceramic stand with a small bathtub and some disc-shaped silicone sponges mounted over the tub in vertical orientation. The sponges are kept wet by water in the tub and the iron tip is moved between the sponge discs and cleaned thoroughly.
Cutting Blade
Thanks guys for the flux advise.
HPotter,
Don't you have to worry about the heat that might get generated on the saw blade when cutting/drilling metal. When I was a little kid I saw my father at his work place that he used some milky white liquid dripping onto the stock metal and the cutter blade, what do you call those very very hard pointing bar that scrap the metal away thin layer by thin layer. I recall he said the milky liquid is for cooling. Those machine were big though he said the motor on it was like 5 HP and the thing is like 10 feet long. The key he used to turn the jaw clamp was like the size of the cross bar to change flat tires.
Chris
I'm not worried about heat because my average cut doesn't last longer than 10 seconds.
Regarding flux, it is also helpful in removing excess solder your joint might contain. After flux "tratment" only the minimum amount of solder is left and the joint looks "professional".😉
Regarding flux, it is also helpful in removing excess solder your joint might contain. After flux "tratment" only the minimum amount of solder is left and the joint looks "professional".😉
Cutting emulsion
Chris,
you ask about that milky fluid. It is cutting emulsion, a mixture form a special oil and water, ratio 1:5 to 1:15. It is meant for cooling and greasing the cutting tool as well as for preventing the cooling agent making the machine's metal corrode.
The cutting edges you adress are bars made from sintered tungsten carbide, then brazed into place and finally ground to shape. The edge shape for wood cutting purposes is considerably different to shapes for metal cutting. Metal cutting blades usually have alternating shapes, every one roof-shaped and every other rectangular.
Also the type of tungsten carbide is a different one for wood and for metal, due to different requirements for stiffness and brittleness/elasticity
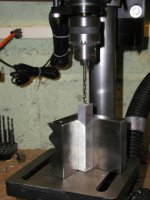
Here is a simple way to drill straight holes at the end of a rod or similar part. No vice needed and if you lubricate the drill bit you don't even have to clamp the part to the block but simply hold it with your hand. I'm using stainless still block but you can easily make it out of wood. That's what I call simple, fast and precise.😉
Attachments
There was a question how to cut square holes for AC jack and switch. I found the switch that has the same width as AC jack and I put it directly above the jack so I have to open just one square hole. Since most of my panels are usually 1/4" doing it by hand would be pretty hard. I used many different methods before, but found out that those 2 tools are most handy for the job. To start the hole I drill 1/4" holes in ea. corner of the square. Final trim is done by hand and a file.
Attachments
Was at Home Depot last weekend and noticed this circle cutter in the tool section...
Seems to me that this would be very good for loudspeaker baffles...
I've already got the Rotozip so I'll try the attachment and report back... I can vouch for the Rotozip - very handy to have around for all sorts of stuff...
Rotozip $60
http://www.rotozip.com/whatis.phtml
Circle Cutter 2 (the larger one - range 1" - 20") $24
http://www.rotozip.com/attachments/circlecutters.phtml
If anyone cuts their baffles (or anything else) with the circle cutter, I'd be interested in knowing how it works before buying one...
Thx,
Steve
Attachments
HPotter
What are the numbers of teeth on your non-ferrous blades? The compound blade looks to be made by Freud; how pleased are you with their blades for this purpose? Would you buy another?
How smooth are the cuts using this method?
This method looks far easier and faster than my bandsaw... Why didn't I think of this!!!! 😀
Thx,
Steve
One of my best tools is an alligator clip on the negative lead of my multimeter.
This allows connection to system ground, and easy one handed relative measurements.
If I need to measure a single component, I clip the alligator clip to a thin long screwdriver and this provides the second probe.
I've used this for 20 years, and find it much better than two probes.
Regards, Eric.
This allows connection to system ground, and easy one handed relative measurements.
If I need to measure a single component, I clip the alligator clip to a thin long screwdriver and this provides the second probe.
I've used this for 20 years, and find it much better than two probes.
Regards, Eric.
Speaking of multimeter measuring, I have sharpen my positive test lead so that it's as sharp as a needle so that I can be sure that I have a good contact on the test point.
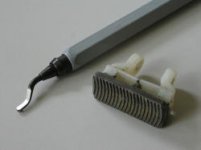
Deburring tools
I present here my two favourite deburring tools. One on the left is pretty easy obtainable from Home Depot and I use it on larger holes. The one on the right is made out of a Vixen file. I cut a piece from a file and glued a handle. This is the best tool for deburring. You can use it on holes in aluminum, after drilling PCBs, on sheet metal edges etc. I've been using it for last 10 years.
I also provide a link to a best supplier of aircraft sheetmetal tools (both new and used). They have monthly catalog with good specials: http://www.yardstore.com
Attachments
Jasper circle cutting jig
The Jasper Circle Cutting Jig by Jasper Audio is probably the coolest tool I've ever used. You can screw the jig to the bottom of a plunge router, stick a pin in the hole representing the right diameter for the circle and move the router around in a circle. It's easy AND fun!
The Jasper Circle Cutting Jig by Jasper Audio is probably the coolest tool I've ever used. You can screw the jig to the bottom of a plunge router, stick a pin in the hole representing the right diameter for the circle and move the router around in a circle. It's easy AND fun!
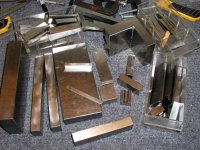
Apart from using clamps for aligning metal pieces I find those stainless steel bars very handy. I don't know where one might find them, I got them from my friend who works as a tool and die maker. The small ones are good for setting spacing between parts. Some of them are also good for achieving proper angles.
Quote from another thread ....
_________________________________________________
I cut thick aluminum with a mitre saw, see [url
http://www.diyaudio.com/forums/show...15&pagenumber=2[/url]
I don't use a brake, whenever needed I use angles (usually from Home Depot). As to aligning, I
always drill holes in one piece and then clamp it to the other piece and drill through. Usually drill
the thicker part first. Although I use clecos at work, somehow I never felt the need to use them
when doing my chassis. Probably because I use screws for fasteners and not rivets. However, you
can try to use clecos and the best place to look for them is http://www.yardstore.com/.
So for me, clamps work the best and although I have quite a few of them my favourite are
probably Quick-Grip brand from Home Depot.
_________________________________________________
I'm glad to hear that for aligning, you also drill one piece first and then then clamp it and then drill through to the other piece. It's so time consuming but so far, I have been quite successful in almost getting it to line up properly.
By the way, which one in the picture is Quick Grip (say, counting clockwise)? I have been using a 3" grip with a strong spring in the middle from Home Depot.
Oh, the bars ... those are good suggestions! Thanks!
_________________________________________________
I cut thick aluminum with a mitre saw, see [url
http://www.diyaudio.com/forums/show...15&pagenumber=2[/url]
I don't use a brake, whenever needed I use angles (usually from Home Depot). As to aligning, I
always drill holes in one piece and then clamp it to the other piece and drill through. Usually drill
the thicker part first. Although I use clecos at work, somehow I never felt the need to use them
when doing my chassis. Probably because I use screws for fasteners and not rivets. However, you
can try to use clecos and the best place to look for them is http://www.yardstore.com/.
So for me, clamps work the best and although I have quite a few of them my favourite are
probably Quick-Grip brand from Home Depot.
_________________________________________________
I'm glad to hear that for aligning, you also drill one piece first and then then clamp it and then drill through to the other piece. It's so time consuming but so far, I have been quite successful in almost getting it to line up properly.
By the way, which one in the picture is Quick Grip (say, counting clockwise)? I have been using a 3" grip with a strong spring in the middle from Home Depot.
Oh, the bars ... those are good suggestions! Thanks!
It is time consuming but I found it to be the best way to make it accurate. Quick Grip is the biggest one with yellow jaws. Beside it, is the smaller one which looks similar in type. It also says "Quick-Grip" on a body (always read small print)😉
- Status
- Not open for further replies.
- Home
- Design & Build
- Equipment & Tools
- Useful tools and techniques