Hi Eric,
Thanks for the earlier info. I want to know when you mean adding the bypass E capacitors, you are actually SOLDERING another cap in parallel with the existing one? Forgive my ignorance on this one.
Thanks for the earlier info. I want to know when you mean adding the bypass E capacitors, you are actually SOLDERING another cap in parallel with the existing one? Forgive my ignorance on this one.
Saffier and Eric,
I noticed in your pics that you might have used BG that were not STD grade, rather NX...I would like to know if we can still squeeze more sonic/picture improvement by using higher grade caps.
I am just being greedy here.
😀
I noticed in your pics that you might have used BG that were not STD grade, rather NX...I would like to know if we can still squeeze more sonic/picture improvement by using higher grade caps.
I am just being greedy here.
😀
Hi all,
partly because of my reading of this thread I'm a proud owner of the DVD 963 sincre a few weeks. I'm using it as CD drive and upsampler for my professional DAC. As you discussed some postings earlier, the clock of the player seems not to be that good. My DAC has a wordclock and superclock output on TTL level (specified Jitter <50 ps rms). Is it possible and would it improve things, if I feed the DAC clock directly to the upsampler chip?
Regards
reins
More improvement
Hi Dewdrop,
I think you could try, but I think it will have more sonic improvement when you improve the PSU, the SMPS and the additional linear analog SPU.
I will be testing a slipstream carbon Bybee purifier in two weeks, I will report on this forum what the sonic improvement is.
An Audio Consulting PSU filter will be the next project, just to see what additional sonics can be squeezed from this machine.
Did you already dampen the casework? Did you already load the improved servo software?
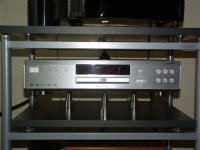
What about the new supports, see picture:
Regards,
Saffier
Hi Dewdrop,
I think you could try, but I think it will have more sonic improvement when you improve the PSU, the SMPS and the additional linear analog SPU.
I will be testing a slipstream carbon Bybee purifier in two weeks, I will report on this forum what the sonic improvement is.
An Audio Consulting PSU filter will be the next project, just to see what additional sonics can be squeezed from this machine.
Did you already dampen the casework? Did you already load the improved servo software?
What about the new supports, see picture:
Regards,
Saffier
Attachments
Hi Saffier,
I will do just that: get better grade of BG to try out, of course, I wouldn't be able to tell that this is better unless I have another 963SA set to compare. Oh well...
What and where did you use as damping material?
Also, what is the servo software that you are referring to? A standard one from Philips?
servo upgrade
Hi Dewdrop,
You can download a new firmware software with upgraded servo software at:
http://philips.ianc.net/downloads.shtml
I used adhesive lead bitumen, see pictures I posted. I covered the inside of the lid and on various other parts of the casework.
Regards,
Saffier
Hi Dewdrop,
You can download a new firmware software with upgraded servo software at:
http://philips.ianc.net/downloads.shtml
I used adhesive lead bitumen, see pictures I posted. I covered the inside of the lid and on various other parts of the casework.
Regards,
Saffier
Is it possible the firmware software upgrade to affect somehow the region free settings of the player or something else? I want to be sure before trying.
Thanks
Thanks
Analog powersupply
Who has done the PSU upgrade yet? I know Eric did. He did a great job. I just want to know other people's findings on this upgrade.
I have the PSU already soldered together, just waiting for the relais to arrive.
Some interesting news to come on:
www.tentlabs.com
regards,
Saffier
Who has done the PSU upgrade yet? I know Eric did. He did a great job. I just want to know other people's findings on this upgrade.
I have the PSU already soldered together, just waiting for the relais to arrive.
Some interesting news to come on:
www.tentlabs.com
regards,
Saffier
Eganz or anyone who has done the Analog Power Supply upgrade:eganz said:
The new +8V and GND were wired onto the bottom of the board at the op amps, and to the bypass capacitors. The new -8V was wired to cap #2445.
I was fine up to here. Before this Eganz suggested wiring to where the regulator [#7601] was.
I would be much appreciative if someone could detail exactly where to wire the +8V and GND to. Also, does the -8V get wired to the negative side of cap #2445?
Many thanks. I've already done the cap upgrades and it certainly has upgraded the sound.
I've also thought that since I leave the unit on all the time I really don't need the the relay. Am I right? What happens if you don't have the relay and turn the unit off?
Thanks,
Mel
Analog powersupply connections
Hi Mel,
I've not implemented the analog supply yet, but I have the electrical diagrams.
If you wire the -8V to cap. 2445 (on the negative side indeed), than you have wired only the left front speaker output. You should also wire it to cap. 2442 (on the negative side) for the right front speaker output.
If you can wire the negative 8V to the caps. why not connect also the positive an ground to the caps.
For the left output you should connect to the positive side of cap 2444, ground to the negative side.
For the right output you should connect to the positive side of cap 2443, ground to the negative side.
If you want to connect to the opams direct, use pin 4 for the negative supply and pin 8 for the positive supply.
See also link to datasheet: http://www.analog.com/UploadedFiles/Data_Sheets/111312881AD8022_a.pdf
Opamps are:
#7403 left output
#7404 right output
But ERIC CORRECT ME IF I'M WRONG, thanks.
Saffier
Hi Eric or anyone-who-knows-this,
I think I read somewhere that the front LR channels has a fabulous OP AMP in its signal path and not for the stereo channels.
All this mod that Eric has done so far, is this for the 5-channel playback or the stereo channels?
Thanks!
I think I read somewhere that the front LR channels has a fabulous OP AMP in its signal path and not for the stereo channels.
All this mod that Eric has done so far, is this for the 5-channel playback or the stereo channels?
Thanks!
Has anyone changed the clock in their 963´s? According to the site http://www.effectiveaudiomod.com/ and some threads on avsforums it should be a noticable difference.
Reduced drive noise
Hi,
I had some problems with big vibrations when playing track 1 or 2 on some CDs. The vibrations came from the laser unit in the drive. So I dampend the carrier of the laser unit and the suspension between the carrier an the chassis with in Germany called "plastic-fermit". This is a permanent elasic material like dough the children play with. But it stays elastic. This material is often used by plumbers. With enough dampening there aren't any vibrations anymore. A really nice side effect is that the dirve noise is much lower than before, also the ticking noise.
I had also the feeling that the soundstage is more stable and wider/deeper than before but that isn't a thing I'm sure of.
Best regards
stephanr
Sofia
I do not think so, is this software originally published by Philips? If yes and your player has warranty yet, if any troubles occur, the warranty service will be free for you.
But hardware upgrades has more to do with the sound quality.
Personally I found this player some kind of heat generator, especially the PSU. If I had such, Firstly I would do a linear PSU //there is enough space for that// and shange some opamps in the main output signal's path.
Regards
Hi, Asen,Asen said:Is it possible the firmware software upgrade to affect somehow the region free settings of the player or something else? I want to be sure before trying.
Thanks
I do not think so, is this software originally published by Philips? If yes and your player has warranty yet, if any troubles occur, the warranty service will be free for you.
But hardware upgrades has more to do with the sound quality.
Personally I found this player some kind of heat generator, especially the PSU. If I had such, Firstly I would do a linear PSU //there is enough space for that// and shange some opamps in the main output signal's path.
Regards
Hi ...
Is there any one who can send me shematic for 963...I've got one and would like to upgrade it ...
Thanks
Josip
Is there any one who can send me shematic for 963...I've got one and would like to upgrade it ...
Thanks
Josip
stephanr,
Can you post photos showing your damping?
I have done some chassis damping, but it did not fix the big vibration problem, so I am very interested in your method.
Alternatively, you could describe the process in more detail. Thank you
dewdrop,
The mods are for the five channel LR outputs.
saffier,
2442 and 2445 are already connected on the board as are 2443 and 2444.
AD8022 for I/V (#7403 and #7404) then AD8032 (#7405) for output filter.
E
Thanks Eric!
I am planning to buy the BG capacitors, unfortunately, my manual has not arrived and I am unable to open up my 963SA because my screwdriver is an incorrect one! Sigh.
So I will be relying on your advice/experience. Do you think that using the NX series of BG will be even better than the STD or the N series?
hi eric,
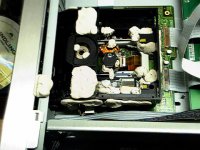
here is a picture of the dampening. I think most important are the two big bubbles on the left and right in the back of the carrier. This bubbles of "plasic-fermite" are connected to the carrier, to the original yellow damper and to the backside of the cardridge. I dampened nearly every free space on the drive. I couldn't find the origin of the ticking, maybe it's from the laser unit itself.
regards
stephanr
Attachments
saffier,
2442 and 2445 are already connected on the board as are 2443 and 2444. AD8022 for I/V (#7403 and #7404) then AD8032 (#7405) for output filter. E
Eric,
Yes, I know. Sorry, I've been not so clear in my comment.
I mean that instead of connecting directly to the OPAMPS you can also connect the new +8V and -8V and ground to the above mentioned caps. This is easier to solder than to the OPAMPS pins.
This should be possible or not?
I also want to minimise the de-soldering on the AV board, so can I leave all the other parts on the AV-board, just remove the jumpers #4604 and #4606??!!
Do you have any suggestions to make a Schottky diode bridge for the analog PSU?
Stephan,
Probably the ticking noise comes from the laser unit reading ahead to load the buffer memory. The only way to ge rid of it is to dampen it mechanicaly, as you did. I probably going to put a square of granite over the top of the whole transport. You can see the 4 holes on the sides of the transport outerside. There I want to fixate the granite. I've got this idea from a german CD-manufacurer called : Audionet, CD-player ARTV2.
Thanks,
Saffier
- Home
- Source & Line
- Digital Source
- Upgrading Philips DVD 963 SA