Well this is what I was beginning to suspect after all the strange results we were getting, that perhaps the actual material the board is made of has in some way become conductive.
Its not easy to visualise it all from the picture but if there are no connections to that print then it has got to be something oddball like conduction within the board material. Maybe it has been washed in some cleaner or exposed to something... but I don't know for certain, just guessing.
Its not easy to visualise it all from the picture but if there are no connections to that print then it has got to be something oddball like conduction within the board material. Maybe it has been washed in some cleaner or exposed to something... but I don't know for certain, just guessing.
Even more crazy that just the stand has 12V on it! While the other pair is 0V!
Look
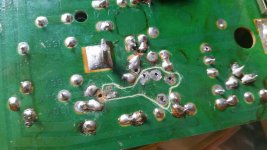
http://terrom.ru/pcb7.jpg
Look
http://terrom.ru/pcb7.jpg
but it gives me 0V!
"If you connect your meter to C3 negative and then press the other probe into the bare board around T1 does any voltage show up at all. Any at all."
"If you connect your meter to C3 negative and then press the other probe into the bare board around T1 does any voltage show up at all. Any at all."
Very odd. I can see the board is 'mottled' in appearance. Look at the right where you have written 0V. What is that ?
Even more interesting:
Another cheap multimeter gives me only 2.6V on the stands and also 22V on this isolated trace. I couldn't understand it. What the hell is going on?
Another cheap multimeter gives me only 2.6V on the stands and also 22V on this isolated trace. I couldn't understand it. What the hell is going on?
It's a fastening system this PCB to the turntable. On the pcb they have no connections to any trace of couse.
Could I clean this PCB ultrasonicaly? Is it possible or I wil damage all the componets (resitors, capacitors and so on)
I've done a deeper groove of the isolation of this trace. Voltage down to 0,4V but I couldn't do it 0V.
Another attempt - 0V! What is next?
Another attempt - 0V! What is next?
Last edited:
Even more interesting:
Another cheap multimeter gives me only 2.6V on the stands and also 22V on this isolated trace. I couldn't understand it. What the hell is going on?
The different meter/different voltage on the stand could be explained away by different meter characteristics if it really is a high impedance leakage causing the voltage there. Or maybe that point is floating... I wouldn't worry over that to much.
Could I clean this PCB ultrasonicaly? Is it possible or I wil damage all the componets (resitors, capacitors and so on)
That's something I've never tried and I think it would only work if the problem was surface contamination.
This didn't help me. I have still 22V on the trace.
I've done a deeper groove of the isolation of this trace. Voltage down to 0,4V but I couldn't do it 0V.
Another attempt - 0V! What is next?
Digging deeper into the board and seeing the voltage go lower and lower seems to confirm it really is something with the board that is causing the problem. An isolated trace should of course have no voltage present.
What next... it seems these boards are jinxed and that they perhaps have some deep hidden history from their past.
I know its a shame but I think we are going to have to call it day for these two. We have done all that is reasonably possibly and do-able.
Lets do just the last attempt as I think it could be a contact near the transistors whare the traces comes togeter. May be it's not a board materisal itself!
OK, but don't lose sight of the fact that you have voltage present on what is isolated print. If you can not correct what is causing that, then its never going to be successful. Stick to finding the reason for the unwanted voltage on that isolated print.
You can wash boards successfully using hot water and a little detergent to generally clean them, but that would only remove surface problems. The components wont be harmed by that. Just dry it fully before applying voltage again. Hot sun or a very low oven temperature work well.
You can wash boards successfully using hot water and a little detergent to generally clean them, but that would only remove surface problems. The components wont be harmed by that. Just dry it fully before applying voltage again. Hot sun or a very low oven temperature work well.
Terrom, have you considered to replace the potmeters? They are open types, and as far as I know it is common-practice to replace them, cause they do not age well and can be the source of many problems.
but what to do after the clean? Everything that we have desoldered put back on the pcb?
No, I wouldn't do that at this stage. Work with something real and tangible which is the piece of isolated print that has voltage on it.
More 🙂 how did you come to obtain the boards and turntables. Were they both from the same place ?
Mooly,, could you advise me what should I check now? Where to check the voltages? So I could understand if it pcb material fault or not.
We go back to here,
http://www.diyaudio.com/forums/anal...k1-help-me-please-repair-pcb.html#post4383398
Remember you had 9 volts (that is plus 9) or so across the base/emitter of T1 and that was with T1 and T3 removed. The emitter of T1 was at zero (as measured from ground at C3). That meant that the 9 volts on the base has to be coming from 'somewhere' and we couldn't locate where.
Then you had the print isolated and still having voltage on it which is what has led us to the possibility of the board being conductive in some way.
- Status
- Not open for further replies.
- Home
- Source & Line
- Analogue Source
- Thorens 125 MK1. Help me please repair this PCB.