Its not the order a problem, but to be sure you got two legs of the trimmer together as in that little pic I showed on #1971. Because on the original schematic I just describe the Rref with a note on the CCT, I am afraid of maybe a possibly wrong connection there.
Yes.
The leds aren't lit.
0V.
Now I have 0V of Vout, loaded with 1K 5W resistor.
Check the LEDs with a battery. Make 100% sure that they are pointing the right way.
Its not the order a problem, but to be sure you got two legs of the trimmer together as in that little pic I showed on #1971. Because on the original schematic I just describe the Rref with a note on the CCT, I am afraid of maybe a possibly wrong connection there.
Ok I wil check.
Check the LEDs with a battery. Make 100% sure that they are pointing the right way.
Ok I will check the LEDs with a battery to be 100% sure.
Check the LEDs with a battery. Make 100% sure that they are pointing the right way.
LEDs are ok 100% tested with a battery all 3 shining.
Its not the order a problem, but to be sure you got two legs of the trimmer together as in that little pic I showed on #1971. Because on the original schematic I just describe the Rref with a note on the CCT, I am afraid of maybe a possibly wrong connection there.
You'r right the middle leg was connected to gnd, now I changed & left like you said.
LED's aren't sining.
Vout 0V.
What's the voltage across R1 and what value is R1?
The voltage across R1 is 0V, the R1 value is 10 ohms.
Q1, the ccs mosfet is either not connected right, or burnt? You might want to take it out and test with DMM.
Don't know, I hope not. But then he mentioned hfe.
When I'm in a hurry I test the mosfet out of the circuit with the diode tester. If I hear a beep, that's it, gone. A better test is to charge it with the diode tester a bit, then discharge it by touching the other two pins with the fingers.
When I'm in a hurry I test the mosfet out of the circuit with the diode tester. If I hear a beep, that's it, gone. A better test is to charge it with the diode tester a bit, then discharge it by touching the other two pins with the fingers.
Don't know what you mean. But I think the mosfet is fried.
Ok I will replace for another new. Tomorrow I will let you know. Thks & good night.
Last edited:
Good night.
Just so you know, for testing, The CCS circuit alone can be tested. This is how.
1) 200mA fuse just before R1, in series.
2) Disconnect the drain of Q1 (pin 2), leave it disconnected, or connect from drain to ground a 4k7 resistor, 1W
3) replace R1 with a value that will give you a current of about 25mA total.
The LEDs should be on and you should be able to observe a limit current of about 25mA through R1. The current should be limited even if you short the drain of Q1 to ground.
If this works, then you got a functioning CCS, and you can move on to the next part, getting the shunt working properly.
You want the over 40V one capable in symmetric that LaOde uses for D1 and first was used in Italy on EB class A kit amp driver stages?
Salas,
I would like to produce a regulated voltage somewhere between 40 and 50v with about 200mA current both positive and negative. I plan on using it to supply the LME49811 and maybe a second pair to power the driver transistors.
Thanks again.
Ken L
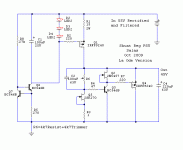
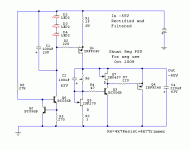
That one will run +/-180mA if your Leds can reach 2V Vf for about 2.5mA. Else, about 150mA. R1 sets that. ICCS=(Vf3LEDStot-Vgs)/R1. Fix it given your actual parts. The trimmer gives you an adjustable Vout. Don't ask more than 65V out. You can use BF245A if you can't get 2N5457, don't use anything more than 3mA IDSS collector load, so to keep the error amp BC546B dissipating conservatively. Remote sensing is recommended. You have seen how on the one I showed for Merlin a few pages back. Good luck.
Attachments
Good night.
Just so you know, for testing, The CCS circuit alone can be tested. This is how.
1) 200mA fuse just before R1, in series.
2) Disconnect the drain of Q1 (pin 2), leave it disconnected, or connect from drain to ground a 4k7 resistor, 1W
3) replace R1 with a value that will give you a current of about 25mA total.
The LEDs should be on and you should be able to observe a limit current of about 25mA through R1. The current should be limited even if you short the drain of Q1 to ground.
If this works, then you got a functioning CCS, and you can move on to the next part, getting the shunt working properly.
Thks for your patience with me, sorry in advance to ask a lot of questions.
Wich value to replace R1 to have a current of about 25mA total?
Q1, the ccs mosfet is either not connected right, or burnt? You might want to take it out and test with DMM.
Sorry for newbie question: How to test with DMM?
The easiest way: DMM set for 2kohms. Probe between all legs (i.e. 1 and 2, 1 and 3, 2 and 3) Repeat inverting polarity (if you put the red probe on leg 1 and black on leg 3, invert them: red on 3 and black on 1).
Eventually compare with a new one, but if there is one short, it's gone. Replace.
Eventually compare with a new one, but if there is one short, it's gone. Replace.
- Status
- Not open for further replies.
- Home
- Amplifiers
- Power Supplies
- The simplistic Salas low voltage shunt regulator