The rubber mounts keep it off the metal, but just barely in my case, since the chassis is 1/8" thick aluminum. I think the mounts were designed for a thinner computer chassis, so they are stretched a bit and thus the ring that separates the fan from the chassis is pulled very tightly to the chassis hole. I think it works out to be a good thing in this case since I don't want a larger gap, only just enough to keep the fan off the chassis.
Should you find the mounts to be too short, McMaster-Carr has isolation mounts.
Just sayin'...
~Tom
Just sayin'...
~Tom
I love McMaster-Carr. Fast shipping and everything I've ever ordered they had in stock. Great customer service too.
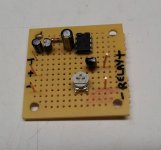
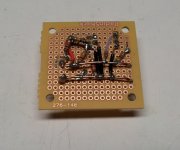
I went ahead and built the fan failure circuit linked in post #437 of this thread. It works by comparing a smoothed voltage derived from the tachometer output of the fan (yellow wire) to a pre-set threshold value set using the trimmer potentiometer, in a Schmidt trigger arrangement using an LM741 opamp. After setup adjustment it works very well. In normal operation nothing happens, but when I stop the fan with my hand, simulating a fan failure, it triggers a 12VDC SPST-NC relay that can be used to open the AC line feeding the soft start circuit for the 833 B+. If I let go of the fan and it resumes spinning it resets and recloses the relay (in actual use the 833C B+ won't go back on until I push the button on the front panel). Just another layer of safety to prevent overheating and meltdowns!
Pictures 1 and 2 show the front and back of the circuit wired up P-to-P on a small piece of Radio Shack protoboard. It's compact enough that I should be able to fit this near the fan power supply and remotely trigger the relay located on the back panel between the mains switch and the soft start board.
Time to build another one for the other monoblock!
Attachments
I'll second McMaster. There prices aren't the best but not the worst either. Plus what ever you can think of, they have it. They have lead bricks to mu metal.
Hey,
originally I entered the tubes forum just because I was bored and wanted to take a sneak peek into some tube preamps... ran into this thread... and now it's about 3 hrs later... been fly-reading through all 47 pages, accompanied from a loud laughter every once in a while as well as many "WOW"s 😀
Congratulations for what you did and still intend to do
And coming back to the start...
Are you REALLY sure? You see... you end up with nearly the same weight and amount of iron... 2 head-lights (I think a Corvette still doesn't give you Xenons?😉)... and you'll probably need wheels to move it around 😀
I really begin struggeling whether it is a good idea to build solid state amps. These monster tubes along with the massives around are genuine porn, and looking at bear's picture in post #88 I start to dream... and consider to buy a CNC machine just to build a Unibody for a tube amp...
I'll keep following... and all the best wishes for your project 🙂
BR,
Holgi
originally I entered the tubes forum just because I was bored and wanted to take a sneak peek into some tube preamps... ran into this thread... and now it's about 3 hrs later... been fly-reading through all 47 pages, accompanied from a loud laughter every once in a while as well as many "WOW"s 😀
Congratulations for what you did and still intend to do
And coming back to the start...
-My wife, upon seeing the 833C triodes in person - "That's not an amp, that's a Midlife Crisis!"
-My reply, "Hey, it's cheaper than a Corvette..."
Are you REALLY sure? You see... you end up with nearly the same weight and amount of iron... 2 head-lights (I think a Corvette still doesn't give you Xenons?😉)... and you'll probably need wheels to move it around 😀
I really begin struggeling whether it is a good idea to build solid state amps. These monster tubes along with the massives around are genuine porn, and looking at bear's picture in post #88 I start to dream... and consider to buy a CNC machine just to build a Unibody for a tube amp...
I'll keep following... and all the best wishes for your project 🙂
BR,
Holgi
I start to dream... and consider to buy a CNC machine just to build a Unibody for a tube amp...
This is DIY, build your CNC. there's not much to them. It's certainly easier than building an amp.
Hey,
originally I entered the tubes forum just because I was bored and wanted to take a sneak peek into some tube preamps... ran into this thread... and now it's about 3 hrs later... been fly-reading through all 47 pages, accompanied from a loud laughter every once in a while as well as many "WOW"s 😀
Congratulations for what you did and still intend to do
And coming back to the start...
Are you REALLY sure? You see... you end up with nearly the same weight and amount of iron... 2 head-lights (I think a Corvette still doesn't give you Xenons?😉)... and you'll probably need wheels to move it around 😀
I really begin struggeling whether it is a good idea to build solid state amps. These monster tubes along with the massives around are genuine porn, and looking at bear's picture in post #88 I start to dream... and consider to buy a CNC machine just to build a Unibody for a tube amp...
I'll keep following... and all the best wishes for your project 🙂
BR,
Holgi
Thanks for the compliments, Holgi!
It sounds like you've been bitten by the tube bug...there is NO CURE. Welcome to the club!
Speaking of DIYing things that usually aren't. I'm now in the process of making the tube sockets for the 883s. I have a 1"x1"x12" bar of Teflon that I have cut into suitably sized pieces and drilled the holes for the mounting screws. They fit on the chassis as they should (see pic with aluminum connectors). Next step is to route a 5/8" groove in the inside edge of each for the connector to fit snugly into so it's not just sitting on top like in the picture. Then I'll route a roundover into the bottom edge of the Teflon over the fan so that the air can flow more smoothly from the fan.
I ordered the pyrex cylinders for around the 833s. 3/16" thick walls, 5.9"OD, 13" high, with 9/64" holes drilled at 90, 180 and 270 degrees around the rim for thumbscrews . Once I get them I'll curve the outside edge of the Teflon socket to fit snugly inside the cylinder and add threaded inserts into the ends of the teflon, then use thumbscrews through the glass to hold the cylinder to the sockets.
Just pluggin' away...
Attachments
I ordered the pyrex cylinders for around the 833s.
Where did you get them? I'm finishing up an amp w/ exposed HV anode heatsinks and have been looking for suitable glass cylinders.
Thanks
Where did you get them? I'm finishing up an amp w/ exposed HV anode heatsinks and have been looking for suitable glass cylinders.
Thanks
Here:
Pyrex tubes, sight glass, bell jars, lab glassware, lighting glass
833 amp
Hi Magz, you are certainly cracking on with the amp now. Yes the sockets need some careful thought...I remember when I was building mine that I tried 4 or 5 different designs some of them over the top....I finished up in the end with something very simple...in fact I have already posted a drawing to you....2 Large aluminum blocks with a set screw....okay different issue but same subject...if anyone is reading this and can help I would appreciate it...I am trying to find somewhere were I can buy some Tubes....(I dont want to use the 833 this time around) so I thought about either...2 Pieces of RCA 851...OR....RCA 849...OR.... TB5-2500 any ideas please let me know....thank you
Hi Magz, you are certainly cracking on with the amp now. Yes the sockets need some careful thought...I remember when I was building mine that I tried 4 or 5 different designs some of them over the top....I finished up in the end with something very simple...in fact I have already posted a drawing to you....2 Large aluminum blocks with a set screw....okay different issue but same subject...if anyone is reading this and can help I would appreciate it...I am trying to find somewhere were I can buy some Tubes....(I dont want to use the 833 this time around) so I thought about either...2 Pieces of RCA 851...OR....RCA 849...OR.... TB5-2500 any ideas please let me know....thank you
Last edited:
Sockets for one of the monoblocks are complete (see pic). I added a roundover to the bottom of the Teflon where it's over the fan to let more air through, and switched to hex cap screws countersunk into the Teflon to give clearance for the tube pin screws. The aluminum connectors are held to the block with 1/4-20 bolts into flanged threaded inserts which will also serve to clamp the filament wires to the connectors. I used flanged inserts so that the force of the tightened bolt is against the flange and not the Teflon block, to ensure the insert won't pull out of the soft Teflon.
When the glass cylinders arrive some time next week, I will need to cut down the outer edge of the Teflon block to fit the ID of the cylinder, and add the threaded inserts for the thumbscrews that will hold the cylinder in place.
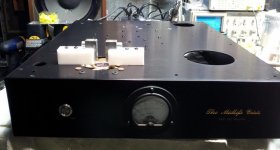
It's starting to look like an amp!
When the glass cylinders arrive some time next week, I will need to cut down the outer edge of the Teflon block to fit the ID of the cylinder, and add the threaded inserts for the thumbscrews that will hold the cylinder in place.
It's starting to look like an amp!
Attachments

It's starting to look like an amp!
Nah... It's really starting to look like a midlife crisis... 🙂
~Tom
833
Hi Magz, I see in the picture for the 833 Filament connections that it is basically what I finished up with on mine....except I did not have such a thick piece of PTFE but rather used the space to have more Aluminium as a Heat Sink...its only my suggestion but you can't you mount the PTFE blocks under the chassis and use the space on top for bigger heat sinks........I am only suggesting this as I know those SEALS on the Tube get really really hot after about 30 minutes.
Hi Magz, I see in the picture for the 833 Filament connections that it is basically what I finished up with on mine....except I did not have such a thick piece of PTFE but rather used the space to have more Aluminium as a Heat Sink...its only my suggestion but you can't you mount the PTFE blocks under the chassis and use the space on top for bigger heat sinks........I am only suggesting this as I know those SEALS on the Tube get really really hot after about 30 minutes.
Are the connections at filament pinouts rigid or flexible? I'm afraid these parts will expand quite abit during operation, even with the fan.
Hi Magz, I see in the picture for the 833 Filament connections that it is basically what I finished up with on mine....except I did not have such a thick piece of PTFE but rather used the space to have more Aluminium as a Heat Sink...its only my suggestion but you can't you mount the PTFE blocks under the chassis and use the space on top for bigger heat sinks........I am only suggesting this as I know those SEALS on the Tube get really really hot after about 30 minutes.
No room under the chassis for those PTFE blocks, and I'm not sure what they would do under there anyway. With the fan blowing on the connectors I don't think there will be an issue, but there's only one way to find out for sure. The usual connectors used on the 833 (the ones you can buy online from China) just have spring clips with less mass than what I'm using.
833
Understand...I am pretty sure you will be alright with the FAN underneath...I did not have one on mine hence my need for bigger heat sinks. just out of interest the 833 you are using is it from PENTA Labs ?
Understand...I am pretty sure you will be alright with the FAN underneath...I did not have one on mine hence my need for bigger heat sinks. just out of interest the 833 you are using is it from PENTA Labs ?
Are the connections at filament pinouts rigid or flexible? I'm afraid these parts will expand quite abit during operation, even with the fan.
I'm not sure which connections you refer to. The aluminum connectors are fastened to a 1/4" flanged threaded brass insert with a single machine bolt. They are able to rotate very slightly front to back but the PTFE block keeps them from turning more than a couple degrees in either direction. At high temps the PTFE will soften somewhat, and probably allow a little bit more motion in the front-back and side to side directions.
The attached picture is of the Silvercore amps which I believe are or were commercially available. They use a solid Teflon block to hold the 833C. It doesn't look any more flexible than what I have (and maybe less so).
.
Attachments

Last edited:
Understand...I am pretty sure you will be alright with the FAN underneath...I did not have one on mine hence my need for bigger heat sinks. just out of interest the 833 you are using is it from PENTA Labs ?
Yes, they're from Penta, even though they say Machlett on them. I think they supply them with several different designations; all from China I believe.
I meant where the tube pins contact your aluminum connectors.I'm not sure which connections you refer to. The aluminum connectors are fastened to a 1/4" flanged threaded brass insert with a single machine bolt. They are able to rotate very slightly front to back but the PTFE block keeps them from turning more than a couple degrees in either direction. At high temps the PTFE will soften somewhat, and probably allow a little bit more motion in the front-back and side to side directions.
The attached picture is of the Silvercore amps which I believe are or were commercially available. They use a solid Teflon block to hold the 833C. It doesn't look any more flexible than what I have (and maybe less so).
.
On the commercial sockets you can see the tube will be held on the spring connectors. My guess is that these connectors are somewhat flexible and will allow the tube to have some degrees of movement due to heat cycles expansions/shrinkage or vibrations and avoid cracks.
I'm not sure if this is really important, but it's better to be taken account from the start.
- Home
- Amplifiers
- Tubes / Valves
- The Midlife Crisis - My 833C Amp Build