Tool's Chocolate Chip trip... great track.
Loving those passive networks wesayso. My LX521's uses the analogue signal processor, and whilst it's different to your present work, I'm really glad I got DSP out of the way as the native DAC's can be quite limiting (although you may be able to compensate with good preamp... Octo Research DAC8 Pro might be very good choice for line arrays?). I've put loads of effort into my custom digital music server which feeds T+A DAC 8 DSD - I just keep on getting better and better imaging and soundstage with each iteration, so its addictive.
Thanks for bringing me upto speed... will keep watching 🙂
Last edited:
Am I getting closer to audio content again? We currently are viewing curtain options and we came across a nice velvet like material. Color wise we haven't found the right match just yet, but I already have plans how to hang the curtains and have it include my damping panels in its construction. Oh, my girl must go mad at times dealing with me and my strange wishes 😀.
She has to put up with a lot, I'll admit to that! But this is one of the key ingredients to success, as is the damping of the wall behind the listener. It's not all about me though, I work real hard to give her what she wants too 😉. Give and take....
She has to put up with a lot, I'll admit to that! But this is one of the key ingredients to success, as is the damping of the wall behind the listener. It's not all about me though, I work real hard to give her what she wants too 😉. Give and take....
Sorry for the way-off-topic interjection here, but what guage wire did you use for the internals of the Two Towers?
There's a sale on crimp connectors here in Sydney and I'd like to stock up before my build early next year.
Thank you.
There's a sale on crimp connectors here in Sydney and I'd like to stock up before my build early next year.
Thank you.
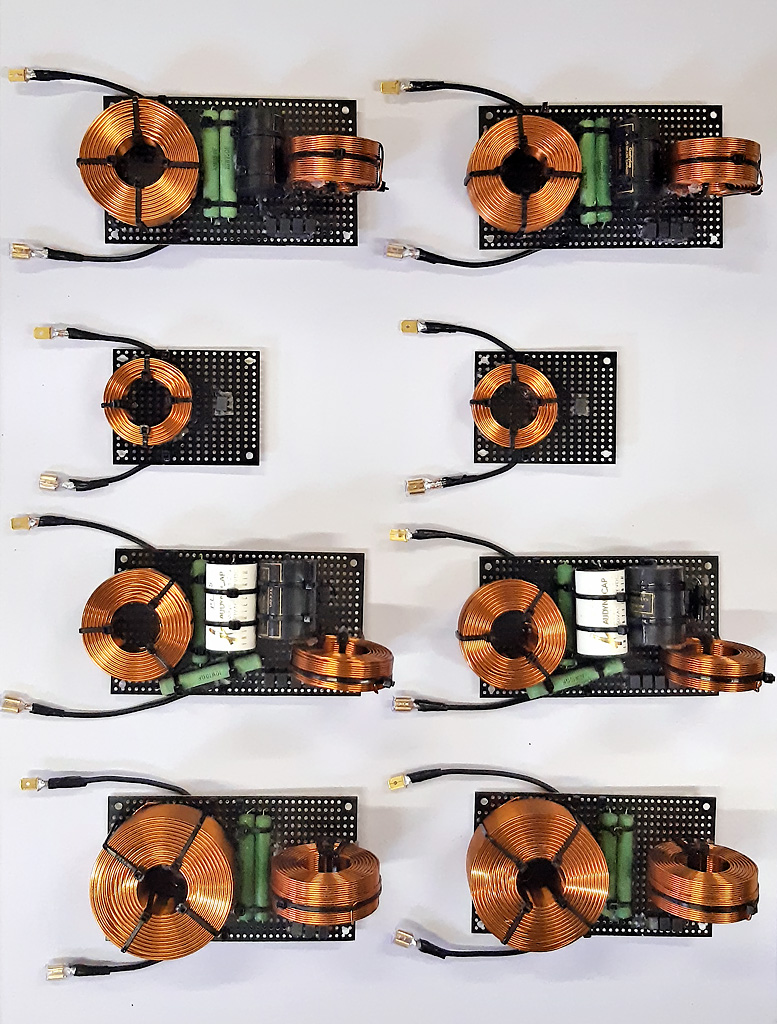
I used 16 AWG wires (or 1,5 mm2) for all short runs, I remember reading Roger Russell used 18 AWG (stranded hookup wires) throughout his IDS build. I have 2 long wires running along the length of the array, the main positive and negative runs, that are a bit thicker. All parallel groups split off from those wires.
I can't remember the gauge of the long wires, as I had it in my posession already from another project. I suspect it is 2,5 mm2 or 14 AWG but it could be one size larger.
I used 2,8x0,5 and 4,8x0,5 crimp-on connectors to hook-up the drivers.
I can't remember the gauge of the long wires, as I had it in my posession already from another project. I suspect it is 2,5 mm2 or 14 AWG but it could be one size larger.
I used 2,8x0,5 and 4,8x0,5 crimp-on connectors to hook-up the drivers.
Last edited:
I'm still finishing details in our home, like fixing up a 95 year old door etc. Figuring out how to hang the new curtains while incorporating the (new) damping panels within its construction...
I'm getting closer to start on the arrays though. How I do miss them! I might get some work done on them this weekend but weeks are flying by like it's nothing...
I actually had plans to start working on the arrays today, but chose to first finish the door. The new curtains are on order, I really do hope for a good outcome on their acoustic properties. While this is a chance to redo the damping panels (making them slightly thicker), the next compromise is there too. The curtains will no longer hang before the entire wall towards the corner which might not be ideal as far as acoustic properties are concerned, but after all this work the looks count too! We will decide one way or the other once the curtains are delivered.
Too bad one has to work to be able to play 😀. I really feel my weekends are too short! Being without my main setup really is killing me. Yes, even my patience has limits, but I'm trying real hard not to let it show 😉.
I do find myself watching movies while imagining hearing the sound that should belong to it. Soon I hope... at least somewhere this year!
Last edited:
If solidarity helps, I feel your pain (being in the same situation) 🙂Too bad one has to work to be able to play 😀. I really feel my weekends are too short!
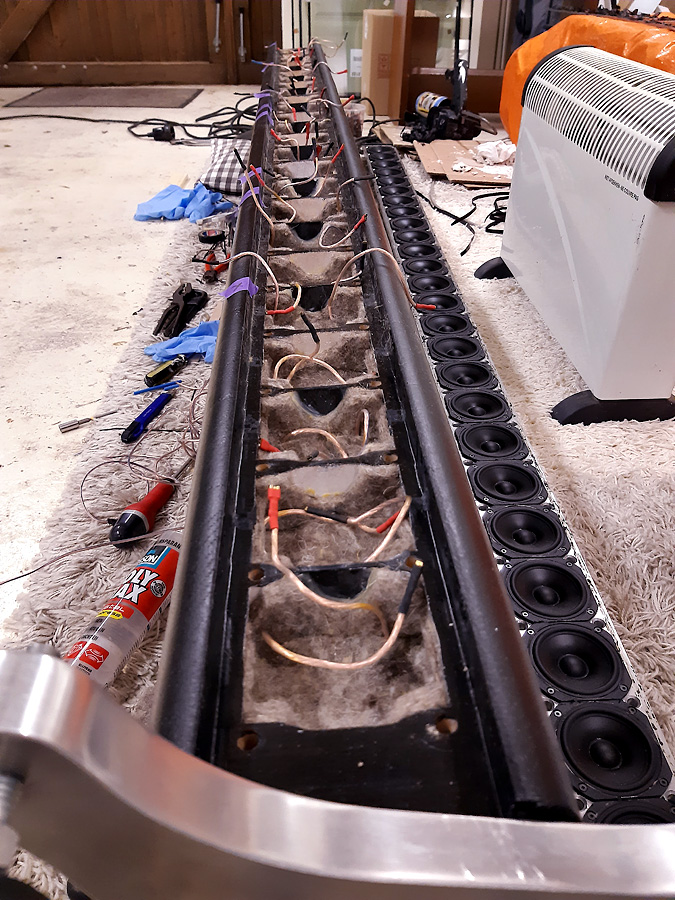
Work should begin on getting these boards inside the arrays this weekend.
Quite chilly in the garage but I'll have to start at some point. Still loads to do before I'm finished but I'm getting excited again to start working on the hobby projects.
I turned on a small heater and the radio (essential 😉) and will start dismantling the baffle very soon. I hope the butyl rope I put between both baffles doesn't give me any headaches. I'm kind of nervous to start...
Looking forward to seeing results! I hear you about temps; already had a taste of winter here, got down to freezing at night once 🙂
We're touching freezing temps here at night as well. I can now confirm the butyl rope bytes me in the, well you know what... 😀
So it is going to be a challenge just removing the inner baffle. I first have to remove all butyl goop. It isn't too bad, just time consuming. It's the same stuff that is used to glue modern windows in cars.
The first outer baffle is off already, without harming the cones. That was the important part. I'll order some new butyl rope for re-assembly. It really does work wonders for damping the baffle. Way better than the neoprene that was in there before.
The baffle with drivers is lifted, this day is gone though... losing the temperature to be comfortable enough to continue. Tomorrow I'll disconnect the drivers and hopefully will be able to dive into the chambers to connect the filters. This is going to take me a while...
I looked in my stash and still have some butyl rope leftovers. I probably need some other stuff too, like neoprene sealing tape (to go below the main baffle) and I will have to order it all. Usually from abroad and that too will take up time.
I looked in my stash and still have some butyl rope leftovers. I probably need some other stuff too, like neoprene sealing tape (to go below the main baffle) and I will have to order it all. Usually from abroad and that too will take up time.
Last edited:
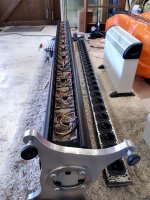
Just a picture to show the operation is really going to happen...

Maybe I've become more patient through the years. Knowing what is waiting for me on the other side does help 🙂.
I did learn along the way to take my time and not rush things. Due to health issues I only have a limited amount of energy, not nearly as much as I used to have. So that really forces you to take your time. It will get done, that's what I keep telling myself. But it's never easy 😀.
Attachments
Wow what a sight! Can't wait to hear about how you experience the difference after this modification! But - take your time as you say. Sad to hear about yout health issues.
What was the feeling seeing inside of them again? Did you feel like a surgeon? Like an archeologist? Like a burglar?
To be honest, I felt mostly like a burglar, why did I get this crazy idea? It would have been so much easier to do something like this from the start...
I'm moving along though, not as easy as I thought it would be. Working in tight cramped spaces with relatively low temperatures aint no fun! I could not use screws to fix the crossover modules. So I had to come up with another way of mounting them. Tie-wraps to the rescue. I'm about halfway through the first array modification, I got to stop early because of other obligations, that's the way it goes.
Changing the grouping on a fixed and ready array is not as easy as I thought it would be. I'll take my time and get it done. Just not as quick as I would want to.
Another day of work is done... All filters are in and before I accept I did it right I'll make some test cables to test each of the series connections in the array to see if they have no open circuits.
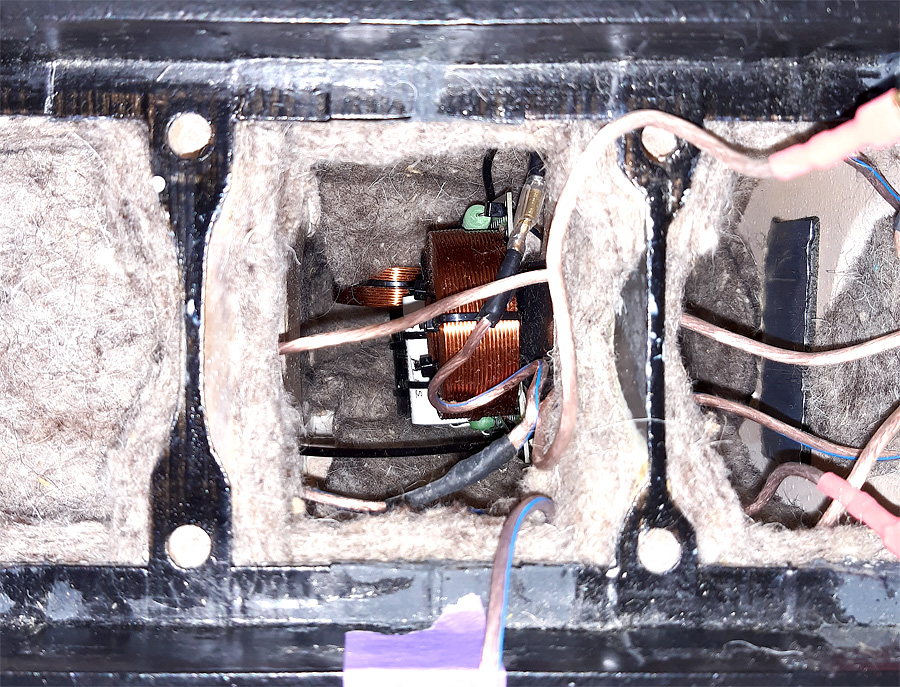
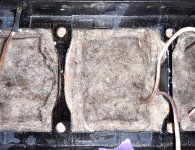
Here's one of the bigger filters in its place in the enclosure:
And after closing it back up with damping material and wool felt:
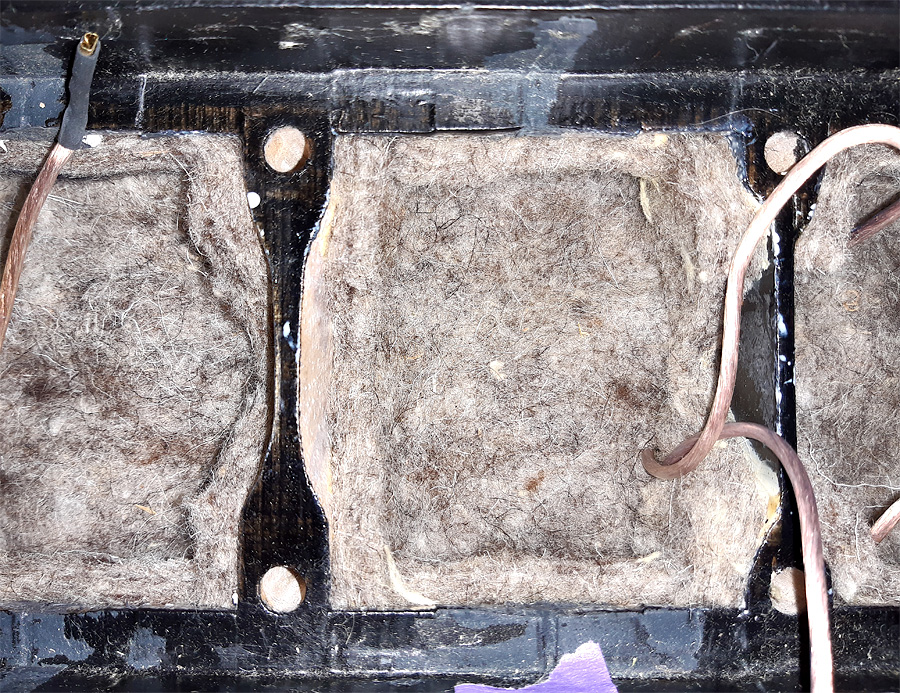
No more evidence I was ever in there again 😉. The purple tape is to remind me which places needed an operation. 🙂
I hope to be able to run the tests tomorrow, so I can close up the first array again. The idea is to replace each of the 5 driver groups with straight wires and test it's resistance. That should tell me if all of the -series wired- groups are OK. Easiest way I can think of to know if everything is hooked up properly.
I can measure the resistance at the main speaker terminals and measure one series group at a time. The center group should have very little resistance, each of the other groups should be similar to the filters measured by themselves. If that works out I can start cleaning the baffles and prepare them for closing up again. I'll only mount the inner baffle, to make the array ready for a fresh coat of epoxy/paint. After that is done I'll give the outer baffle a good rub, mount it again and call it finished. Meanwhile the second array will get it's surgery.
Patient after operation:
Lots of purple tape where I needed to dive in...
Here's one of the bigger filters in its place in the enclosure:
And after closing it back up with damping material and wool felt:
No more evidence I was ever in there again 😉. The purple tape is to remind me which places needed an operation. 🙂
I hope to be able to run the tests tomorrow, so I can close up the first array again. The idea is to replace each of the 5 driver groups with straight wires and test it's resistance. That should tell me if all of the -series wired- groups are OK. Easiest way I can think of to know if everything is hooked up properly.
I can measure the resistance at the main speaker terminals and measure one series group at a time. The center group should have very little resistance, each of the other groups should be similar to the filters measured by themselves. If that works out I can start cleaning the baffles and prepare them for closing up again. I'll only mount the inner baffle, to make the array ready for a fresh coat of epoxy/paint. After that is done I'll give the outer baffle a good rub, mount it again and call it finished. Meanwhile the second array will get it's surgery.
Patient after operation:
Lots of purple tape where I needed to dive in...
Attachments


Last edited:
Just finished testing the series groups one by one, all check out fine, pfew 😀.
They measure quite close to their respective separate filters, at least how accurate my multi meter measured with a not so good battery. All within about 0,1 Ohm.
Not bad for a first try of re-arranging 2 groups and inserting the 4 filters. Now on to cleaning the inner baffle, getting the residue butyl off that sticks literally everywhere and to anything and make a new neoprene seal to go between the enclosure and inner baffle.
As is obvious, I'm taking my time, not wanting to make any mistakes. It's all cramped spaces and lots of itchy fiberglass fill, even though the nitrile gloves help somewhat it still is unpleasant at times. Had a late start to watch F1 and Moto GP 😉.
I did go back in in some of the chambers to re-seat the damping material as over time I found better ways to get it back in through the wiring and all the way down into the chambers. Hopefully the filters won't take up too much air space, I tried to get it as small as possible volume wise. They do sink into the chamber quite a bit and the chambers all have breathing holes to nearby chambers so I'm guessing I'll be alright there.
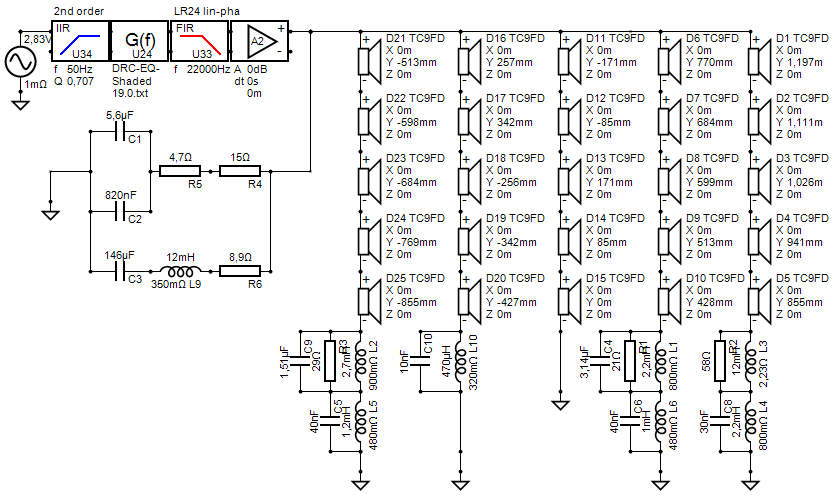
The biggest filter is mounted into the top chamber, which has a little extra spare space anyway. I've connected them exactly like I ran the sim, meaning they are all inserted in the negative wire:
They measure quite close to their respective separate filters, at least how accurate my multi meter measured with a not so good battery. All within about 0,1 Ohm.
Not bad for a first try of re-arranging 2 groups and inserting the 4 filters. Now on to cleaning the inner baffle, getting the residue butyl off that sticks literally everywhere and to anything and make a new neoprene seal to go between the enclosure and inner baffle.
As is obvious, I'm taking my time, not wanting to make any mistakes. It's all cramped spaces and lots of itchy fiberglass fill, even though the nitrile gloves help somewhat it still is unpleasant at times. Had a late start to watch F1 and Moto GP 😉.
I did go back in in some of the chambers to re-seat the damping material as over time I found better ways to get it back in through the wiring and all the way down into the chambers. Hopefully the filters won't take up too much air space, I tried to get it as small as possible volume wise. They do sink into the chamber quite a bit and the chambers all have breathing holes to nearby chambers so I'm guessing I'll be alright there.
The biggest filter is mounted into the top chamber, which has a little extra spare space anyway. I've connected them exactly like I ran the sim, meaning they are all inserted in the negative wire:
Attachments

Last edited:
I'm still (over)thinking (not always good 🙂) if I will change the baffle damping. The way I had it made disassembly quite difficult, as some of the butyl got caught in the bolts holding the baffle. As I said, it will stick to anything.
All of the front seals on the TC9 drivers are gone too. So I'll have to decide what to do there. I have enough neoprene to make some new seals, I'd hate to seal that part with the sticky butyl. I might order some 3M caulk, as I've used that as a driver gasket too at times. It depends if the neoprene will bend in a circle easily, at the back side of the outer baffle. I can cut it into narrow strips, it is 10mm standard, x 1.5 mm thickness.
All of the front seals on the TC9 drivers are gone too. So I'll have to decide what to do there. I have enough neoprene to make some new seals, I'd hate to seal that part with the sticky butyl. I might order some 3M caulk, as I've used that as a driver gasket too at times. It depends if the neoprene will bend in a circle easily, at the back side of the outer baffle. I can cut it into narrow strips, it is 10mm standard, x 1.5 mm thickness.
- Home
- Loudspeakers
- Full Range
- The making of: The Two Towers (a 25 driver Full Range line array)