Member
Joined 2009
Paid Member
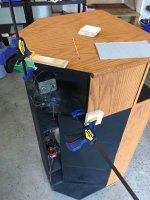
The boxes need some surgery and cleaning up. Some sandpaper has been pressed into action on the veneer.
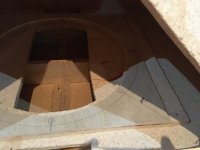
Some damaged spots where the finishing veneer was torn during my handling of the boxes from their old home into my garage have been glued and clamped into place. You can see also in this photo that the original passive XO filters are glued into the enclosure - old PIO capacitors and what-not. These are also removed and the wooden surfaces cleaned up. I won't be reusing these ancient XO parts.
The front of the top box has been removed and notched to accommodate the flange for the 511B metal horn
Attachments


Member
Joined 2009
Paid Member
When I saw that my thread had been moved to a new forum today I got all excited that there maybe a Horns forum at last. Alas not, now dumped into multiway. Most other WAW threads are in full range but I’m sure the multiway forum is just as friendly!
Member
Joined 2009
Paid Member
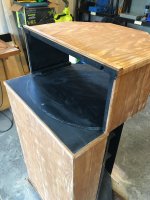
Well, we have a set of finished boxes, the front was modified and re-painted to accomodate the full size 511B horn, the finishing was sanded back and re-varnished. Boxes are in the basement for use with movies, pretty close to some of the original uses for large folded horns I think.
Attachments

Member
Joined 2009
Paid Member
Member
Joined 2009
Paid Member
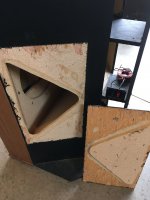
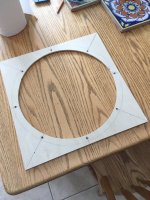
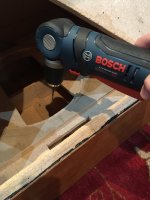
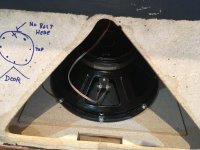
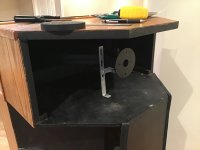
To mount the new woofer requires marking out new bolt holes, which are to be used with metal threaded inserts installed into the sound board first and then the woofer mounted and bolted into these inserts. There's very poor access to the woofer box so I decided it was necessary to make a wooden template that can be used to ensure the bolt holes are properly aligned with the woofer frame.
Attachments

Member
Joined 2009
Paid Member
Member
Joined 2009
Paid Member
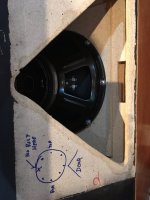
the woofers were installed after finding that the metal inserts had ligned up pretty well. Each woofer was installed with 7 bolts because in each case one bolt was over damaged wood where the old woofer had been removed.
wire was duly soldered into the terminals for each woofer
wire was duly soldered into the terminals for each woofer
Attachments
Member
Joined 2009
Paid Member

Member
Joined 2009
Paid Member
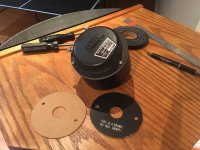
Next up is the tweeter horn.
Supplied support bracket added so should be all set. However, I realized that only one driver had the OEM gasket included. I cut a new one from some very similar card type material. Then I found that the screw terminals on the CD were not that tight so I opened them up to check and tighten them. It seems that there is a limit to how well these screw terminals will tighten against the back cover because they're darn old and the feed-through insulator is not in the prime of it's life - I don't want to see it damaged. This means that finger tight binding posts will require some care to avoid damage when they are connected/disconnected.
Supplied support bracket added so should be all set. However, I realized that only one driver had the OEM gasket included. I cut a new one from some very similar card type material. Then I found that the screw terminals on the CD were not that tight so I opened them up to check and tighten them. It seems that there is a limit to how well these screw terminals will tighten against the back cover because they're darn old and the feed-through insulator is not in the prime of it's life - I don't want to see it damaged. This means that finger tight binding posts will require some care to avoid damage when they are connected/disconnected.
Attachments
Member
Joined 2009
Paid Member
With the boxes now mostly restored it's time to do some testing. Yet to come are foam strips to seal against the walls but that will be done later.
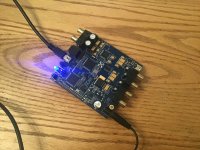
For quick testing I am using a miniDSP 2x4 HD, my first foray into such things.
First test on one speaker using my TGM8 solid state amplifier - produced acceptable sound within what felt like 30 minutes, maybe it was longer but I'm completely sold on the miniDSP for DIY !
For quick testing I am using a miniDSP 2x4 HD, my first foray into such things.
First test on one speaker using my TGM8 solid state amplifier - produced acceptable sound within what felt like 30 minutes, maybe it was longer but I'm completely sold on the miniDSP for DIY !
Attachments
Member
Joined 2009
Paid Member

Unlike the original version where the woofer horn output is way behind, but in phase with the HF, you can time align the two with DSP.First test on one speaker using my TGM8 solid state amplifier - produced acceptable sound within what felt like 30 minutes, maybe it was longer but I'm completely sold on the miniDSP for DIY !
Do the drivers have loading caps? They should! If so, then recommend not using the rear cover, etc., and connect straight to the spades.It seems that there is a limit to how well these screw terminals will tighten against the back cover because they're darn old and the feed-through insulator is not in the prime of it's life
Member
Joined 2009
Paid Member
I've got 6ms of delay dialled-in for the mid-treble based on reading around on the internet for consensus on the best value. I figure that this will do until I can measure - I'm open for further insight from you folks?
GM - the drivers have loading caps indeed. If I get disheartened by the screw terminals I shall do exactly as you have suggested but I hope it may not be needed. A bigger problem is that I've no idea what phase I've wired up, didn't see any clear markings on the spades. I figure that I'll discover via measurements with my microphone at some point - it would be a huge laugh if it turns out they're wired backwards and I didn't even notice 🙂
GM - the drivers have loading caps indeed. If I get disheartened by the screw terminals I shall do exactly as you have suggested but I hope it may not be needed. A bigger problem is that I've no idea what phase I've wired up, didn't see any clear markings on the spades. I figure that I'll discover via measurements with my microphone at some point - it would be a huge laugh if it turns out they're wired backwards and I didn't even notice 🙂
Easiest is to use a 1.5 V battery to test, so attach some tissue over the mouth and whichever way the battery terminals makes the tissue flip away is your positive/negative terminals and from long experience never assume the other will be identical since by the time the 808 came along there were QA issues to the point where the S.E./Atlanta distributor was testing each driver and marking them with a '+' on a piece of very sticky masking tape, which often didn't match the +/- signs engraved on the terminal cap and at some point in time they quit paying extra for the engravings and normally just had a dab of red paint to denote positive.
Bigun: How did this work out? I recently picked up a pair of Khorns, and currently have LA Scala bass bins with Kappa 15Cs combined with 511Bs with Renkus Heinz SSD-1800s. My understanding is that Khorn bass bins have trouble reaching up high enough to meet with the 511Bs at 500 HZ. I would love to hear what your thoughts are on the Khorn bass bin/511B combo.
FYI/FWIW, way back when, I doubled up 511s, one with 802-8A (alum) and the other with the then just released 802-8G tangerine for a 1.5 way horn, which gave me more horn mouth, diaphragm area than the 805/288 multicells @ 500 Hz XO they replaced + much more extended HF and the 350 Hz XO capability I was hoping for.
Member
Joined 2009
Paid Member
Hi tizman, the Khorns are in use as the main sound reproducer in my ht system. They work just great but I haven’t spent time digging further with measurements and pressing them with some favourite ‘test tracks’. I’m afraid summer and travel became a more enticing use of time.
If I remeber correctly, I ended up lowering the XO below 500Hz as I don't run the horns hard the 511B’s never get stressed.
I am interested, when I get back to them, to explore the necessity / value of time alignment. If it’s only a marginal benefit then I can explore passive filters with a bi-amp setup rather than leaving my dsp permanently in place.
p.s. The dispersion of these speakers appears to work well with my ht set up, no centre channel needed.
- Home
- Loudspeakers
- Multi-Way
- The legendary K-Horn using altec 511B and 808-8a