ever use the A.R.T. (Italy) solid carbon mat and/or Damper weight from back in the S. Cascianio days of Be Yamamura?
I'm sorry, unfortunately I never had the opportunity to feel these products applied on the platter or see them; of the A.R.T. I only have a carbon platter to apply over the cd disc for better reading of the disc.

Got the PS caps removed and boards cleaned. Someone had added solid wires with some sort of brushed-on coating on top of traces that had no evidence of prior damage, so it seems they thought there was more current present than the boards can handle as designed. My guess it's the same person who did a pretty lousy job of replacing some of the caps, leaving long leads under the boards, bad solder joints, and a couple of lifted traces. The smaller value original caps were not replaced, and one of the 100uF/16V was starting to leak at the seal. There was evidence of prior electrolyte leakage at several of the cap locations.
One of the AC wires from the switch was hanging on with two strands, and someone had tried in vain to remove the main filter cap clamp, munching up the screw, so those will be replaced with new stainless hex screws.


Cleaned the acrylic conformal coating off with IPA followed by Crystal Simple Green (unscented, uncolored, commercial version), then water and pressurized air. All the caps are on order, along with a new silicon nitride ball for the bearing and all new fuses.


I tested the original and no-name replacement caps on my LC-102 for value, leakage, DA and ESR, then my TH2832 LCR meter for Q, D and R at 120Hz and 1kHz. The original caps tested very close to their values, but ESR was at the high end on some of the smaller caps, while Q was low on several, and D (dissipation factor) was unsurprisingly high given the age. The main filter cap tested well, but dialectric absorption was getting high at 7%, though leakage was low. However, a few of the no-name replacements tested poorly; low or high capacitance, high DA, high ESR, high D. Again, not surprising.
One of the AC wires from the switch was hanging on with two strands, and someone had tried in vain to remove the main filter cap clamp, munching up the screw, so those will be replaced with new stainless hex screws.
Cleaned the acrylic conformal coating off with IPA followed by Crystal Simple Green (unscented, uncolored, commercial version), then water and pressurized air. All the caps are on order, along with a new silicon nitride ball for the bearing and all new fuses.
I tested the original and no-name replacement caps on my LC-102 for value, leakage, DA and ESR, then my TH2832 LCR meter for Q, D and R at 120Hz and 1kHz. The original caps tested very close to their values, but ESR was at the high end on some of the smaller caps, while Q was low on several, and D (dissipation factor) was unsurprisingly high given the age. The main filter cap tested well, but dialectric absorption was getting high at 7%, though leakage was low. However, a few of the no-name replacements tested poorly; low or high capacitance, high DA, high ESR, high D. Again, not surprising.
Someone had added solid wires with some sort of brushed-on coating on top of traces that had no evidence of prior damage, so it seems they thought there was more current present than the boards can handle as designed.
That's factory, presumably to help mitigate the impact of stress fractures at the W2B interfaces. You'll want to remove all of that old bond glue as it will eventually become acidic and start eating mask and traces.
I didn't go crazy and clean the bottoms of the boards in the PSU, only cleaned the selective areas where I removed parts and obviously needed clean joins...taking a less is more approach. JP are you saying that the "gunk" covering the PCBs is glue? Or just if one encounters the wire/mod and there's glue there?
@pfarrell - the glossy, mostly clear coating is acrylic conformal coating. I've seen it on a lot of Japanese and one or two American PCBs. I think JP is referring to the thicker brown stuff over the wires in my photos, still present after cleaning off the coating. That stuff looks like the glue often used to hold caps which is typically called Sony bond glue.
Leaving the acrylic coating in place contaminates new or reflowed solder joints to at least some extent, as I found when I first encountered the material about 10 years ago. It is now my practice to remove the coating from any solder joint, or with older boards, all of it. Alcohol works well, but for the entir board, I follow up with Simple Green and then water. In some cases, I'll re-apply new acrylic conformal coating - usually with thin boards, or those with marginal-quality traces or those I've had to repair and/or re-adhere to the board. I use MG Chemicals 419D or 419E, as it's easier to remove than the silicone or polyurethane versions.
Leaving the acrylic coating in place contaminates new or reflowed solder joints to at least some extent, as I found when I first encountered the material about 10 years ago. It is now my practice to remove the coating from any solder joint, or with older boards, all of it. Alcohol works well, but for the entir board, I follow up with Simple Green and then water. In some cases, I'll re-apply new acrylic conformal coating - usually with thin boards, or those with marginal-quality traces or those I've had to repair and/or re-adhere to the board. I use MG Chemicals 419D or 419E, as it's easier to remove than the silicone or polyurethane versions.
I just grabbed this from a radio station sale in my town. Went to the sale for vinyl but they had all this old equipment they were taking offers on. The DJ (awesome guy) said this one had speed problems, so he sold it to me for $25. I had to buy the matched power supply elsewhere but so far the investment is still low enough that I can put more resources to restoring it. I will check the innards this weekend. The outer surface seems to just have minor stains, no dings or corrosion (central california weather). Any recommendations of cleaning off the sticker residue? Besides the recap what would be a high priority to restore for the electronics or elsewhere? Power supply will come this week and I will test to see what else. Pretty excited for this restore.
I just did a chassis that had all sorts of glue residue on it, was able to get it off with nothing more than lots of hot water and fingernail. It was extremely helpful that the table was taken completely apart so the chassis could be in the sink, but after some decent effort we decided not to refinish it as the overall improvement was notable. Will live with the big scratches as it’s indicative of the table’s previous life. Is it perfect? No, but it will look neat when done.
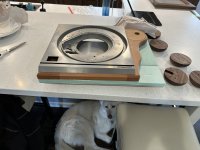
Plinth in progress, 1” slate will go in place of the green foam.
Plinth in progress, 1” slate will go in place of the green foam.
Attachments
@Enochrome
Goo gone, or 99% alcohol (not that I trust amazon basics at all) for glue residues, cotton cloth or microfiber. There is a clear coat on the surface of these TT it seems to me—though very hard...
Goo gone, or 99% alcohol (not that I trust amazon basics at all) for glue residues, cotton cloth or microfiber. There is a clear coat on the surface of these TT it seems to me—though very hard...
Re: circle arm boards, when I make them this way it's a two part process with the router. With a decent material thickness and tight tolerance they don't move easily but allow for infinite adjustment...and don't need a mechanical attachment to the plinth, though perhaps warranted...That looks nice, Jim. I like the "live edge" style wood plinth. Will you be bonding/gluing the slate to the wood? Also, nice arm board cutouts - looks like you used a hole saw with a fine kerf?
Last edited:
I just did a chassis that had all sorts of glue residue on it, was able to get it off with nothing more than lots of hot water and fingernail. It was extremely helpful that the table was taken completely apart so the chassis could be in the sink, but after some decent effort we decided not to refinish it as the overall improvement was notable. Will live with the big scratches as it’s indicative of the table’s previous life. Is it perfect? No, but it will look neat when done.
Plinth in progress, 1” slate will go in place of the green foam.
Nice wood base.
Nice dog too.
Thanks 6L6 and pfarrell. I will start with hot water and cotton cloth, then alcohol if needed for the sticker residue. I'll most likely take it apart to be safe and the mk2a has a one piece board for easy removal.
Thanks 6L6 for posting those links at the start of the thread, I was reading through the first link after I posted here; seems pretty straight forward. The brake part seems a little more complex, hopefully that won't be an issue for me. Recap and test first. Replacing the trim pots with new ones necessary? Are they prone to loss of accuracy over time?
I am thinking of a birch ply, mdf, and layers of damping for the plinth. The design will be pretty basic, although I have not decided whether to go with a removable arm board. I have a Terminator linear tracking tonearm that would be great with this deck.
Awesome job 6L6. What a result with just water and elbow grease; looks great. The plinth is very cool.
Not really. The MK2A has a lot more adjustments (similar to a MK3) and the SM method for at least one of them doesn’t really work well. Easiest if you can leave most of those alone.Replacing the trim pots with new ones necessary? Are they prone to loss of accuracy over time?
- Home
- Source & Line
- Analogue Source
- The Incredible Technics SP-10 Thread