A curiosity has now got me.
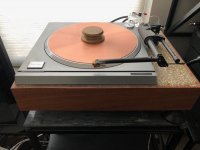
With the 20mm POM being reported as advantageous to the SQ in the Comparisons of Materials.
Now the 20mm POM is in use, a Spacing of approx' 30mm is present from Chassis to Top of Platter.
This increased Height Dimension appears to open up a opportunity to use a
Peripheral Ring.
I am now wondering if the addition would be capable of offering a perception of further improvement to the Sound Quality ?
That is an excellent question and the answer is yes. The problem with a ring on the SP10 is not the chassis clearance but the chamfer on the platter fouls the ring.
I use a peripheral ring and before I made the new platters I used a 5mm acrylic spacer under the rubber mat to raise the LP so the ring didn't hit the platter.
With the 20mm POM it is possible to use the ring with 10mm weights. I have the Wayne Audio SS-2 that comes with the 10mm weights, I have used it both ways and can hear no difference with or without the weight so I use it without.
The ring provides a sonic improvement as it flattens and couples the LP to the platter.
All of the testing of the POM platters I have used the ring..
One of my friends has constructed a little PCB with a de-bounce circuit for the BBC-modified SP10s. I have a prototype mounted in my SP10 P/L. The circuit is based on a programmable chip and both the hardware and the program works well.He is currently redesigning it with SMDs in order to fit it onto an existing connector in the SP10.
would a finished board be something that would be of interest to people here?
The cost of the circuit, which it is hoped will be a drop-in replacement for the SH-10C connector box to enable a direct connection to the SH-10 E power-supply would still need to be priced, but will probably be under £100.
Question
I have two SP-10 MK2's in incredibly good condition, both with the original obsidian plinths, one EPA 100 tonearm and two original technics head shells.
I have decided to build a resin/bentonite plinth (decision between bentonite and Panzerholz). For now, I thought I would essentially copy the "floorplan" and elevations of the existing plinth as I want the tone arm to attach directly to the plinth for damping. No arm board.
My question/problem is.... How do you accommodate changes like adding a delrin mat, or different arms? Is it basically one plinth per setup or is there a way to accommodate changes. And, how would that be done.
Thanks for the help. Totally relying on experience here.
Regards,
Don
To accomodate a a variety of Tonearms the Plinth will need to have a Oversized Hole and a Tonearm Board/Base Plate to allow for a Base Plate to be used to Suit different Geometries and be securely fastened.
The Pillar on a Tonearm should allow for an Elevation of the Wand to suit a added Platter Material.
Otherwise if the Tonearm Board is selected as the mounting method, it will need to be of a additional Thickness and not be flush to the Plinths Top Surface.
A Tonearm Board could be produced from P'holz to give a close match in properties to the Bentonite Resin Plinth.
A little research should show how to produce a inlet for the Tonearm that allows for a securely fastened Tonearm Board / Base Plate.
Thanks JohnnoG,
My next question on the plinth is the resin/bentonite mix. Guidance would be greatly appreciated. Some volume or weight proportions. Or, something like as much bentonite as you can get in the mix and be fully wet. There is possibly a wide range here.
Thanks,
Don
With fiberglass work you normally squeegee as much resin out as you can as excess doesn't do any good. So, my guess would be on the dry side but there are working considerations. I have no experience with bentonite. Is bentonite the primary sound absorber?
The EPA100 has quite a lot of height adjustment to it. I run a platter that is 15mm taller than the OEM and my EPA100 fit fine.
The other thing you can do is use an aluminium arm board if needed as most tonearm bases are aluminium there is no acoustic impedance difference, should work fine.
The resin / bento mix I use is 2:3 by weight. I used Catsan kitty litter, but any bentonite kitty litter will work.
Catsan Ultra Clumping Bentonite Cat Litter 7kg
For the mold you will need to ensure you make inserts for all the holes you need in the plinth. Machining this stuff is messy.
warrjon,
Big help. Covers all the key questions. Thank you.
I bet it is messy. Nice combo - clay and resin mix in a fine dust.🙁
R,
Don
Big help. Covers all the key questions. Thank you.
I bet it is messy. Nice combo - clay and resin mix in a fine dust.🙁
R,
Don
Happy to help,
The bentonite is not a fine dust, it should be a mix of pellets that will vary in size, don't crush it to dust use it straight from the pack.
The bentonite is not a fine dust, it should be a mix of pellets that will vary in size, don't crush it to dust use it straight from the pack.
If Lenco Heaven is visited there are Photo Record Builds using Polybentonite.
It is important that the Resin is the correct product, it is worth making sure that the resin is available to purchase without too much hassle.
It is important that the Resin is the correct product, it is worth making sure that the resin is available to purchase without too much hassle.
Oops
warrjon,
I probably didn't say that very well. I meant when finishing the plinth. If its rough and there is a lot of sanding and grinding there is going to be a lot of dust that is not the friendliest kind.
Don
warrjon,
I probably didn't say that very well. I meant when finishing the plinth. If its rough and there is a lot of sanding and grinding there is going to be a lot of dust that is not the friendliest kind.
Don
resin / bento mix
I made a plinth with the resin / bento mix.
I used hardwood strips for the sides of the mould, so no finishing would be needed. The top is the natural level of the mould, I did not sand it either.
Where I did sand was under the turntable where it it fits snuggly to the resin / bento surface so it was even. It is a very very hard material and I gave up sanding to level.
I used tape on the underside of the turntable and used small thin wood shims to level the turntable to resin / bento, then mixed up more resin and used a putty knife to fill the gap.
Cleaned up the surface as best I could before it cured.
It is not perfect, but it works and sounds great.
Removed the turntable and tape and remounted the turntable and mounted the arm, drilling holes where needed.
Hope this helps,
Rush
Attachments
Rush
I like the Honesty to the Aesthetic of the Plinth.
Fair Faced Concrete is a much desired design/feature today.
Your work aligns with this feature quite nicely.
Good on you to be reserved in the cosmetic of the model.
I like the Honesty to the Aesthetic of the Plinth.
Fair Faced Concrete is a much desired design/feature today.
Your work aligns with this feature quite nicely.
Good on you to be reserved in the cosmetic of the model.
I like the timber surround look. I was going to do this but was a bit concerned that the resin would not bond to properly to the timber and eventually separate.
I bought some West Epoxy for my next plinth. The Timber will be coated with epoxy as this will bond well to the timber and the polyester resin will bond to the epoxy.
I bought some West Epoxy for my next plinth. The Timber will be coated with epoxy as this will bond well to the timber and the polyester resin will bond to the epoxy.
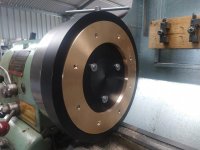
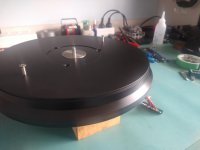
POM Platter
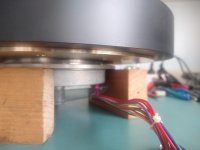
Another platter. This time 40mm POM with a gunmetal insert to lower COM. Removing the GM insert and this will fit a stock SP10 chassis with minor mods.
The POM sits directly on the motor and uses a secondary spindle so the motor spindle is isolated from the LP.
I had a quick listen last night and the results are promising.
Attachments
warrjon,
How exciting, What are "minor" adjustments? Hopefully that's in our world since you can do just about anything in your world.😀😀😀
Don
How exciting, What are "minor" adjustments? Hopefully that's in our world since you can do just about anything in your world.😀😀😀
Don
It's only the outer lip where the outside of the GM is in the photo it's 35mm. That POM lip need to be reduced to 10mm to fit down the strobe recess.
However I'm not sure if in a stock SP10 the difference between the OEM/POM and the 40mm POM would be audible, I don't have a stock SP10 in a plinth yet to test it. It's definitely audible in a Kaneta plinth as the resonance control is far superior with the motor coupled directly to the Polybento.
I have another SP10 owner coming over in a couple of weeks I was planning on offering him a couple of platters to test in his stock SP10 setup and give me feedback.
Last edited:
- Home
- Source & Line
- Analogue Source
- The Incredible Technics SP-10 Thread