We did Chat about it and for the FE127 i suggested starting with the middle-size CC to give you more room to play.
dave
dave
a suggestion or two...
if you need to have a larger back cavity volume there is no problem at all. Simply cut a large hole in the rear wall (directly behind the driver. Then you can utilise the "dead" space and volume can easily be adjusted with small bags of sand which will also act to camp the panels. A second suggestion comes to mind if you dont want to open up the "v" shaped cavity. You could fill the rear chamber behind the driver with perlite but you will have to use fine mesh and poly batting to insure that the perlite stays inside of the cavity and cannot get into the horn or the driver. This damping will yield you the largest increase in apparent volume you can achieve but it will require some extra work to insure that it is properly contained. PS: why nor run the speaker wire through the dead space rather than running through the throat end of the horn? Best regards Moray James.
if you need to have a larger back cavity volume there is no problem at all. Simply cut a large hole in the rear wall (directly behind the driver. Then you can utilise the "dead" space and volume can easily be adjusted with small bags of sand which will also act to camp the panels. A second suggestion comes to mind if you dont want to open up the "v" shaped cavity. You could fill the rear chamber behind the driver with perlite but you will have to use fine mesh and poly batting to insure that the perlite stays inside of the cavity and cannot get into the horn or the driver. This damping will yield you the largest increase in apparent volume you can achieve but it will require some extra work to insure that it is properly contained. PS: why nor run the speaker wire through the dead space rather than running through the throat end of the horn? Best regards Moray James.
Dave,
Sorry I don't remember that conversaion, woops. Well I have lots of midrange coning from the mouth, sooo. Well I have cut our the dead space for design purposes. I will be stuffing the CC soon. I'm not quite settled in, but my folks are going to bring some stuffing when they come up.
Josh
Sorry I don't remember that conversaion, woops. Well I have lots of midrange coning from the mouth, sooo. Well I have cut our the dead space for design purposes. I will be stuffing the CC soon. I'm not quite settled in, but my folks are going to bring some stuffing when they come up.
Josh
my frugal horn is finished
Hi there,
My frugal horn, wedgie version, is finished and running. Made of plywood, using Dave's modded FE126E's. Finished with ebony stain and beeswax rubbed in. Cavities filled with sand.
Sorry, no pix yet - don't have a camera.
Only tested so far with the in-law's very cheapo Sony midi system -- but they sound good. Very good. And they haven't even been placed in corners.
The thing that has struck me most is how they tend to disappear. Midrange is amazing.
Cannot wait to get them set up properly and do some serious listening, in a few weeks when I move country and unpack my other stuff. These are my first ever fullrange speakers - and were great fun to build.
Thanks to all involved in this project. More feedback upcoming as soon as I get installed properly.
rgds, ssmith
PS: I'm using the small chamber for now -- any idea on optimum volume for the FE126E's???
Re: my frugal horn is finished
See post #344 above regards Moray James.
PS: I'm using the small chamber for now -- any idea on optimum volume for the FE126E's??? [/B]
See post #344 above regards Moray James.
Re: my frugal horn is finished
🙂
The definitive answer still awauts more people playing, but we have been happy with the small chamber for the FE126.
dave
ssmith said:Hi there,
My frugal horn, wedgie version, is finished and running. .. but they sound good. Very good.
🙂
PS: I'm using the small chamber for now -- any idea on optimum volume for the FE126E's???
The definitive answer still awauts more people playing, but we have been happy with the small chamber for the FE126.
dave
Forgot to mention that I did the 'level 2' build : curved back, without supra baffle at the front or diffuser at the back.
WAF is VERY high. So is MILAF (mother-in-law).... she wants a pair....
Nearly finished a t-amp and a NOS dac with tube buffer output. Really looking forward to some serious listening. But just shifted them to the corners of the kitchen and they immediately produced the most incredible soundstage.....
But honestly, these speakers have really surprised me connected with lamp cord to the Sony midi system. Soon I'll be comparing them to my Norh 6.0, 6.1's and 9.0's. But I suspect I may not be going back to 2-ways.... 🙂
SSmith,
Interesting, in India are you subject to both WAF and MILAF, or is it only a factor in this case because she likes them?
Interesting, in India are you subject to both WAF and MILAF, or is it only a factor in this case because she likes them?
johninCR said:in India
There is a story there. England & France are involved.
I'm glad to hear these are doing well out of the gate.
dave
Dave, that shore is purdy, but now these frubel horns are at the top of my to do list. Depending upon the overall height, I might build one as a center channel and place it on top horizontally, of a 55" rear projection TV. MMMMMMM more speakers.
no xo said:frubel horns...Depending upon the overall height, I might build one as a center channel and place it on top horizontally, of a 55" rear projection TV.
It is 60" (so the sides fit into a piece of BB... with careful aforethot each Frubel uses 1 sheet of 5x5 BB.
dave
That would look a little large on the TV, but I have 2-18MM 5X5 sheets of BB ready to cut. It`s always nice to have options.
Don't beat me to completion of the first pair guys...
Second box should be completed by tomorrow evening, so I'll let you know about the sound then. I'll probably be asking for you guy's advice on how to tweak them over the weekend.
Second box should be completed by tomorrow evening, so I'll let you know about the sound then. I'll probably be asking for you guy's advice on how to tweak them over the weekend.
planet10 said:a mouse-eye view
How does your mouse use a digital camera with those itty bitty paws?
dhenryp said:[How does your mouse use a digital camera with those itty bitty paws?
Actually, with all the cats around here, there aren't many mice around here. Now if they'd only catch the pesky grey squirrel.
dave
johninCR said:SSmith,
Interesting, in India are you subject to both WAF and MILAF, or is it only a factor in this case because she likes them?
whew, I had to re-read that - my intial reactin was that WAF and MIL F would be mutually exclusive (or else a very interesting family history)

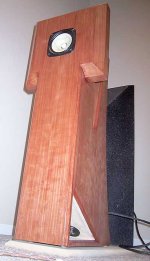
this is my unfinished version of 1.4 minus the wedge and the curved back.
the front,top and bottom is also altered so its one piece with no Baltic birch ply showing. the back will have trim also to hide the ply.
the front and top are a unique pick of plain maple that has a nice ripple in it.
It should come out in the stain. there is no baffle because it was not in the WAF. However before it gets finished I may add some maple wings if I can get away with it after it gets some break in time.
P.S. Dave your plans could not be any better. they were as perfect as you could get and zero guessing.
Your modded drivers look awsome in them, so good in fact I may not stain at all.
Thanks for everything
the front,top and bottom is also altered so its one piece with no Baltic birch ply showing. the back will have trim also to hide the ply.
the front and top are a unique pick of plain maple that has a nice ripple in it.
It should come out in the stain. there is no baffle because it was not in the WAF. However before it gets finished I may add some maple wings if I can get away with it after it gets some break in time.
An externally hosted image should be here but it was not working when we last tested it.
An externally hosted image should be here but it was not working when we last tested it.
P.S. Dave your plans could not be any better. they were as perfect as you could get and zero guessing.
Your modded drivers look awsome in them, so good in fact I may not stain at all.
Thanks for everything
- Home
- Loudspeakers
- Full Range
- The Frugel-Horn Project