I know nothing about plastics and such...but.
You've been able to model the thing in 3D CAD...
What about 3D printing the whole lamella (already assembled) and support assembly in 1 pass- you could print it with almost no gaps between the lamella- heck they could each be a more accurate part of a sphere.
I wonder if any suitable 3D printing materials exist..?
Print assembly from Voice coil up and attach to seperate voice coil / magnet assembly...hmmmm
Magnesanti ...amazing work.!
Gubrin And others
Hey Gubrin The plan is to make all drivers as per mbl to have as a control in testing as I plan to improve on the mbl design. Everyone who is interested in somehow making your own whether that is a kit or parts or what have you please post so that I can gauge the interest. After a fair bit of comments we can try to sort something out.
Hey Gubrin The plan is to make all drivers as per mbl to have as a control in testing as I plan to improve on the mbl design. Everyone who is interested in somehow making your own whether that is a kit or parts or what have you please post so that I can gauge the interest. After a fair bit of comments we can try to sort something out.
Diy'er
Rethinking this Even If I were to give out every part needed to make this that includes metal housings parts, lamellas, motor, neoprene, glue, alignment parts, screws, wire, and a guide it would be too much work and too difficult for anyone to build. The attachments are more or less a one time thing glue is hard to come by and is expensive A kit including all these things would be much too costly for anyone I think to consider. The only possible thing I think would suit anyone is to pre-assemble the diaphragms to mbl spec. Having the receiver do with it what ever they can. I can give metal housing specs then.
Rethinking this Even If I were to give out every part needed to make this that includes metal housings parts, lamellas, motor, neoprene, glue, alignment parts, screws, wire, and a guide it would be too much work and too difficult for anyone to build. The attachments are more or less a one time thing glue is hard to come by and is expensive A kit including all these things would be much too costly for anyone I think to consider. The only possible thing I think would suit anyone is to pre-assemble the diaphragms to mbl spec. Having the receiver do with it what ever they can. I can give metal housing specs then.
David,
Besides a few people who have a machinist type of background I don't really see this as a diy type of speaker build. How many people, probably no more than a handful on this entire site have ever assembled a speaker from scratch? Perhaps you could offer a kit where the entire moving assembly was already assembled, but to just expect someone to be able to construct these speakers with all the glue joints and multiple materials I think would just be a disaster and would give you a bad rap when someone can't make this work. A fully assembled moving assembly would be tough enough to get right and would still require alignment fixtures for assembly with the motor and top plate. If you find a couple of people capable of doing this level of construction who can add to the project that would be another avenue to explore, but to just give out these parts in raw form just makes little sense to me. I see you are indeed getting a following and interest, now you have to decide how to work with others and make this a truly inspired project with the improvements that should trump the MBL in final use.
Besides a few people who have a machinist type of background I don't really see this as a diy type of speaker build. How many people, probably no more than a handful on this entire site have ever assembled a speaker from scratch? Perhaps you could offer a kit where the entire moving assembly was already assembled, but to just expect someone to be able to construct these speakers with all the glue joints and multiple materials I think would just be a disaster and would give you a bad rap when someone can't make this work. A fully assembled moving assembly would be tough enough to get right and would still require alignment fixtures for assembly with the motor and top plate. If you find a couple of people capable of doing this level of construction who can add to the project that would be another avenue to explore, but to just give out these parts in raw form just makes little sense to me. I see you are indeed getting a following and interest, now you have to decide how to work with others and make this a truly inspired project with the improvements that should trump the MBL in final use.
Tweeter
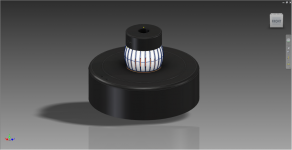
Detailing of Mbl Tweeter Ht37 has begun. The driver has been chosen and all parts have been modeled. Mid-range will continue to be improved upon.
Detailing of Mbl Tweeter Ht37 has begun. The driver has been chosen and all parts have been modeled. Mid-range will continue to be improved upon.
Test Tower
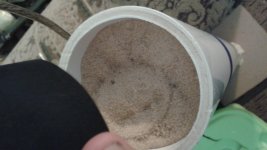
Below are the images of the test tower/listening tower that I made the tower is sand filled as can be seen. Also a quick connect/disconnect method. it holds the mid-range in the same vertical distance from the floor.
Below are the images of the test tower/listening tower that I made the tower is sand filled as can be seen. Also a quick connect/disconnect method. it holds the mid-range in the same vertical distance from the floor.
Attachments

Last edited:
Blocking
I decided to play a little with artificially reducing the dispersion in the northern and southern hemisphere. I used foam board at full dimensions to block the northern and southern hemisphere and all variations in between. what I found was what one would expect the broad blocked the dispersion and created a platform where ever it was put. Doing this I found that both singular board in the single hemisphere creates an unnatural platform. and just sounds wrong. The best compromise was placing both boards in polar hemispheres. This created a more balance sound but the ultimate was no boards at all which allowed the speaker to speak to the room and create holographic images and a fuller sound. This was tested with the mbl top-plate. Further reduction will be tested with the nylon units. I will play a little more with dimensions and make a small write up. My theory with the speaker and really any is that the speaker must be allowed to fully speak to the room and the room must accommodate the speaker doing this allows for the room itself to become the platform for the sound and not the speaker.
I decided to play a little with artificially reducing the dispersion in the northern and southern hemisphere. I used foam board at full dimensions to block the northern and southern hemisphere and all variations in between. what I found was what one would expect the broad blocked the dispersion and created a platform where ever it was put. Doing this I found that both singular board in the single hemisphere creates an unnatural platform. and just sounds wrong. The best compromise was placing both boards in polar hemispheres. This created a more balance sound but the ultimate was no boards at all which allowed the speaker to speak to the room and create holographic images and a fuller sound. This was tested with the mbl top-plate. Further reduction will be tested with the nylon units. I will play a little more with dimensions and make a small write up. My theory with the speaker and really any is that the speaker must be allowed to fully speak to the room and the room must accommodate the speaker doing this allows for the room itself to become the platform for the sound and not the speaker.
Last edited:
David,
As you can see i would say that this type of speaker to sound as best as possible is going to require very critical placement in a room. The interference patterns bouncing off all the different surfaces of a room are going to have some very strong interactions. I would aay a conic horn in a room is the least critical and this omnidirectional design the most critical for room placement. I think many of us older audio guys will remember this same type of situation with the original Bose 901 speakers and room boundary conditions.
As you can see i would say that this type of speaker to sound as best as possible is going to require very critical placement in a room. The interference patterns bouncing off all the different surfaces of a room are going to have some very strong interactions. I would aay a conic horn in a room is the least critical and this omnidirectional design the most critical for room placement. I think many of us older audio guys will remember this same type of situation with the original Bose 901 speakers and room boundary conditions.
New shipment
Just received a new shipment that will easily allow for mbl quality drivers. The previous Speaker used yellow contact glue and a specialized glue for the lamellas which both turned out to not be so great a new glue allows for easy placement of sealer and lamellas with great strength and beauty as no glue will be showing in future builds only small silicone sealer dots will be seen. Build of another unit has begun with this new glue.
Just received a new shipment that will easily allow for mbl quality drivers. The previous Speaker used yellow contact glue and a specialized glue for the lamellas which both turned out to not be so great a new glue allows for easy placement of sealer and lamellas with great strength and beauty as no glue will be showing in future builds only small silicone sealer dots will be seen. Build of another unit has begun with this new glue.
Yeah Steve that thing is really nasty to work with and after all the adhesion was less than stellar. This new glue has super strong adhesion for the materials I am working with. The clean up if I accidentally get some anywhere will also be super easy and just allow for a great clean look I have not been able to get until now.
New Guard
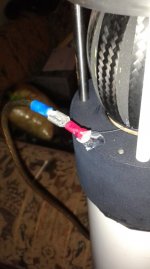
I just got done assembling a new unit. I took care to improve this one where the other needed work. the adhesive holding the carbon in place is put behind the lamellas so it is no longer visible. Also there is no longer adhesive visible from the sealer attachment. To add to this the bonds are also much stronger. The method for attaching and detaching the diaphragm from the to plate has been finalized so you can look forward to the measurements.
I just got done assembling a new unit. I took care to improve this one where the other needed work. the adhesive holding the carbon in place is put behind the lamellas so it is no longer visible. Also there is no longer adhesive visible from the sealer attachment. To add to this the bonds are also much stronger. The method for attaching and detaching the diaphragm from the to plate has been finalized so you can look forward to the measurements.
...looking over The Master's shoulder....
...and Finally catching up on your progress...
Beautiful Build, Mags. Absolutely stunning what you've achieved. Caught the Soundcloud entry, liked your opening cut. 😉 And it sounds marvelous, despite what omnis sound like to a microphone. Our ears are somewhat more suited to what they do...
I'll have to try filling my bases with sand and see if there's any improvement with my progeny. Hadn't occurred to me.
Having owned a pair of 901's a long time ago, there's really no comparison. 901's did one thing really well, play Extremely LOUD with an enormous soundstage. Not a subtle speaker, no...
Reducing the dispersion (as you noticed) doesn't offer any advantage, esp. if you're 'absorbing' the field to any great degree. Early reflection might give you additional perceived volume, but might muddy up imaging. I've given mine lots of space to play in, and it seems to work well to my ancient ears....
A DIY kit? I'm pretty adept with tools, but the precision you're exhibiting reminds me of brain surgery. I'm teasing a little, but I'd only sell it with a disclaimer and a signed release ("If you f up, you were warned."). Not for the average enthusiast, no. Bring your A game, or stay home...
3D printing the bass lamellas? The process has moved on to 'printing' metals, but I suspect it's still a high $ endeavor. It would lend itself to being a stamped object, but the precision of the molds involved, *whew*. Big bucks either way. You might consider staying with cf for a test version, since you seem to have that process down. But that's just MHO. *S*
Anyhow...you're becoming legend. Sell tickets. 😉
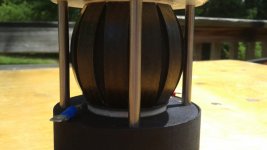
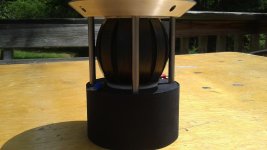
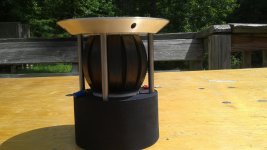
Pictures
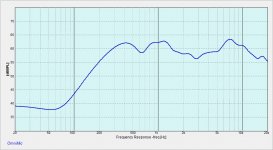
Here is the fully assembled unit. Interesting to see what the measurements will say. I haven't had a chance to listen to it I am waiting for a audio cable should arrive today.
Here is the fully assembled unit. Interesting to see what the measurements will say. I haven't had a chance to listen to it I am waiting for a audio cable should arrive today.
Attachments

Last edited:
"...waiting for a audio cable..." for me would feel like waiting for Godot. *L* I'd have dug into my misc. and found Something that could be conscripted...remarkable restraint, Mags. 😉 But I understand, if you're going to measure it, best to have The Good Thing in place....
Looks terrific, and it'll be the 'proof of the pudding' to see what you've created.
Meanwhile...I'm sitting on a pile of PVC 'rings 'n things' here...about to lash together V3.5 ( or V.4...I'm been 'blurring' what to call this pair...). We'll see soon enough what sort of racket they're capable of.
...and regardless of what I do, the pic flips...*grrr*
Attachments

Ok I have had the unit playing for some days the first impression is it play pretty nicely. not much distortion. there is no voice coil rub but there are distortion in the form of a slight air leak and slight mechanical vibrations. they are minimal and are here and there depending on several factors. The stand I made broke so no critical listening has taken place as any other support wont do it justice.
Magna.
The air leak will be simple, the mechanical vibration could be a much greater concern and problem to solve. Do you have any idea what is making the noise, is it from the lamellas themselves or some other source? I'm still not a fan of the epoxy resin carbon fiber combination but we will see. A few air entrapments in the laminate would be all it takes to cause a problem with an internal noise in the lamella.
The air leak will be simple, the mechanical vibration could be a much greater concern and problem to solve. Do you have any idea what is making the noise, is it from the lamellas themselves or some other source? I'm still not a fan of the epoxy resin carbon fiber combination but we will see. A few air entrapments in the laminate would be all it takes to cause a problem with an internal noise in the lamella.
- Home
- Loudspeakers
- Planars & Exotics
- Summer Project - Replication of MBL loudspeaker 101mkII