Please post them. Inquiring minds want to know 🙂Hi. I can take some pictures. Do you want me to post them here or send them directly to you?
Yes I agree , here would be best since these are getting old now and the rubber replacement lip might
stir some minds on how to make these available..
stir some minds on how to make these available..
Just brainstorming here: chances that inverting the platter/bearing housing and filling with 100°C oil and letting it soak, or maybe a tall pan filled with hot oil and submerging the assembly at least to the top of the second bronze bearing, would achieve at least partial re-impregnation without removing the oilite bushes? It might be at least a little better than just a dribble on the shaft as I've done so far. I suppose there's some risk the bronze bushes might come loose from the housing if they expand at different rates....they can be “re-lubed”, and should be, after every 1000 hrs of use. It’s done under vacuum, achieving nearly 100% new oil impregnation, or by boiling in oil at 100 C (90%)...
Last edited:
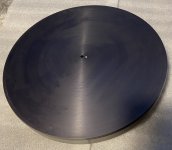
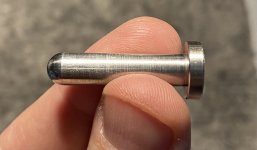
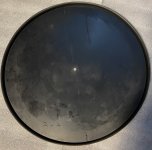
Ok, so here’s the disassembled platter. Spindle piece was removed before me by somebody using probably a hammer, because the top of the spindle has minor damage. I used wood. It came out with an effort, but nothing too dramatic. Sapphire, as I mentioned before, has cracks in it. Later on that.
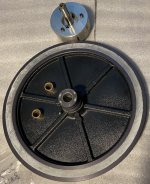
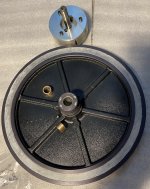
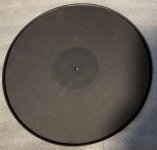
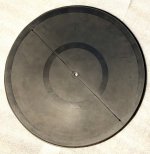
Vacuum hole is clearly seen on top of the platter. Acrylic top layer with fabric is removed rather easily, I’m not sure yet what’s holding it to the rubber layer. Rubber layer top shows vacuum channel holes. In the underside discoloration are clearly seen, where circular double-stick tape was used. I found only one place online that sells it, and each sheet is $50, not cheap. I imagine tape is used for ease of disassembly. Platter can be easily reassembled using 3M spray adhesive, with careful masking of the vacuum channels. The biggest two problems here are:
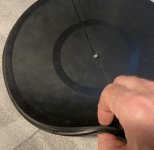
1) Oilite bushings. They came out with a standard pulled rather easily, but they seem to be a non-standard size, so I don’t know where to get them yet. Oilite bushings can not be rimmed or “opened-up” to fit, they have to be exactly made to size. Any attempts to adjust the inside diameter will result in destroying the porous surface, and will result in horrible performance. I think one of the posters here or in the other Sota thread ran into this problem;
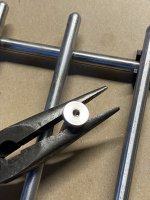
2) Sapphire. Has to be custom made. Or, the one that’s available on ebay can be used, if properly glued right on top of the old one. It is slightly larger, and, since the original is slightly recessed, it has to be glued on a supporting bed, such as two-part epoxy, if it will withstand oil exposure. The new sapphire plate is also very skinny, so it has to be dealt with more car. Perhaps someone can produce exact replacement.
That’s all, faulks!
PS With new bushings, proper ball/plate lubrications, new belt, motor in good condition, very decent wow/flutter figures can be obtained from this table. With fresh coat of 5W-30 automotive oil, imitating new bushings, my table showed very impressive 0.11% in one iPhone program, and 0.07% (!) in the other. Not bad at all for a 40-yr old belt drive table, imho.
Vacuum hole is clearly seen on top of the platter. Acrylic top layer with fabric is removed rather easily, I’m not sure yet what’s holding it to the rubber layer. Rubber layer top shows vacuum channel holes. In the underside discoloration are clearly seen, where circular double-stick tape was used. I found only one place online that sells it, and each sheet is $50, not cheap. I imagine tape is used for ease of disassembly. Platter can be easily reassembled using 3M spray adhesive, with careful masking of the vacuum channels. The biggest two problems here are:
1) Oilite bushings. They came out with a standard pulled rather easily, but they seem to be a non-standard size, so I don’t know where to get them yet. Oilite bushings can not be rimmed or “opened-up” to fit, they have to be exactly made to size. Any attempts to adjust the inside diameter will result in destroying the porous surface, and will result in horrible performance. I think one of the posters here or in the other Sota thread ran into this problem;
2) Sapphire. Has to be custom made. Or, the one that’s available on ebay can be used, if properly glued right on top of the old one. It is slightly larger, and, since the original is slightly recessed, it has to be glued on a supporting bed, such as two-part epoxy, if it will withstand oil exposure. The new sapphire plate is also very skinny, so it has to be dealt with more car. Perhaps someone can produce exact replacement.
That’s all, faulks!
PS With new bushings, proper ball/plate lubrications, new belt, motor in good condition, very decent wow/flutter figures can be obtained from this table. With fresh coat of 5W-30 automotive oil, imitating new bushings, my table showed very impressive 0.11% in one iPhone program, and 0.07% (!) in the other. Not bad at all for a 40-yr old belt drive table, imho.
Attachments
-
 EF6CAE8B-D2D7-4578-B3EC-1AC6DC658C66.jpeg468.7 KB · Views: 95
 -
 A347B852-5F9E-4130-9AFC-FD4FE057C09D.jpeg534 KB · Views: 99
 -
 B2002620-0D00-4951-B17D-D83CAFC1CF2C.jpeg819.3 KB · Views: 90
 -
 7FD2FF61-7D10-47B9-851D-53FE84F889B0.jpeg788.5 KB · Views: 115
 -
 9AE8E4F1-949D-4917-90B9-FECCC74A1B22.jpeg227.5 KB · Views: 91
 -
 A6A75E13-7CCF-47AF-90AF-5CD875F25831.jpeg228.4 KB · Views: 97
 -
 D27D1EC7-70E2-4C46-9062-CBB23C212D2D.jpeg700.3 KB · Views: 95
 -
 1AA2DA2F-470A-44DB-BB95-0E094208F6D3.jpeg292.6 KB · Views: 114
 -
 A2567233-A7FA-47D5-99F8-36CB5CD2EF05.jpeg643.3 KB · Views: 105
 -
 54774D3F-BE9C-4C94-B7B8-BB88C241168B.jpeg603.7 KB · Views: 92
 -
 F26D0DDD-C08C-4068-A9CB-FCCA545E38D9.jpeg531.7 KB · Views: 93
This will work. But in the non-vacuum platter only. Because - how are you going to plug the vacuum holes/channels? And with this high temperature, all the layers will surely come apart. Unless you dissassemble the platter. And if you dissassemble it, you might as well install new bushings. Also, in order to get the oil all the way through the bronze, it has to be open on all sides, rather than adjacent to metal.Just brainstorming here: chances that inverting the platter/bearing housing and filling with 100°C oil and letting it soak, or maybe a tall pan filled with hot oil and submerging the assembly at least to the top of the second bronze bearing, would achieve at least partial re-impregnation without removing the oilite bushes? It might be at least a little better than just a dribble on the shaft as I've done so far. I suppose there's some risk the bronze bushes might come loose from the housing if they expand at different rates.
Like I said...brainstorm. And anything in my brain is rough as a Cat 4, these days 🙂This will work. But in the non-vacuum platter only. Because - how are you going to plug the vacuum holes/channels? And with this high temperature, all the layers will surely come apart. Unless you dissassemble the platter. And if you dissassemble it, you might as well install new bushings. Also, in order to get the oil all the way through the bronze, it has to be open on all sides, rather than adjacent to metal.
Maybe the second thought is better: deep pan, hot oil, turn the platter right-side up and lower it into the oil, to the depth of the top bronze bearing.
So I’ve ordered a couple of new oilite bushings from McMaster-Carr. Let’s see how close they will be. I also spoke to Swiss Jewel company. I’m interested to cooperate with some people here who wrote about ordering some sapphire rods from them.
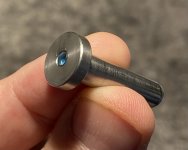
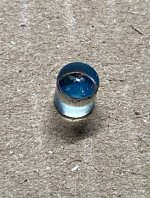
And this is how to remove the sapphire thrust bearing out of it’s housing intact: I used cigar lighter and it came out within a few seconds. It’s held in there by blue locktite.
Attachments
Reverse the sapphire and Lap the other end on a diamond stone , fine of course
use JB weld in its original housing and spin the fixed stone with a drill but will have to find a way to cross
grind the end as just holding the stone against the diamond surface will result in a crest
because surface speeds vary for center to edge of sapphire
better yet, take the glued assembly to a jeweler who can polish the end
Last edited:
Thank you. Sounds great. Except I don’t have the tools you mention and I have never done it ))). There are pretty bad cracks on the work side of it, so a new replacement would probably be in order? I don’t know, what do you think? Swiss Jewel company in PA can produce one to order, I’m not sure about the price but I imagine it will be around $50.Reverse the sapphire and Lap the other end on a diamond stone , fine of course
here's another silly thought: I'm thinking the next time I disassemble the table and lube the bearings, I might just leave the retaining plate off the spindle, bolt the spindle back to the base, then place the platter in from the top. I'm thinking this will make it easy to remove and relube periodically, but wondering if maybe it will compromise the vacuum somehow.
That’s exactly what I did. In fact, I’m using my table without its outer body, no suspension, on the wall shelf ))). Call me a brut, but until I get it going, that’s the way it is. And I don’t like the suspension anyway with my super-heavy Dynavector arm.here's another silly thought: I'm thinking the next time I disassemble the table and lube the bearings, I might just leave the retaining plate off the spindle, bolt the spindle back to the base, then place the platter in from the top. I'm thinking this will make it easy to remove and relube periodically, but wondering if maybe it will compromise the vacuum somehow.
Attachments
So how did you fix the bearing issue and do you mean the mass of the Dynavector was more
than the lead shot adjustment ?
than the lead shot adjustment ?
Yes, Dynavector was more than the table could handle. For some reason, my Cosmos came with zero lead shot, and even with cup empty, arm was too heavy.So how did you fix the bearing issue and do you mean the mass of the Dynavector was more
than the lead shot adjustment ?
i never fixed the bearing issue. I’m exploring the possibilities now, but it doesn’t seem likely that I will be able to do it myself. The bushings are not standard, so will require machining, but there are no precision machine shops left willing to do the job, and to cut the right size supphire is an impossible task for any reasonable amount of money. I don’t know if you saw my previous posts. So if I will ever gather enough money, I will send it to Sota. If not - sell it as is or for parts.
Btw, Sota has raised the prices on their upgrades. Roadrunner went up from $350 straight to $425. And Eclipse motor/controller are now $875.
- Home
- Source & Line
- Analogue Source
- Sota Cosmos: to restore, or?