I had read elsewhere that people do more than one coat…even several
On woofers where loss of some HF can be beneficial.
guesstimate about 1-2:10 mix of tinted water to Modge Podge.
Given that th starting point can differ, that seems about right.
dave
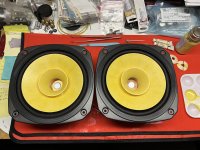
Done…faux mildew spots and all 😉
My daughter says they remind her of Golden Delicious Apples 😋
My daughter says they remind her of Golden Delicious Apples 😋
Attachments
Last edited:
Same paint tray as me.
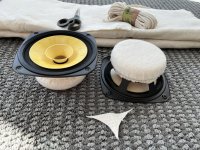
The left over dustcap would have already hit the bin.
Looks good. Give them 24 hours to throughly dry and then listen.
dave
The left over dustcap would have already hit the bin.
Looks good. Give them 24 hours to throughly dry and then listen.
dave
Hmm, didn't get a 'heads up' on this 'new' thread, so came too late to try and save the basic 206E's 'voicing'.
Oh well, with horn drivers in actual horns it's a generally good plan to try what is in effect CD horn EQ in that add a cheap 25 ohm pot in series with the speaker and roll it off till it sounds tonally balanced (flat if measuring) and use a bypass cap around the pot to let the highs through/tonally balance it out as high as practical and only then add a (super) tweeter if desired, which now can be done with something small, cheap since they're often only for top end vocals' 'breath', violins, 'air'.
Doesn't always completely solve 'shout', etc., but reduces it dramatically enough IME to keep driver tweaking to something removable such as my fave for dust caps; a suitably sized stick on 5 pointed star as used by teachers to grade little folk's work papers.

Hi GM
Thanks for the advice about trying to balance the tone/response.
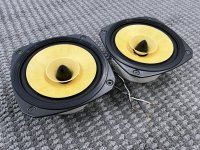
One of my 206e had some mildew staining from storage that was bothering me…so I was already going to do something to the cones to try and fix them aesthetically.
I guess I figured “In for a penny…in for a pound.”
I have the 206nv drivers that came in these horns that are unmolested.
I also have some used 208ez with T90a.
I came across some 206esr as well…unfortunately, when I received them there were also issues with mold on the cones. No idea what to do with them as I didn’t really want another project driver.
I may have to get off my lazy butt and break out the DATS and Umik to take some measurements and compare whichever drivers I decide to try.
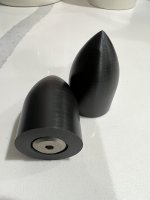
Haven’t accomplished much this weekend….new phase plug materials still haven’t shipped.
Made another attempt with some wooden craft eggs I came across, but it was a fail.
I started thinking about other basic driver mods and lining the back chamber.
No duct seal on hand. Had plasticine clay. But a bit old and wasn’t sure I wanted to deal with the mess of working it into the gap between the frame and magnet.
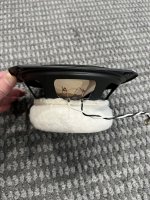
I had some cotton batting on hand. I started making some discs to attach to the magnets.
Of course all my contact/rubber cement was dried up 🤦♂️
Brainstormed other ways to attach the batting.
Came up with
some cotton chord.
Ended up with three layers of batting discs.
The third layer of batting was made big enough to wrap around the magnet and then be tied in place with several passes of cotton chord pulled tight into the gap between the frame and magnet and tied off.
So got some damping from the chord in the gap.
Trimmed the excess batting.
Ended up with what looks like a delicious pork bun covering the reflective surfaces of the magnet.
Thanks for the advice about trying to balance the tone/response.
One of my 206e had some mildew staining from storage that was bothering me…so I was already going to do something to the cones to try and fix them aesthetically.
I guess I figured “In for a penny…in for a pound.”
I have the 206nv drivers that came in these horns that are unmolested.
I also have some used 208ez with T90a.
I came across some 206esr as well…unfortunately, when I received them there were also issues with mold on the cones. No idea what to do with them as I didn’t really want another project driver.
I may have to get off my lazy butt and break out the DATS and Umik to take some measurements and compare whichever drivers I decide to try.
Haven’t accomplished much this weekend….new phase plug materials still haven’t shipped.
Made another attempt with some wooden craft eggs I came across, but it was a fail.
I started thinking about other basic driver mods and lining the back chamber.
No duct seal on hand. Had plasticine clay. But a bit old and wasn’t sure I wanted to deal with the mess of working it into the gap between the frame and magnet.
I had some cotton batting on hand. I started making some discs to attach to the magnets.
Of course all my contact/rubber cement was dried up 🤦♂️
Brainstormed other ways to attach the batting.
Came up with
some cotton chord.
Ended up with three layers of batting discs.
The third layer of batting was made big enough to wrap around the magnet and then be tied in place with several passes of cotton chord pulled tight into the gap between the frame and magnet and tied off.
So got some damping from the chord in the gap.
Trimmed the excess batting.
Ended up with what looks like a delicious pork bun covering the reflective surfaces of the magnet.
Attachments
the gap between the frame and magnet
The shaping of that bit is important. Platicine should be fine, maybe not quite as easy to use.
dave
Greets!
You're welcome!
FYI/FWIW, etc., haven't ever needed to deal with mold staining a driver (yet), but WRT to mold, dust, etc., in general, I use a fine mist sprayer in a hydrogen peroxide bottle since it dissolves it enough to blow any visible residue away, so great for fragile, small, intricate, knickknacks, fake flower arrangements, etc., so please let us know how it affects the removed DCs.
@Dave I just avoided obstructing the frame openings as best I could…I could probably trim the batting fuzz back a little more.
The chord is pretty well tightened into the gap and the batting forms a nice taper over the magnet.
I don’t think it will cause anything adverse sonically.
The chord is pretty well tightened into the gap and the batting forms a nice taper over the magnet.
I don’t think it will cause anything adverse sonically.
Attachments
I did some research to refresh my memory on how archivists handle mold on paper.
Basically kill the mold and afterwards brush it away while using a mask in a well ventilated (outdoors) area and a HEPA vacuum.
Two ways to kill it. Freeze it or dry it out. Moderate sunshine and fresh air circulation outside (an hour or so) can be a good option.
Once you kill/brush/vacuum, if your left with stains (like I was) you can try diluted germacides like alcohol (denatured/rubbing) or perixide.
Don’t spray/soak. Don’t brush/rub. Blotting with cotton balls/pads/Q-tips is best.
That’s about it.
Never use bleach, vinegar or strong detergents. They will cause the paper to break down.
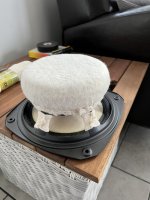
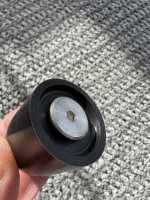
The felt sticking out will not hurt, I shipped a magnet sized felt pad with every FExx6 i have shipped. You have, it seems, taken it a step further.
dave
dave
I’m supposed to get some new bigger diameter acetal in the mail today. Hope to have new phase plugs made by the weekend.
In the meantime…thought about how others had damped and covered the stamped metal baskets on the 206e to help with ringing/reflections.
Was it necessary or beneficial?…who knows.
I had some time in my hand’s yesterday afternoon.
Challenge was continuing to use no glue (still didn’t buy any). Also, what if I wanted to remove this stuff?
I had some thicker rubber electrical tape…but its not very sticky…unless you’re stretching it tightly around wires.
So I started putting some strips of it on the basket spokes.
Striking the spokes with metal tweezers went from “clank!” to “thunk”.
I was worried it might peel and fall off.
Eventually staring at supplies on floor I picked up some finer chord and started doing some speaker basket macrame.
Takes up about the same space or less of a piece of felt wrapped around spokes…actually, tighter and neater I think.
Striking spoke results in a dull thud.
Attachments
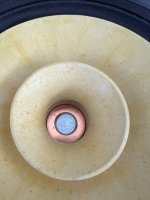
Do you find the 1 steel screw in the centre allows the phase plug to “rock”/“fall over”. Why i went to 2 or 3 spaced screws.
Sound?
dave
Sound?
dave
Hi Dave
The screws are very stable once in place on the magnet pole.
The heads on them are flat and are 3/4” (~20mm) in diameter.
They were left over from some furniture I discarded.
I have purchased longer screws of the same type at the local hardware store to mount transformers in my projects.
I machined a recess for the screw head so they are barely proud of the phase plug base.
The drivers aren’t installed or played yet.
I’m going to line the back chambers before I install them.
Maybe this weekend.
Attachments

barely proud of the phase plug base
I always recessed just enuff so that the screws do not actually touch the pole piece.
dave
Interesting! Wasn't aware there was such a large selection: https://lens.google.com/search?p=Af...oUmMwRmhRM1F0VldoaFp6WXRUV2hUV1ZsNFp3PT0iXQ==
Any reason why?I always recessed just enuff so that the screws do not actually touch the pole piece.
Are there concerns about messing with the magnetic field of the driver?…I would think that might be possible regardless of whether the bolt makes contact.
I had thought about recessing the head slightly, but was afraid that I might lose too much of the magnetic force holding it in place and it might move around. The Delrin/Acetal has a very slick surface.
I suppose I could machine the recess deep enough for the head to fall below the surface and then adjust the height as needed.
The threads towards the bottom do bind a little bit, so they would probably hold it at the height I set.
Last edited:
The small srews i use do not mess with the magnetic field. I doubt your larger one will.
The screws are recesses so that there is a big flat surface to rest on and no metal on metal to potentially chatter. The bottom cavity caused by the proud screw could also be problematic, since one of the purposes of the plug is to fill the air space inside the voice coil.
dave
The screws are recesses so that there is a big flat surface to rest on and no metal on metal to potentially chatter. The bottom cavity caused by the proud screw could also be problematic, since one of the purposes of the plug is to fill the air space inside the voice coil.
dave
Been dragging my feet a bit in general.
I did notice your point about the tendency for the phase plugs to want to rock a little Dave.
After messing around with the plugs a bit I concluded that it was due to the uneven surface on the face of the pole piece.
There is some kind of seam with what looks like a small bead of sealant or adhesive between the core and a copper sleeve?
Anyway, my solution was enlarging the recess for the bolt so there was a large foot formed by the perimeter of the phase plug. The bolt is slightly recessed to prevent contact in the center that would cause rocking.
I decided I wanted to do more than swap the drivers in with modifications and make subjective impressions.
I’ve had a UMIK-1 for a while that I took a few measurements with on previous projects.
I also purchased a DATS V3 this past year…but hadn’t used it yet.
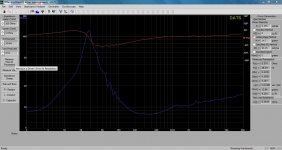
So I decided to get the DATS setup and take measurements of the modified drivers.
I wish I had measured them before I touched them. I was a bit disappointed in the discrepancy of measurements I got between the two drivers.
The DATS wasn’t perfectly consistent and I did struggle a bit with getting the calibration resistance.
It seemed like continuity was affected by the force and contact area the aligator clips had.
I retested each driver several times using an added mass of about 15 grams. The results varied slightly, but the graphs and figures in the pics are representative of what I got for each driver.
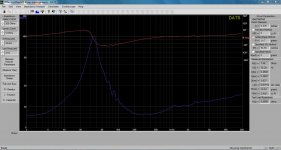
I figured I would measure the 206nv in stock form when I pull them out to see how they measure and what the consistency was like between them.
I went on to set my UMIK up and took a measurement of the Kirishima with the 206nv mounted from my listening position as a base line.
Seems like things are pretty ugly…especially on the bottom end.
There are some big nulls in the reponse.
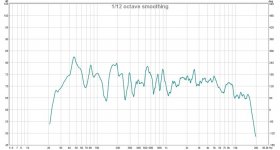
I did some smoothing to focus better on where the big issues are.
I’m not experienced enough to make definitive conclusions, but it seems like the nulls are probably due to the fact that this is a pretty reflective smaller room.
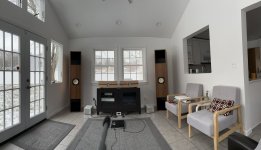
It’s a 12’ X 14’ sunroom with a 10’ vaulted ceiling that has glass on three walls with no curtains.
I’m wondering if the horns having no lining could also be contributing to these issues.
I’m not sure if I should be taking other gated measurements closer to the speakers on and off axis and/or at the mouths of the horns to make better conclusions.
Scratching my head over what to do about it. Seems I’ve opened a can of worms.
I did notice your point about the tendency for the phase plugs to want to rock a little Dave.
After messing around with the plugs a bit I concluded that it was due to the uneven surface on the face of the pole piece.
There is some kind of seam with what looks like a small bead of sealant or adhesive between the core and a copper sleeve?
Anyway, my solution was enlarging the recess for the bolt so there was a large foot formed by the perimeter of the phase plug. The bolt is slightly recessed to prevent contact in the center that would cause rocking.
I decided I wanted to do more than swap the drivers in with modifications and make subjective impressions.
I’ve had a UMIK-1 for a while that I took a few measurements with on previous projects.
I also purchased a DATS V3 this past year…but hadn’t used it yet.
So I decided to get the DATS setup and take measurements of the modified drivers.
I wish I had measured them before I touched them. I was a bit disappointed in the discrepancy of measurements I got between the two drivers.
The DATS wasn’t perfectly consistent and I did struggle a bit with getting the calibration resistance.
It seemed like continuity was affected by the force and contact area the aligator clips had.
I retested each driver several times using an added mass of about 15 grams. The results varied slightly, but the graphs and figures in the pics are representative of what I got for each driver.
I figured I would measure the 206nv in stock form when I pull them out to see how they measure and what the consistency was like between them.
I went on to set my UMIK up and took a measurement of the Kirishima with the 206nv mounted from my listening position as a base line.
Seems like things are pretty ugly…especially on the bottom end.
There are some big nulls in the reponse.
I did some smoothing to focus better on where the big issues are.
I’m not experienced enough to make definitive conclusions, but it seems like the nulls are probably due to the fact that this is a pretty reflective smaller room.
It’s a 12’ X 14’ sunroom with a 10’ vaulted ceiling that has glass on three walls with no curtains.
I’m wondering if the horns having no lining could also be contributing to these issues.
I’m not sure if I should be taking other gated measurements closer to the speakers on and off axis and/or at the mouths of the horns to make better conclusions.
Scratching my head over what to do about it. Seems I’ve opened a can of worms.
Attachments
-
 1C6D9D66-1C9C-48FB-810D-72DE0B7866DD.jpeg356.4 KB · Views: 102
 -
 C17D7CC5-C861-406D-A0DF-6B4095190267.jpeg441.5 KB · Views: 91
 -
 573DCA85-74E5-43EF-81C2-4D8F1454CD1A.jpeg115.3 KB · Views: 94
 -
 0BB28CAB-D80A-4C64-87EE-0BFF2893C8F0.jpeg115.6 KB · Views: 106
 -
 11532852-63BB-4451-8813-AC1ACBBB42B1.jpeg54.9 KB · Views: 117
 -
 78570454-33E4-42C2-A111-A73889E4C2F5.jpeg304.1 KB · Views: 106
- Home
- Loudspeakers
- Full Range
- Sorting Through My BLH Impulse Buy