Hi Dave
Thanks for chiming in.
I went looking for information about the pre-treatment you mention.
I only found the third post in this thread regarding “conformal coating”…which appears to be something that is done after the EnABL process is performed.
https://www.diyaudio.com/community/threads/how-to-enabl.385334/
Is this the same regarding the “pre-treatment” process you’re talking about?
As I mentioned, part of what I would like to do if I pursue applying a coating would be to add a pigment of some kind to hide the mild spotting on the cone that is present.
I’m not sure what you use to add color to your coatings.
I also wanted to clarify whether the Micro Scale product is the only coating product that should be used.
I thought you had posted somewhere that other products like Modge Podge were equivalent and could be substituted?
I’m not very fond of the high gloss appearance of the Micro Scale.
On another note…after spending most of yesterday going through a lot of the same recordings I had previously played through these speakers using my DIY F2J monblocks I pretty much came to the conclusion that I prefer them over the Quicksilver Horn Monos.
The F2J left me with the impression that they were more dynamic…more well defined sonically in general and regarding soundstage depth, width and placement of instruments in space.
They seemed less veiled and distant.
They also gave me the impression they had more balls (with 5 watts!) as opposed to the Quicksilvers (rated at 25 watts).
Go figure.
Great thread and thanks so much for sharing your experience Chromenuts!
You are going to get me killed by my wife ...
Would you say that you don't see any reason to go back to open baffle, particularly your Lii Audio drivers? I ask because I have a set of the Silver 10 and F15 waiting for me to clear a place for them. I got the itch to try double mouth horns but the size and amount of work tamed that for me and I went with Frugalhorns instead.
Cheers,
Stephen
I went looking for information about the pre-treatment you mention.
I have outlined them a number of times, but even i have trouble finding them.
“conformal coating”
The last step in EnABLing. It does do (if you have not done so) some of the same stuff puzzlekoat/ModPodge does.
Step 0: Phase plugs
Step1: Modpodge — colour can be added at this point. Except for black i use some food colouring (a higher end brand gave me more choice of colour. Black is hard, since few things you think black aren’t. So i use a bit of black acyrlic paint for that colour. Thinning and amount applied depends on the driver. FR, thinned a bit and as thin as you can get away with/
Step 2:ZIG 2-way glue at teh surround/cone interface on the back (specific to Fostex FE/FF), 2 coats
Step 3: Massage the wizzer (GM) and coat the back side of the flattened part with acylic gloss
Step 4: Ductseal to smooth the shape of th eback of the driver and damp the basket
Step 5: Line the inside of the basket legs with thickish felt.
EnABL, if you develop the skill, can be done on top of all of these.
I also wanted to clarify whether the Micro Scale product is the only coating product that should be used.
I thought you had posted somewhere that other products like Modge Podge were equivalent and could be substituted?
ModPodge goes on first, acrylic goes over the EnABL spots. Micro Scale Gloss can be used in the role of the ModPodge but typicallly does not achieve the same level.
I’m not very fond of the high gloss appearance of the Micro Scale.
You can get matte and i believe one in-between. Same with the ModPodge.
dave

Hi twitchieWould you say that you don't see any reason to go back to open baffle
I wouldn’t to say that. Regardless how successful I’ve felt about my open baffle experiments so far there are still things I want to try.
I was on the road to playing with some tweeters on my last open baffle set up and I had already planned to pursue using some dual concentric drivers as well as some coaxial CDs with horns in a PAP Trio style configuration.
I’m still not sure I have an ideal space for them, although there is more room in the living area where my main system is.
These Kirishimas fell in my lap at a ridiculous price and they’re something I’ve always been interested in…I took a detour so I could have the experience.
Everything is a compromise.
There are certain things these large BLHs do well just as they are…actually more than I thought they would.
I really enjoy recordings of live performances…especially small ensembles or soloists…jazz, classical piano, guitar, a variety of traditional eastern instruments…female vocalists. These speakers do a beautiful job of presenting this type of music.
They also handle a lot of the downtempo electronic music I listen to surprisingly well.
I’m sure I could expand their versatility by working on their drivers and maybe even considering a subwoofer in the room with them.
If I want to immerse myself in the the soundscape of Floyd, crank Gary Clark Jr. Live until the children cry and dogs howl…or if my wife wants to shake her stuff to a dance remix I head for the living room system which has my Tannoy System 15 DMTii and a big Jamo sub filling in the bottom end…at least for now.
Hi Dave
Thanks again for taking the time to post.
I did some different searches and came across additional information.
There was this recent thread where things about the Fostex 206xx were talked over:
https://www.diyaudio.com/community/...fostex-fe206en-blh.387054/page-5#post-7121283
That and another thread helped me find:
https://www.t-linespeakers.org/design/tweeks.html
https://diyaudioprojects.com/Drivers/Fullrange-Modifications-Tweaks/
So I’ve got more reading to do.
A question I was left with regarding “Step 0: Phase plugs”…
You commented in more than one thread I think that you were waiting to sell off stock of 206 phase plugs before releasing a design into the wild.
I found a 166xx design doc…but no 206xx.
Do you still have stock of it he 206xx plugs to sell at this point?
Do you still have stock of it he 206xx plugs to sell at this point?
Yes.
dave
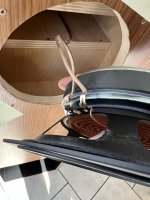
Curiosity got me to do some quick recognizance this AM.
I pulled one of the drivers to take a look at the state of affairs inside the cabinet.
So it looks like I’ve got a bare bones build.
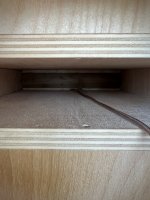
It definitely looks like the driver chamber and throat of the Kirishima.
No modifications to the drivers at all.
No lining in the driver chamber at all.
Run of the mill 16 gauge hook up wire.
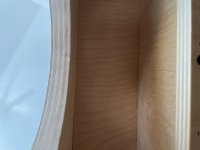
I’m a little disappointed in how the driver hole was cut. Its a rough jigsaw done affair.
It’s not clear that there was any attempt at beveling the edge of the opening…maybe a slight angle or just flexing of the jigsaw blade…only had one hand free to explore and take pics.
I would have done this with my router and a circle jig and then flipped the baffle and beveled the opening before assembly.
As I said, I will probably have to apply a supra baffle to try other drivers.
I may end up making a slightly bigger template with my circle jig to clamp to the front and recut the hole using a bushing guide on the router.
I can make the opening in the supra baffle with the circle jig and bevel it properly.
My only concern would be the slight increase of volume in the driver chamber resulting from adding the thickness of the supra baffle.
So those are my OCD quams.
Even in this state the speakers sound great playing Duo with Kenny Drew & Neils’ amazing bass virtuosity!
I suppose starting with something that sounds this good with absolutely no optimization is a good place to be!
I’m thinking the first thing I may want to consider would be some 1/2” lining in the driver chamber as recommended in the build plans?
I pulled one of the drivers to take a look at the state of affairs inside the cabinet.
So it looks like I’ve got a bare bones build.
It definitely looks like the driver chamber and throat of the Kirishima.
No modifications to the drivers at all.
No lining in the driver chamber at all.
Run of the mill 16 gauge hook up wire.
I’m a little disappointed in how the driver hole was cut. Its a rough jigsaw done affair.
It’s not clear that there was any attempt at beveling the edge of the opening…maybe a slight angle or just flexing of the jigsaw blade…only had one hand free to explore and take pics.
I would have done this with my router and a circle jig and then flipped the baffle and beveled the opening before assembly.
As I said, I will probably have to apply a supra baffle to try other drivers.
I may end up making a slightly bigger template with my circle jig to clamp to the front and recut the hole using a bushing guide on the router.
I can make the opening in the supra baffle with the circle jig and bevel it properly.
My only concern would be the slight increase of volume in the driver chamber resulting from adding the thickness of the supra baffle.
So those are my OCD quams.
Even in this state the speakers sound great playing Duo with Kenny Drew & Neils’ amazing bass virtuosity!
I suppose starting with something that sounds this good with absolutely no optimization is a good place to be!
I’m thinking the first thing I may want to consider would be some 1/2” lining in the driver chamber as recommended in the build plans?
Attachments

I took some time and measured the cabinets overall dimensions, as well as the back chamber, throat and mouths and compared them to the original Kirishima plans.
All dimensions were very close to what the plans call for. A few mm off here and there…probably due to veneering afterwards.
This was just to put any doubt to rest before I try anything else with these cabinets.
So I’d say their identity is sorted.
I’m spending quite a bit if time listening to them and thinking about how I want to proceed.
My “sorting” now will be a shift towards optimizing them.
I’ll be aiming to line the back chamber.
Since I need to remove the driver again to work on that I figured I might as well get a different driver in the cabinet to try in the process.
I have a few different drivers to try…but the ones that would be easiest to just screw into place without having to fabricate a supra baffle or sort out a super tweeter and filter are my older 206e.
I figured if I’m going to try them I might as well do some of the work on them that was discussed.
Haven’t done any tinkering in a while. I spent some time on the lathe this afternoon and tried my hand at some phase plugs (since that’s phase 0 on the mods list).
I used some Delrin I had on the shelf.
I think they came out pretty good.
I still need to bore and tap the base of them for a magnetic bolt to hold them in place.
Length may need adjustment…won’t know until I dive into the dustcap surgery.
Attachments
I usually set the length such that the tip just reached past the edge of the whizzer.
dave
dave
The Spawn plans specify a default back chamber lining of 1/2” felt.
Is there anything wrong with building up the lining in layers?
I have some 100% cotton batting and some grey felt…probably 1/8” thick.
Is there anything wrong with building up the lining in layers?
I have some 100% cotton batting and some grey felt…probably 1/8” thick.
I also have some questions regarding surgery on the dust cap.
I found a you tube video (link) and have read descriptions of this process in the past.
However, the video is of a smaller Fostex (103 or similar) with a raised button style dustcap and no whizzer.
The descriptions I’ve read have been similar…they also noted being careful not to damage the wires leading to the voice coil.
The video appears to rely on slicing the cap into pie wedges and then pulling it out of the surrounding black adhesive where it was joined to the end of the voice coil with the cone.
Clean up of any remaining visible dustcap bits afterwards would be gentle pulling/cutting/scraping with the tweezers and/or hobby knife I suppose.
Caution is given not to get any particles in the voice coil gap…maybe one or two cotton balls gently stuffed in on top of the pole would handle this?
My situation is a little different with 206e.
There is no surrounding bead of black adhesive where the dustcap mounts inside the whizzer. Although, there is some adhesive under the whizzer where it joins to the coil and cone (one of my drivers has an inconsistent bead here that may need addressing).
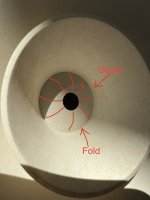
If I slice the 206e dustcap open and then try to pull it apart from the inside of the whizzer I am not sure if it will separate at the seam (see pic) without possibly damaging part of the whizzer or more.
I am wondering if I need to first perforate or cut at the fold (see pic) between the dustcap and whizzer to get the cap off cleanly without damaging the whizzer or cone?
I found a you tube video (link) and have read descriptions of this process in the past.
However, the video is of a smaller Fostex (103 or similar) with a raised button style dustcap and no whizzer.
The descriptions I’ve read have been similar…they also noted being careful not to damage the wires leading to the voice coil.
The video appears to rely on slicing the cap into pie wedges and then pulling it out of the surrounding black adhesive where it was joined to the end of the voice coil with the cone.
Clean up of any remaining visible dustcap bits afterwards would be gentle pulling/cutting/scraping with the tweezers and/or hobby knife I suppose.
Caution is given not to get any particles in the voice coil gap…maybe one or two cotton balls gently stuffed in on top of the pole would handle this?
My situation is a little different with 206e.
There is no surrounding bead of black adhesive where the dustcap mounts inside the whizzer. Although, there is some adhesive under the whizzer where it joins to the coil and cone (one of my drivers has an inconsistent bead here that may need addressing).
If I slice the 206e dustcap open and then try to pull it apart from the inside of the whizzer I am not sure if it will separate at the seam (see pic) without possibly damaging part of the whizzer or more.
I am wondering if I need to first perforate or cut at the fold (see pic) between the dustcap and whizzer to get the cap off cleanly without damaging the whizzer or cone?
Attachments
http://www.planet10-hifi.com/pp-install.html
4 examples including FE167
For FE103 try this trick first. https://www.diyaudio.com/community/threads/fe12x-dustcap-fix.181603/
Sharp? Yes, but it may not seem so when you slice.
The VC issue was 2000-1010 FE127e, never tried to wreck any others.
dave
4 examples including FE167
For FE103 try this trick first. https://www.diyaudio.com/community/threads/fe12x-dustcap-fix.181603/
Sharp? Yes, but it may not seem so when you slice.
The VC issue was 2000-1010 FE127e, never tried to wreck any others.
dave
Thanks for that Dave
I was on your phase plug page…but somehow missed the links to the installation pics.
The 167 pics are perfect fir what I’m dealing with on the 206e.
I was on your phase plug page…but somehow missed the links to the installation pics.
The 167 pics are perfect fir what I’m dealing with on the 206e.
When I read people were using 15/16” sockets as phase plugs in the 206e I figured I’d use 1” stock for my phase plugs…might even be too big 🤦♂️…ugh!!!…that’s the inside socket size bone head!
No idea why I missed this when I propped it on top of the dust cap.
Well…I guess I have some really nice 1” phase plugs I could put in what?…a pair of 107e in some reflex monitors in the bedroom?
No 1.25” Delrin stock on hand…have to find something else or order some.
On the bright side…surgery went well on the first driver .
Attachments
Yup
Can I ask what you recommend for a gap between the phase plug and voice coil former Dave?
I took a look at my Sonido. I’m guessing they have maybe a 1 mm gap between the plug outer circumference and the inside of the coil former.
I measured the bore size inside the 206e coil former around 34.5 mm at the junction with the whizzer/cone…which is just short of 1 3/8”.
I was hoping to use a commonly available size of stock here.
A 1 mm gap would leave 32.5 mm or 1.28”.
The closest most commonly available stock size would be 1.25” rod.
If I were to use 1.25” rod for the plugs I would be left with about a 1.375 mm gap around the phase plug circumference.
Do you know think that’s too much?
Can I ask what you recommend for a gap between the phase plug and voice coil former Dave?
As little space as you are comfortable with. Small.
My FE206 plugs are just over 33 mm in diameter.
dave
OK… I’ll have to wait for some 1 3/8” delrin rod I found to come in then I can take another shot.
I pulled out the Sonido plugs and measured them and their coil former internal dimensions…as I guessed, almost exactly a 1 mm gap.
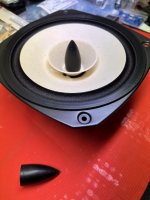
In the mean time, I decided to move forward with trying a coat of the tinted Modge Podge on the driver I removed the dust cap from.
Not easy to maintain a uniform coat thickness…so some color variations…especially where I began and ended where there was overlap.
I’ll make sure I start in a different spot in the cone for the next coat.
It doesn’t look bad.
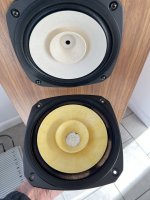
I’m not getting as much opacity as I hoped for to cover the spotting on the cone.
Not sure if I should try adding some more Sienna to the second coat with hopes of blending in more with the spots…or perhaps adding some white for opacity.
I’m tinting with some Windsor Newton tube watercolors I had in hand.
Might go ahead and do surgery on the second driver and add a coat to it so I can see how similar they look.
The spotting only appears to be on this first driver’s cone.
Pic to compare original color (on the 206nv) to the 1st coat.
I pulled out the Sonido plugs and measured them and their coil former internal dimensions…as I guessed, almost exactly a 1 mm gap.
In the mean time, I decided to move forward with trying a coat of the tinted Modge Podge on the driver I removed the dust cap from.
Not easy to maintain a uniform coat thickness…so some color variations…especially where I began and ended where there was overlap.
I’ll make sure I start in a different spot in the cone for the next coat.
It doesn’t look bad.
I’m not getting as much opacity as I hoped for to cover the spotting on the cone.
Not sure if I should try adding some more Sienna to the second coat with hopes of blending in more with the spots…or perhaps adding some white for opacity.
I’m tinting with some Windsor Newton tube watercolors I had in hand.
Might go ahead and do surgery on the second driver and add a coat to it so I can see how similar they look.
The spotting only appears to be on this first driver’s cone.
Pic to compare original color (on the 206nv) to the 1st coat.
Attachments
Not easy to maintain a uniform coat thickness…so some color variations…especially where I began and ended where there was overlap.
It does take some practise, and the FE206 is a big cone, particualrily tricky under the whizzer.
to the second coat
On a FR i try to use as little as possible and never a second coat unless i specifically want to blunt the highs.
Looks good, it is light colouring.
dave
Thanks for sharing that Dave.
I had read elsewhere that people do more than one coat…even several.
It obviously can’t be reversed once it’s on there.
I’d rather do the least amount possible and listen first.
So examining the cone in daylight after it dried for a while I saw that the unevenness I was picking up on was due to some areas being a bit thinner or even not fully covered due to texture in the cone.
I had thinned the Modge Podge off the bat because I first dissolved my coloring in a couple tablespoons of water…guesstimate about 1-2:10 mix of tinted water to Modge Podge.
So I sat in daylight and drybrushed a little more over the areas that seemed thinner or not covered completely as I rotated the speaker and examined it.
I’m happier with it now. Still some starburst strokes here and there, but nothing that is really distracting.
The spotting from the light mildew it picked up a few years ago is still visible…just pale Sienna colored spots here and there. Almost looks like part of a hand made paper making process.
Since the other driver in this pair was completely unaffected it won’t match really.
I’m thinking of purposely adding some spotting.
Gonna do some experiments with splattering some Sienna onto a manilla envelope with a fairly dry hog hair brush from a distance and see what I get.
- Home
- Loudspeakers
- Full Range
- Sorting Through My BLH Impulse Buy