when and where can this kit be bought? Sorry for my ignorance..
Post 1385, but I think you are a bit late
Post 1385, but I think you are a bit late
Aw man! Out of luck.. Once again 🙂
Except, if I decide to convert my order to beers.
There's a chance, although it converges to zero. 😉
There's a chance, although it converges to zero. 😉
How high is the toroidal you mentioned?
Because it will be partly under the PCB boards.
Bracket is about 5 cm, PCB also, if I look at this ever funny picture.
I didn't remember that the brackets and boards "grow" into the case. I was thinking "regular" mounting style for store boards in the UMS pattern.
400VA transformer might be too big, but 2x 200VA from tooidy are 115mm diameter and could be mounted on the side! 😉😉
150VA should be also enough and those are 97mm.
From my understanding a 300VA transformer would be adequate. Someone correct me if I am wrong. Here in the USA from Antek you would have to buy 2 200VA ones, they do not have 150VA if you want to have 2 separate PS sections. If you stack them on top of each other you will save a lot of space.
From my understanding a 300VA transformer would be adequate. Someone correct me if I am wrong. Here in the USA from Antek you would have to buy 2 200VA ones, they do not have 150VA if you want to have 2 separate PS sections. If you stack them on top of each other you will save a lot of space.
That is correct but you might need to double check every measurement if you intend to use the mini dissipante case I mentioned!
Maybe we could setup a group buy from Plitron and get a really nice compact toroid. I can call next week and see what they say about 50 units. Any thoughts?
when and where can this kit be bought? Sorry for my ignorance..
To buy the kit please join this email list and note your preferences: Sony VFET Kit Interest Group
It's hard to say how many will be left after "Group 1" finishes buying. People drop out for all kinds of reasons.
I did specify in my email to "Group 1" that when the next batch (likely) goes on sale in a few months, that anyone from "Group 1" who didn't buy will get first chance at the second batch. Hopefully this takes the pressure off a bit and frees up some kits.
We also limited it to 2 kits per member, and we are manually checking every single order to ensure that as many diyAudio members as possible get a chance to build this amp.
There were 200 kits promised to "Group 1", and now there are 87 left. It depends how many people are waiting till the last minute to organize things place their order.
So feel free to join the list/queue, it is very possible you will get one from this batch, and if not, you will have a place in line for round 2 in a couple of months.
Last edited:
Well they do sell separate, UMS drilled heatsinks 4U and 5U so they know the routine..
UMS 40mm Heatsinks – diyAudio Store
UMS 40mm Heatsinks – diyAudio Store
The internal area is 250mm X 300mm. Enough for a 400VA toroidal (140mm diameter) and the diyaudio PSU PCB (with diode board removed.)
60W should be quite manageable by this heatsink! Nice!!
Now we need to get hifi2000 to make a nice price on drilling the heatsinks for the UMS pattern. Groups buy anyone??
Well they do sell separate, UMS drilled heatsinks 4U and 5U so they know the routine..
UMS 40mm Heatsinks – diyAudio Store
Indeed they do, but asking them to drill a pair of 3U heatsinks even if with the same tooling might become more expensive than just getting a regular 4u dissipante.
We need to know the dimensions of the brackets and boards first to see if everything fits the mini dissipante case.
Can't remember if I posted about this! 😉 , but would like to put in a pitch for the "Steel Deluxe" chassis' which are considerably cheaper than the Alu ones. Personally I think the steel chassis looks a bit "crisper" than the alu one, and you can still get the 10mm alu front panel which I do recommend. The main advantage of the aluminum chassis is that the back panel of the standard version, which has no rear drilling is much easier to drill and cut for custom connectors if you get the Alu version. But since the Deluxe Steel chassis is already drilled for the Back Panel Kit and you order the Back Panel Kit, then no work on the back panel required. It's like you get the Back panel kit for $25 since you save $54 on the chassis, and no drilling!
Last edited:
So where do we see this steel version of the 4u? Is it just a matter of making the necessary substitution in the order form? I can't find a product description for the deluxe steel case.
So where do we see this steel version of the 4u? Is it just a matter of making the necessary substitution in the order form? I can't find a product description for the deluxe steel case.
Here: Deluxe 4U Steel - diyAudio Store
Maybe I didn't add it to a category you were looking at? Let me know!
Yes as Mark said, we now have this lower cost steel version of the 4U. Getting that rear panel punched out of steel is something that can only be done in bulk, but I thought it would be popular so we got a bunch made. That means you can now get a 4U Deluxe in steel, or you can add that "Deluxe" style rear panel to a regular steel Dissipante if you should want (I haven't made this an option yet).
Indeed they do, but asking them to drill a pair of 3U heatsinks even if with the same tooling might become more expensive than just getting a regular 4u dissipante.
We need to know the dimensions of the brackets and boards first to see if everything fits the mini dissipante case.
FYI, we have had a "3U Deluxe" on the cards for a while but just haven't got around to it as it requires a bit of work to recalculate all the dimensions for the rear, front and heatsinks, and make sure the riser panels align properly to the perforated base plate.
This project was tailor made for the 4U Deluxe Chassis, which is what Jim is using for his build guide.
You are of course free to use whatever chassis you like 🙂 If you happen to want to use something from the diyAudio store, that's great.
Last edited by a moderator:
I couldn't find it before you posted the link. looks interesting!
Do you have the dimensions of the boards and brackets?
Do you have the dimensions of the boards and brackets?
Here: Deluxe 4U Steel - diyAudio Store
Maybe I didn't add it to a category you were looking at? Let me know!
Yes as Mark said, we now have this lower cost steel version of the 4U. Getting that rear panel punched out of steel is something that can only be done in bulk, but I thought it would be popular so we got a bunch made. That means you can now get a 4U Deluxe in steel, and also you can add that "Deluxe" style rear panel to a regular steel Dissipante if you should want (I haven't made this an option yet).
FYI, we have had a "3U Deluxe" on the cards for a while but just haven't got around to it as it requires a bit of work to recalculate all the dimensions for the rear, front and heatsinks, and make sure the riser panels align properly to the perforated base plate.
This project was tailor made for the 4U Deluxe Chassis, which is what Jim is using for his build guide.
You are of course free to use whatever chassis you like 🙂 If you happen to want to use something from the diyAudio store, that's great.
Someone asked about pictures of the kit, post #1503 of Nelson holding the main parts are what they look like other than the plates being black, anodized, and the boards are also black instead of green. Quality looking components as one would expect from Nelson and our store.
As far as a case I would not use a case any smaller than the 4U. You may get by with smaller but then you may have to add a fan. No big deal really, I am not afraid of using a fan. If you are worried about hearing a fan turn your music louder.
As far as a case I would not use a case any smaller than the 4U. You may get by with smaller but then you may have to add a fan. No big deal really, I am not afraid of using a fan. If you are worried about hearing a fan turn your music louder.
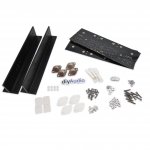
The grease is now a big syringe that's 28g. and there are a few less lockwashers and the long bolts are a bit shorter. Other than that the photo is correct!
Good Question! anyone have a suggestion where to get a couple hundred of each or so?Sorry but what we can put for the 2SK2013/J313 ??
Last edited:
OK the store description of what you get with a Deluxe Steel Chassis is pretty lame. So go here to the Deluxe Alu Chassis info to read about all the upgrades a "Deluxe Steel" also provides, such as a separate heavy interior baseplate with perforations every 10mm in ea. direction to really support your transformer, and mount various PCBs, and tapped holes on the inside of the thick front panel as well as the UMS tapped holes in the heatsinks, and the aforementioned rear panel cutouts..
http://diyaudiostore.com/collections/chassis/products/deluxe-ultimate-amplifier-chassis
The "magic" is that by saving money on the steel Deluxe Chassis you can afford (?) to order this too:
Back panel parts kit plus PCB / Transistor / Diode mounting parts kit – diyAudio Store
It bolts right into the holes in the "Deluxe" chassis back panels. -- Those models are Deluxe because they come with all those holes punched in the back. Note the inputs are Neutrik RCA's so you can bolt Neutrik XLR's into the same holes if you prefer balanced..
I would much prefer 4U over a 3U mini dissapante for the room inside. It's quite possible you could jam a transformer and PSU board in there but I would worry it's not easy!
Last edited:
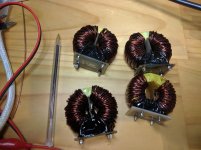
You could also put some inductors in series with the primary or secondary
windings, and that would also improve your power factor.
😎
I don't suppose any of these guys would do would they? Just yanked them from a broken solar inverter...
Attachments
In regard to substitutes for 2SK2013/J313, Nelson mentions the following in his article on the http://www.diyaudio.com/forums/diyaudio-com-articles/194809-burning-amplifier-ba-3-a.html (at the end of the paragraph on Construction):
"The 2SJ313 and 2SK2013 are still available, and you can use them or substitute other Mosfets, such as the Fairchild FQP3N30 and FQP3P20. The Vgs of the Toshibas is about 2 volts."
As others can likely confirm, the FQP parts are readily available but don't yield many pairs. I think I got four or so out of 30 each, the Vgs spread is huge. They do be nicely complementary though.
- Home
- Amplifiers
- Pass Labs
- Sony vFET Amplifier Part 2