
The inner carcass is glued up. Side panels next, then outer baffle.

I decided to get one of the same jigs as I needed to make some larger circle cuts that the Jasper jig allowed. Do you find that the scale doesn't seem quite right? With my Dewalt and vacuum attached there is almost no dust that gets out, a single pass in the opposite direction gets it all. Maybe too late after you bought a new router.I have not been happy with any dust collection device attached to a hand-held router. I have a compulsive need to watch bits/blades as they cut through wood. I don't like anything blocking the view. This means dust collection of hand-held routers is problematic for me
@hifijim
Who says you can only have router? (like one speaker...)
(I have a Japanese-made 2.5hp Makita, and compact lighter 18V DeWalt)
I can tell you there are much worse addictions that will keep you on the street at night...
Who says you can only have router? (like one speaker...)
(I have a Japanese-made 2.5hp Makita, and compact lighter 18V DeWalt)
I can tell you there are much worse addictions that will keep you on the street at night...
Last edited:
The inner carcass is glued up. Side panels next, then outer baffle.
What is the greyish glue visible on some of the joints?
Yes, the scale is off by about 2 mm. I have rarely found the built-in scales on tools to be accurate. I draw my circles with a compass and fine line pencil, then position the bit onto the line.Do you find that the scale doesn't seem quite right?
I saw the DeWalt router demonstrated at a trade show a few years ago, and the integral dust collection impressed me as being the best dust collection then available.With my Dewalt and vacuum attached there is almost no dust that gets out, a single pass in the opposite direction gets it all.
I am up to 4 routers at this point... A huge ancient Porter Cable 3.5 HP plunge which is used in a router table, a new Bosch 1617 plunge, an older Bosch 1617 fixed base, and a very old Porter Cable mini-router laminate trimmer. But yes, one can't have too many, so who knows?Who says you can only have router? (like one speaker...)
j.
It is construction adhesive. When joints are tight fitting, I use titebond wood glue. Titebond is an excellent glue, it is strong, easy to clean up with water, safe for skin contact, and inexpensive. However, it requires a tight fitting joint. At the start of the assembly process, I use titebond exclusively. However, as more pieces/sections come together, there are gaps due to tolerance buildup. One option would be to trim down the proud areas (high spots) with a sander. I choose a different option, I use a gap-filling construction adhesive.What is the greyish glue visible on some of the joints?
The sides are attached, and the outer baffle is machined.


Progress has been slow... vacations, chores, other activities... I expect I will have the cabinets assembled within a week, and I can begin making measurements of the drivers installed.
j.
Progress has been slow... vacations, chores, other activities... I expect I will have the cabinets assembled within a week, and I can begin making measurements of the drivers installed.
j.
More construction photos. I am applying the outer baffle using construction adhesive. Here I use a slightly different product, Loctite PL3X. This is a tan colored adhesive, and it is less dense and lower viscosity than the gray-colored PL-Max. I found it flows better under pressure than does the PL-Max, so it is not necessary to spread it (using a serrated trowel for instance).


During clamping, I like to see a lot of squeezed-out adhesive along every edge, and inside the driver holes. Construction adhesive is easy to clean off with a putty knife before it has cured. If we allow the squeeze out to cure hard, it becomes a difficult sanding job to get it smooth.
Here I am cutting the bevels:

These are straight (non-tapered) bevels. They are considerable easier to cut than the tapered bevels I have use on several recent projects. I use a table saw to cut these, but a router with a 45 or 30 degree bit would do the job well. I cut the bevels with a 35 degree angle relative to the baffle. Any angle from 30 to 45 degrees would create the reduced diffraction edge we are looking for.

Because the bevels are non-tapered, the back of the cabinet is placed against the fence. In the above photo, I have made the first cuts to a depth of about 15 mm. Now I am preparing for the final cut to the target width of 20 mm.

I did not hit the target bevel width of 20 mm (as viewed from the front). My final cut was 19 mm, and I judged this to be good enough. I did not want to risk another push through the saw to attempt to trim 1 mm.
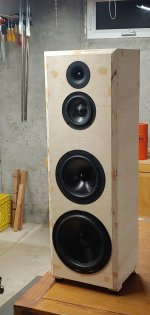
I have the wiring for the drivers installed, and routed through a 3/8" hole in the bottom. I need access to all 6 wires to do measurements and crossover development. The finished speaker will sit on a plinth, or small elevated base, and the passive crossover will be housed within the plinth. For now, I have installed temporary feet.
j.
During clamping, I like to see a lot of squeezed-out adhesive along every edge, and inside the driver holes. Construction adhesive is easy to clean off with a putty knife before it has cured. If we allow the squeeze out to cure hard, it becomes a difficult sanding job to get it smooth.
Here I am cutting the bevels:
These are straight (non-tapered) bevels. They are considerable easier to cut than the tapered bevels I have use on several recent projects. I use a table saw to cut these, but a router with a 45 or 30 degree bit would do the job well. I cut the bevels with a 35 degree angle relative to the baffle. Any angle from 30 to 45 degrees would create the reduced diffraction edge we are looking for.
Because the bevels are non-tapered, the back of the cabinet is placed against the fence. In the above photo, I have made the first cuts to a depth of about 15 mm. Now I am preparing for the final cut to the target width of 20 mm.
I did not hit the target bevel width of 20 mm (as viewed from the front). My final cut was 19 mm, and I judged this to be good enough. I did not want to risk another push through the saw to attempt to trim 1 mm.
I have the wiring for the drivers installed, and routed through a 3/8" hole in the bottom. I need access to all 6 wires to do measurements and crossover development. The finished speaker will sit on a plinth, or small elevated base, and the passive crossover will be housed within the plinth. For now, I have installed temporary feet.
j.
Great looking project. Nice to see how you put the cabinet together.
I haven't used a polyurethane glue on a speaker cabinet before. I'm curious if you use the Loctite PL3X rather than regular wood glue to achieve some degree of constrained layer damping for the front baffle?
I have mainly used Goop or E6000 for gap filling when I can't properly clamp a joint. These adhesives are amazingly strong when fully cured (though this is not always a good thing when you're taking the cabinet apart again). Maybe the construction adhesive is less messy?
I'm getting ready to do some experiments with Liquid Rubber as an adhesive between layers of wood, to see if it provides a useful degree of damping.
Ben
I've found that E6000 can be pulled apart if absolutely necessary, but PL Premium construction adhesive and wood glue like Titebond and Gorilla Glue won't. I used E6000 for xover assembly, mounting components or such, but not for assembly.
It’s interesting stuff, relatively soft even days after applying, but continues to cure for weeks and months. Very tenacious grip after several months. As far as I can tell E6000 and Goop are the same thing in different packaging.I've found that E6000 can be pulled apart if absolutely necessary
I am not expecting any structural damping from the adhesive, such as constrained layer damping. My reasons for using a gap-filling construction adhesive to glue the outer baffle are all about tolerance build up and gaps (see post #288). PVA wood glue, such as Titebond, needs a tight fitting joint, generally with a gap of 0.5mm or less. My maximum gap when gluing up the outer baffle was about 1.5 mm.I'm curious if you use the Loctite PL3X rather than regular wood glue to achieve some degree of constrained layer damping for the front baffle?
There are 5 glue surfaces which fit to the outer baffle: inner baffle, top edge, bottom edge, L side edge, R side edge. In traditional wood working, we try to design joints so that there are no more than two glue surfaces in a joint clamping operation. That works fine for tables, face-framed cabinets, benches, etc... but it is just not possible with a speaker cabinet. I could have spent an hour with a belt sander to flush everything up, but I have learned that a gap filling adhesive is so much easier, and there seems to be no downside at all. In fact, trimming edges with a sander or router can leave the cabinet un-square, since the panels themselves were all cut orthogonal.
I have no experience with E6000 adhesive. Based on what I have read, it does not cure to a hard solid, but more to a rubber-like solid... yes?
I admit I have not done any experimentation to find the best adhesive. Several years ago I was using West System epoxy thickened with microfibers and colloidal silica when I needed gap filling capability. That was fairly inconvenient and messy. Someone on this forum suggested construction adhesive, and I tried it and found it to be very well suited. Since it works well, I have not bothered to try other adhesives.
j.
Yes, this makes perfect sense. The inner baffle needs to fully engage the braces so isn’t perfectly flush with the front of the sides. I’ll have to try out the PL3X.There are 5 glue surfaces
The long curing time of the E6000 may be a deal killer for some. It’s performance after many months is much stronger than initial rubbery consistency.
Not quite the same formulation, as the Goop is household strength, and the E6000 is industrial strength. They are made by the same company. The new E6000 Premium in the red tube is great for plastics.It’s interesting stuff, relatively soft even days after applying, but continues to cure for weeks and months. Very tenacious grip after several months. As far as I can tell E6000 and Goop are the same thing in different packaging.
@augerpro has a very long thread where he (and others) explore various cabinet structural damping techniques.
https://www.diyaudio.com/community/...n-methods-shootout-thread.356130/post-6245271
One of the interesting takeaways is that not all rubber-like adhesive caulk materials are good at damping in a CSD application. Some are elastic at acoustic frequencies, which means they do not absorb energy as they deform, but instead store energy like a spring. In other words, the stress-strain hysteresis curve is narrow. Other materials are quite good at absorbing energy... which is converted into an insignificant level of heat. If I recall, fully cured silicone caulk behaved rather elastically, even though it feels soft and rubbery to the touch. So keep this in mind when evaluating E6000... it may be a fine CSD damping material, or it may not be.
Some thoughts on structural damping.
My normal process when building a high performance cabinet is to use extensive bracing, and to use foil-backed butyl rubber damping on the interior. I have found that the best results come from two layers of the 80 mil butyl rubber damping sheets.
I am not employing any structural damping techniques in this project. The cabinet is well braced, but I did not go to the effort or expense of using damping sheets. There is a fair level of effort that is required to properly cut and apply the butyl damping sheet. If I was going to go to that level of effort, I would use a more expensive suite of drivers.
I do not consider this a high performance project, and the drivers I am using are not high end… they fall towards the affordable end of the spectrum. The cabinet design does use highly profiled shapes to minimize diffraction effects, it uses a basic edge bevel to achieve acceptable diffraction performance. So it did not make sense (to me) to expend the effort to use butyl damping material to minimize resonances and signature.
j.
In other news, the drivers are installed, and nearfield testing is underway...
Attachments
That's one great looking speaker!
... "doesn't use"?The cabinet design does use highly profiled shapes to minimize diffraction effects,
- Home
- Loudspeakers
- Multi-Way
- Some Interesting Drivers, a New 3-way Project