custom chassis, if made in quality and if just anodizing is outsourced, is easily more expensive than, say, chassis from Modushop
though, if custom is a goal, then money is of secondary importance
though, if custom is a goal, then money is of secondary importance
👍👍👍A little more assembly today - now ready to start installing the amp board.
Phew, this thing is getting heavy - good job I thought that some handles might be a useful feature!


Speaking of... I just realized that the DIYAudio Store offers the 4U in Black for the same price as silver. I might just end up going that route.custom chassis, if made in quality and if just anodizing is outsourced, is easily more expensive than, say, chassis from Modushop
though, if custom is a goal, then money is of secondary importance
If MS had heatsinks of this quality, I wouldn't shop anywhere else 😉custom chassis, if made in quality and if just anodizing is outsourced, is easily more expensive than, say, chassis from Modushop
though, if custom is a goal, then money is of secondary importance
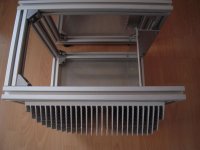
These were the heatsinks.
https://www.ebay.co.uk/itm/133596859193?hash=item1f1afe4b39:g:CrEAAOSwH9Jfymi0They are from failed solar power inverters. I bought six at about £30 each. Though it's probably too expensive to ship to the USA it may be possible to find the same units failing in your neck of the woods. This is I think the original use for the heat sinks.
https://www.ebay.co.uk/itm/39365374...YaVZudPBhEkXx6GqUROOtBK1zIpPCTjoaAuOREALw_wcBand
https://www.ebay.co.uk/itm/13306132...8lyo0o7UM2YIx7DkU%3D|ampid:PL_CLK|clp:2047675
Last edited:
Thanks for the links Jotom,
I have two pairs already, Hehe. One pair is free to use, future SissySIT home maybe......
I have two pairs already, Hehe. One pair is free to use, future SissySIT home maybe......
That's great 🙂. Others may find the idea of, as we call it "Skip dipping or Dumpster diving" useful to them too!
Yes, the heatsinks are the ones jotom750 linked to - the seller is pretty close to me and hand-delivered some of them. I have two pairs that I'm using in projects and have a fifth that has been halved and will eventually get used in an ACA build. The heatsinks are already anodised (natural colour) but I did have the SissySIT ones reanodised as they had some scratches - I was going to have them done black but the company had problems getting the anodised finish to take the black dye (something to do with the particular alloy apparently).
I took the simple view that, as they were previously used as heatsinks they'll be fine as heatsinks again in an amplifier and a quick check with a heatsink calculator suggests they'll be fine with projects like SissySIT.
The heatsinks have quite a few tapped holes and I use them when practical but the material does drill and tap well with the right tools - just a pillar drill and some good quality hand taps - a tap guide is essential though as are decent measuring sticks and a caliper. I do all the planning in a drawing package (I mostly use Front Panel Designer) and then print out templates. I use threaded studs into the heatsinks and then fix stuff to them with nuts/washers. I have no special metal-working skills and had to make some minor adjustments when things didn't quite align, but if I can do this then so can most others I think. One thing to be cautious of is the curved outer profile of the heatsinks which means you need to make sure the inner face needs to be levelled so that drill holes are perpendicular to the surface.
I really like Modushop products and have used quite a few in previous projects. I could easily have used one of them for this project and it would have been cheaper/easier but I just wanted a slighly different style - I like the curves of the heatsinks and the more cube-like proportions give it a sort of pugnacious look.
I bought the handles on ebay - I think they're from ex-military equipment and very strong.
The top plate was machined by Schaeffer (Front Panel Express in the US).
I still need to decide on a front panel - maybe get something 3D printed or perhaps a nicely figured wood.
first amp one is building is hardest to build without hurry and fully enjoy
but once when you have first one, singing happily, every next one needs to be enjoyed as glass(es) of exquisite wine
if custom case is increasing quality/quantity of that wine - even better
but once when you have first one, singing happily, every next one needs to be enjoyed as glass(es) of exquisite wine
if custom case is increasing quality/quantity of that wine - even better
Today I finished the power supply wiring, chassis safety grounding, etc. All complete and good.
Tomorrow the amp board but first I have to ride up Alpe d'Huez on my pink bike!
Tomorrow the amp board but first I have to ride up Alpe d'Huez on my pink bike!
pink is for Weaklingsssssesssss
Good ride!
(don't forget bleeding da caps before further wiring)
Good ride!
(don't forget bleeding da caps before further wiring)
Yes, well, I'm not actually going to ride the real Alpe d'Huez...
https://zwiftinsider.com/route/road-to-sky/
https://zwiftinsider.com/route/road-to-sky/
Looking for hints and suggestions as to mounting the SissySIT boards to a deluxe 5u Modushop case. I appreciate ZM’s efforts to fit the universal pattern. I’m currently doing dis-assembly on the case to drill/tap for the SITs.
The SissySIT boards have the 4 mounting holes, one of which mounts the MOSFET.
How to handle the MOSFET mounting? I understand the keratherm/mosfet placement on the heatsink part. Is it safe to have the board sitting directly on the face of the mosfet, with the bolt going through board and mosfet into the heat sink? If so, suggested stand off lengths foe the other 3 holes? I see how ZM’s edge mounting works, but kind of wanted some reassurance about placing the board dir on top of the Mosfet and bolting it all down tight.
Alex,
1/4w for the input repeater transformer is good, right?
please clarify
I can't mentally connect wattage with input xformer
if you 're thinking about some specific resistor (around xformer) - say which one
- Home
- Amplifiers
- Pass Labs
- SissySIT R.3