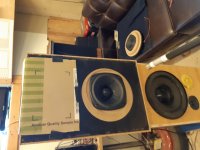
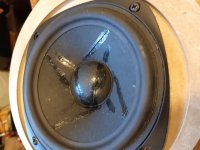
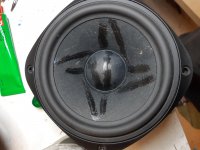
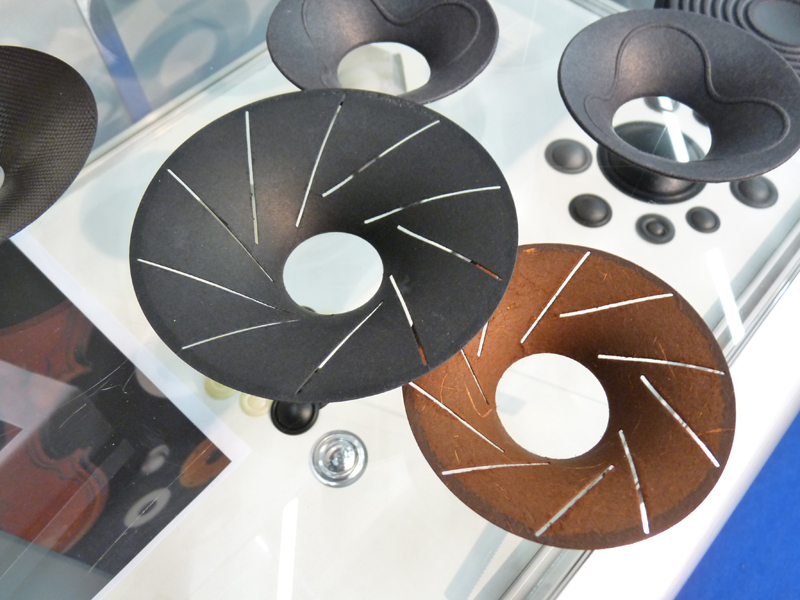
I have some measurements and pictures of my little experiment. The second driver is modified and drying as we speak. I started with four long cuts in the cone, and then added the four short ones, and could see an additional improvement in the upper range. I also put some dabs of glue on the rear of the surrounds, and that improved the 'blip' around 1,7k.
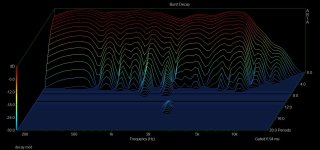
I measured frequency response, decay and distortion to compare. I was a little bit worried when I saw the distortion on the modified driver, but when I measured the unmodified driver I could see it was just as bad (or slightly worse).
The result is not perfect, but it should make the driver easier to manage in the XO region. Not sure if I should try something on the dustcap too.
Attachments
-
 20200405_114909.jpg659.2 KB · Views: 606
 -
 20200405_115754.jpg680 KB · Views: 609
 -
 20200405_122923.jpg913.1 KB · Views: 613
 -
 decay mod.jpg168.3 KB · Views: 617
 -
 dist mod.jpg101.6 KB · Views: 605
 -
 FR mod vs std.jpg91.8 KB · Views: 371
 -
 std decay.jpg178.3 KB · Views: 351
 -
 std dist.jpg102.2 KB · Views: 323

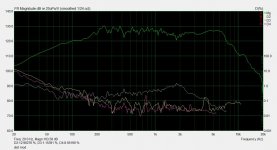
It seems the 7 kHz peak is tamed substantially, but I am not sure. Could you please use 5dB steps and different colours?
Sorry about the colors, but I only saved screenshots, so that is all I have. FR grid is 5dB, but the range could have been less.
FR: the 3-4k dip is almost gone, and the peaks after that are smoother, and the curve rolls off earlier, but smoother. Decay looks better too.
I'm a bit disappointed with the distortion tough, the level was not high, but still reaching 1%, and it's 3rd harmonic going high. Well, I guess I got what I paid for.
Note: the SPL is not calibrated.
The distortion seems dip related. This looks like either breakup or a surround reflection. Stiffening the surround or the cone surround connection with glue might help. That might be somewhat of a challenge, given that the surround has a smooth transition from roll to cone.
Yes, now that you mentioned it, there seems to be some relation between distortion and frequency response looking at the diff between the modified and std curves. I did put a little glue on the back of the cone/surround before, maybe I will try some more.
Thank you for the advice!
Thank you for the advice!
BTW: I think you are too modest about the results of the SB cone slitting. In my opinion the improvement is substantial. Mind you, you are working with an approx. 24 € 24 $ midwoofer Regardless of price of the driver, the SPL curve is now very smooth and up to the best, apart from the dip.
Well, except for the distortion.. I measured a few, and this is among the worst for some reason..
Anyway, it was a good experiment, did not end up in disaster like many others 🙂 (unless it falls apart when played!)
Anyway, it was a good experiment, did not end up in disaster like many others 🙂 (unless it falls apart when played!)

The pole cavity turned out to be pretty influential. I cut 3/8" thick F13 felt and then sliced and replaced the dust cap. Will have to do high power long term testing to see if the E6000 holds up. I think it will . I have some drivers that I glued a penny on the pole 6 years ago with it. So, here's the SB15 stock, then below that, under cap mods, then also sliced.

That's 8dB of bump removed, congratulations! 🙂
How much smoothing on the curves? The felt did a lot too!
The way I see it is that the slices give more flex and damping to the cone, so less ringing. The flex also causing smaller area of the cone to move with rising frequency, so rolling off in the high's.
Do we have a soft cone driver after the slicing, or just a damped cone? Would coating with some damping compound do the same? Or maybe the damping compound would add more weight than the slicing.
How could one determine the hardness/damping relation of the cone after the mod?
Last edited:
Hello Rallyfinnen,
Rest assured: no amount of cone doping comes even close to the result with slitting. Effects of cone doping in most cases are marginal. The results might be different with lots of dope on very porous cones, but that is no longer coating, but impregnating. (I did not even mention the infamous polka dots here.....)
Rest assured: no amount of cone doping comes even close to the result with slitting. Effects of cone doping in most cases are marginal. The results might be different with lots of dope on very porous cones, but that is no longer coating, but impregnating. (I did not even mention the infamous polka dots here.....)
Seems the slit's did not do much in your experiment? I saw some improvement with the first four (long) cuts, but doing the four extra short ones did just as much I would say.
@jbruner: is it just a cavity resonance or is the dustcap itself also involved?
It's mostly the cavity resonance. Also the helmholtz resonance from the pole vent, which I was careful not to block. If there were no pole vent, we could simply fill the area with pretty much anything. In this case, the felt is a necessity, or you just make the vent resonance worse.
I just want to add that I took some random measurements of the PFC-drivers again today, and some of the stuff seen is due to the baffle I used, however, the surround is still causing an 'S' in the frequency response around 1k (varies with mic distance and angle), so I added some more glue to the cone edge/surround today. There is also a mild peak before it starts to roll off, but the sharp dip seen just under 2k seems to be the baffle.
Seems the slit's did not do much in your experiment? I saw some improvement with the first four (long) cuts, but doing the four extra short ones did just as much I would say.
It might be my glue to reconnect was too stiff so there was no added damping. Perhaps a softer glue?
Could be the glue, and maybe more slits too?
What is the 'feel' of the glue used in the SS Revelators? Soft and sticky, or fairly hard?
What is the 'feel' of the glue used in the SS Revelators? Soft and sticky, or fairly hard?
the slit cone seems to be mfr'd by dr kurt muller gmbh
An externally hosted image should be here but it was not working when we last tested it.
- Home
- Loudspeakers
- Multi-Way
- SBacoustics + slit cone (poor man's revelator)?