Since you clarify its a continuation of the right channel and its very silent for hum or other noise both on Fostex cans and Aleph J amp, I can't say you have done something wrong. Leave it as is, don't fix what's not broken, green wire included. It at least makes a narrow loop area twist around the red signal wire for seeing its ground return closely.
Beautiful job..
Suggestion only... LEDs by the selector switch to see which input is active and use the other half of the selector switch to switch dim LEDs. Functionality no change but convince wise it's nice to look and see what is selected.
Not a criticism.. just a suggestion in case you hadn't thought of it. Forgive me if it was intentionally left out.
But everything is beautiful all the way down to good wire pair twisting!!
Salas DCG3 preamp (line & headphone)
Salas, or, Eagle‘s Eye…
It is so great to see him (you, as you own the thread 😉 ) observe every oh so little detail and share (I believe) every deepest engineer‘s secret. [emoji1376][emoji1376][emoji1376]
Salas, or, Eagle‘s Eye…
It is so great to see him (you, as you own the thread 😉 ) observe every oh so little detail and share (I believe) every deepest engineer‘s secret. [emoji1376][emoji1376][emoji1376]
Last edited:
He achieved a very silent build when he uses Klipsch Heresy speakers. Don't know if they are 99dB/W for real as claimed, but they are certainly sensitive and noises would stick out. Not bad at all for his second preamp build ever.But everything is beautiful all the way down to good wire pair twisting!!
Nice work. Are you using this is a preamp as well as a headphone amp?
I'm SLOWLY making progress on my build. I finished the 8 Ultra Bibs (4 pos and 4 neg) and spent the last few hours doing the mechanical drawings for the bottom plate (~60 mounting holes and 16 vent slots under the UBib heatsinks).
I'm SLOWLY making progress on my build. I finished the 8 Ultra Bibs (4 pos and 4 neg) and spent the last few hours doing the mechanical drawings for the bottom plate (~60 mounting holes and 16 vent slots under the UBib heatsinks).
Since you clarify its a continuation of the right channel and its very silent for hum or other noise both on Fostex cans and Aleph J amp, I can't say you have done something wrong. Leave it as is, don't fix what's not broken, green wire included. It at least makes a narrow loop area twist around the red signal wire for seeing its ground return closely.
Sounds good, I'll leave well enough alone!
Beautiful job..
Suggestion only... LEDs by the selector switch to see which input is active and use the other half of the selector switch to switch dim LEDs. Functionality no change but convince wise it's nice to look and see what is selected.
Not a criticism.. just a suggestion in case you hadn't thought of it. Forgive me if it was intentionally left out.
But everything is beautiful all the way down to good wire pair twisting!!
Thank you troystg.. Thank you for the kind words. I considered adding the LED's to the selector knob, and may go back and do it at some point. To be honest, I was worried about not getting the lights on a perfect radius and not being happy with them.. As of now, and likely for the foreseeable future, I only have 1 input.. lol..
Salas, or, Eagle‘s Eye…
It is so great to see him (you, as you own the thread

) observe every oh so little detail and share (I believe) every deepest engineer‘s secret. [emoji1376][emoji1376][emoji1376]
No kidding! Salas sees it all! 😱
He achieved a very silent build when he uses Klipsch Heresy speakers. Don't know if they are 99dB/W for real as claimed, but they are certainly sensitive and noises would stick out. Not bad at all for his second preamp build ever.
Thanks Salas.. Listened again this afternoon via Heresy's and it's dead quiet even with them.. I think it was 50 percent good luck, and 50 percent some really good people who offered a LOT of good suggestions..
Nice work. Are you using this is a preamp as well as a headphone amp?
I'm SLOWLY making progress on my build. I finished the 8 Ultra Bibs (4 pos and 4 neg) and spent the last few hours doing the mechanical drawings for the bottom plate (~60 mounting holes and 16 vent slots under the UBib heatsinks).
Jaytor.. Yes sir.. I'm using it for both pre and headphone amp.. Works beautifully both ways!
The LEDs don't have to be circular, there can be just a straight line vertically or horizontally. And again just a suggestion. I sometimes forget which input I'm using and then have to flip to tuner or something to see where the selector is connected.
Decals are also informative. Although not as visible as a horizontal row of Leds over a big knob like on a NAD 3020. They were used as rough output power indicators there but anyway.
Nice work. Are you using this is a preamp as well as a headphone amp?
Build looks great SkyPirate!
I recently took the opportunity to listen to some vinyl via the phones—Not sure why I didn't up until now—I was quite stunned. Absolutely quiet and incredible detail and dynamics. What a treat! — an all Salas signal path after the tonearm!
Salas..
Typo.. Yessir.. They are very 30 year old Klipsch Heresy I's. I've done some crossover mods and upgraded the woofer.. Mod called the "Super Heresy".. I'll take a hard look at the TKD pot.. I looked a few months back when I started all of this and I think I need to order from across the pond.. Thanks for the rec!
I have Klipsch Heresy I (original) too, could you share your mods? Tks u.
I have Klipsch Heresy I (original) too, could you share your mods? Tks u.
Linhvk,
Heresy "Super Heresy" mod link below.. I'd recommend reading through all of it. I did the crossover modification with cap changes and rewire of the autoformer, ported the rear panel, and did the woofer swap. While I wanted to use "Klipsch" woofers, in the end I grabbed a pair of the recommended Eminence Delta Pro's. The mod seems to be very well considered and proven.. I was very impressed with the increase in the low's and mid range. Good luck if you give it a go, very easy to do!
Super Heresy 1 (Baby Cornwalls Mod.) - Technical/Modifications - The Klipsch Audio Community
I kept my original back panels and cut new ones just in case.. Couldn't bring myself to cut holes in the backs of 40 year old speakers!
They do sound great—I have heard them in person....
Well, you did find them for me! (Great find btw!)
Mechanicals?
Hello Salas,
Is it possible to obtain a dwg which I can use to mark/drill a chassis? What I'm fishing for is a dwg that provides distances from one mounting hole to another. For both DCG3 and DCSTB. I have tried to measure my boards using both mm and 1/100" units but cannot seem to obtain good numbers. Pilot error, to be sure. I have traced the boards onto a piece of white paper, and will use that in the future if necessary And if this info is not readily available, please do not spend any time, as I'm only asking for something that already exists.
Mike
I only have a .drd file coming from the Gerber set. PM me to send it to you if its useful to your purpose.
Slow progress being made
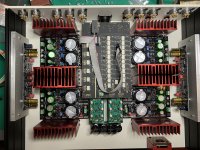
I've been super busy at work lately so haven't made as much progress on my new preamp as I had hoped. But it is starting to come together. I still have some work to do on the various PCBs (mostly installing the last transistors) and wiring everything up, but I did a test fit of all the circuit boards to make sure everything fit the way I had planned.
It's been a while since I posted, so as a reminder ,I am building a fully balanced two-chassis preamp.
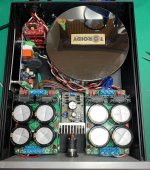
There is a separate Modushop chassis for the transformer, rectifiers and CRC filtering. The transformer is a custom 400VA Toroidy with nine secondaries. These feed four +/- supplies and one regulated 5V supply for the digital electronics (to control the switched attenuator). The four +/- supplies feed four pairs of UBib 1.3 regulators in the main chassis for +/- 12V and +/- 17V for each channel. I've included a photo of the power supply chassis below.
For the main chassis, I am using side panels from Modushop, but the rest of the panels are being fabricated by Front Panel Express so that I could use heavier aluminum and have everything powder coated.
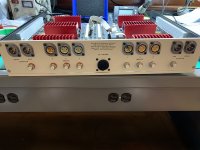
The main chassis will use a pair of AMB.org A24 input buffers (after a 6-1 input selector) which feed a balanced switched attenuator (input selector and attenuator from Khozmo). The output of the attenuator will feed the balanced Salas DCG3 output stage (one 2-channel DCG3 board for each balanced output) as well as another AMB A24, so the preamp will have both DCG3 and A24 outputs. The primary reason for the A24 is to provide a single ended output for my subwoofers.
You may notice that the number 2 XLR input connectors are mounted upside down. This is intentional since I have some super-stiff XLR cables and this gives me more flexibility where the components are placed since the cables do not like to be twisted.
The bottom panel is not quite as flat as I was hoping so I'm going to have to add a clamp between the top and bottom panels to get a tight fit.
If all goes well, I'm hoping I'll have this fully operational in the next several weeks.
I've been super busy at work lately so haven't made as much progress on my new preamp as I had hoped. But it is starting to come together. I still have some work to do on the various PCBs (mostly installing the last transistors) and wiring everything up, but I did a test fit of all the circuit boards to make sure everything fit the way I had planned.
It's been a while since I posted, so as a reminder ,I am building a fully balanced two-chassis preamp.
There is a separate Modushop chassis for the transformer, rectifiers and CRC filtering. The transformer is a custom 400VA Toroidy with nine secondaries. These feed four +/- supplies and one regulated 5V supply for the digital electronics (to control the switched attenuator). The four +/- supplies feed four pairs of UBib 1.3 regulators in the main chassis for +/- 12V and +/- 17V for each channel. I've included a photo of the power supply chassis below.
For the main chassis, I am using side panels from Modushop, but the rest of the panels are being fabricated by Front Panel Express so that I could use heavier aluminum and have everything powder coated.
The main chassis will use a pair of AMB.org A24 input buffers (after a 6-1 input selector) which feed a balanced switched attenuator (input selector and attenuator from Khozmo). The output of the attenuator will feed the balanced Salas DCG3 output stage (one 2-channel DCG3 board for each balanced output) as well as another AMB A24, so the preamp will have both DCG3 and A24 outputs. The primary reason for the A24 is to provide a single ended output for my subwoofers.
You may notice that the number 2 XLR input connectors are mounted upside down. This is intentional since I have some super-stiff XLR cables and this gives me more flexibility where the components are placed since the cables do not like to be twisted.
The bottom panel is not quite as flat as I was hoping so I'm going to have to add a clamp between the top and bottom panels to get a tight fit.
If all goes well, I'm hoping I'll have this fully operational in the next several weeks.
Attachments
Salas, I have a few questions about DCG3.
What is the size of the holes for resistors on the board? 0.8mm?
How critical R15 value?
If I chose for example something in the range of 47-68 Ohm.
How much R10 of 7.5 Ohm value dissipate?
I thought maybe 0.5W resistor may be okey.
What is the size of the holes for resistors on the board? 0.8mm?
How critical R15 value?
If I chose for example something in the range of 47-68 Ohm.
How much R10 of 7.5 Ohm value dissipate?
I thought maybe 0.5W resistor may be okey.
I've been super busy at work lately so haven't made as much progress on my new preamp as I had hoped. But it is starting to come together. I still have some work to do on the various PCBs (mostly installing the last transistors) and wiring everything up, but I did a test fit of all the circuit boards to make sure everything fit the way I had planned.
If all goes well, I'm hoping I'll have this fully operational in the next several weeks.
Be sure to have a fully vented top cover. Depending on your CSS setting you gonna have quite a lot of heat in the area where the two UBIBs heatsinks are facing each other, best is to have the bottom drilled there at least.
Salas, I have a few questions about DCG3.
What is the size of the holes for resistors on the board? 0.8mm?
How critical R15 value?
If I chose for example something in the range of 47-68 Ohm.
How much R10 of 7.5 Ohm value dissipate?
I thought maybe 0.5W resistor may be okey.
Yes 0.8mm
R15 is setting lab standard interconnection ~50Ω Ζο. Doesn't have to be precise, especially in audio. Can be 47Ω or 51Ω when the BOM's 49.9Ω isn't available in a stockist you buy from.
Power dissipation on R10 is 7.5Ω*(0.15Α*0.15Α)=0.169W. Because it brings about 150mA bias. X3 nominal is safe so 0.5W is on the nose. Prefer 1W if available for super cool resistor operation.
- Home
- Source & Line
- Analog Line Level
- Salas DCG3 preamp (line & headphone)