Side note... I took on the Wolverine build and they set the bias to 100ma!!! (44mV) WOW! and yes they get warm...
What, precisely, is the problem?
Does it simply run hot if left idling?
Is idle current excessive with the specified bias setting?
Does the idle current avalanche?
Does it simply run hot if left idling?
Is idle current excessive with the specified bias setting?
Does the idle current avalanche?
After straightening out mine, It runs cool to a little warm, even after a good subwoofer pounding session.Hopefully it's just an adjustment that needs to be made and no components need to be changed.
Doesn't everyone with a 502,702,1002 have this problem? I can imagine this bias setting being wrong right from the assembly line if we all have the same problem.
That's what we need to know, the problem and what was the solution.
And who can I trust to send these gems to because neither have a scratch on them.
The bigger question is where was the bias when you first checked it? Was it above 1.5?
And who can I trust to send these gems to because neither have a scratch on them.
The bigger question is where was the bias when you first checked it? Was it above 1.5?
Last edited:
What brand of capacitors were used in your 1002?After straightening out mine, It runs cool to a little warm, even after a good subwoofer pounding session.
If I remember, I ordered Panasonics from Mouser. You have to watch the height so they fit.
Having any luck?
Having any luck?
I meant what brand were the originals factory installed.
I may send it to Shawn king to look things over.
It's a class A/B amp and I'm not optimistic about being able to get it to run cooler.
Since it's 25 years old though, thought it would be good to check/replace caps.
I may send it to Shawn king to look things over.
It's a class A/B amp and I'm not optimistic about being able to get it to run cooler.
Since it's 25 years old though, thought it would be good to check/replace caps.
I'm not worried about it shutting down from heat. I'm more concerned with it getting warm enough to trigger thermal throttling and reducing my output power.
I haven't pulled it from the vehicle yet, but I just got a JL RD1000/1 to run while I get the 1002 checked.Having any luck?
I'm running a Rubicon 502 4 ohms stereo to MB quart components and I want to have that looked over as well before it experiences some type of failure that could ruin the connected speakers.
Oh boy... Cant remember originals but the newer caps can be much better quality.I meant what brand were the originals factory installed.
I may send it to Shawn king to look things over.
It's a class A/B amp and I'm not optimistic about being able to get it to run cooler.
Since it's 25 years old though, thought it would be good to check/replace caps.
I don't have a good photo of the secondary caps but they're also the SMS series. The logo is visible on the primary filter caps. One of the Chemicon companies?

Perry is holding out on me. Maybe I should send my amp to him to try and get it running cooler and draw less current.
When I pull the amp from vehicle I may take off the bottom and see what caps they used, I'm guessing all builds used the same.
Seems fitting to replace caps with Rubycons, since it's a Rubicon amp.
When I pull the amp from vehicle I may take off the bottom and see what caps they used, I'm guessing all builds used the same.
Seems fitting to replace caps with Rubycons, since it's a Rubicon amp.
I no longer do repair work.
The secondary caps are beyond an inductor so they have very little stress on them. Unless you installed 'plague capacitors', there is very little chance of them failing, no matter what you use (unless the inductor is shorted). Rubycons are OK.
The secondary caps are beyond an inductor so they have very little stress on them. Unless you installed 'plague capacitors', there is very little chance of them failing, no matter what you use (unless the inductor is shorted). Rubycons are OK.
If I remember correctly, a guy that worked at Soundstream told me to check for current hogs... He said to check the voltage across each pair of emitter resistors, the voltage should be equal. If not, check the individual emitter resistors to see witch transistor is pulling too much current. try to get the final output trans to be fairly equal.
Attachments
Yeah, the builders were supposed to remove any hogs and replace them. Apparently they skipped those steps, because the reviews on this amp all say the same. It runs too hot and draws gobs o current.
I will re-read your repair thread.
You said some chips were running hotter than others, but I may be mistaken, it sounds like you just replaced everything because you had NOS parts anyway.
My PPi art series A600.2 ran cool and it barely had heatsink.
I will re-read your repair thread.
You said some chips were running hotter than others, but I may be mistaken, it sounds like you just replaced everything because you had NOS parts anyway.
My PPi art series A600.2 ran cool and it barely had heatsink.
I was nervous booting the amp up the first time because it sat NIB for 20+ years so I pre-charged the caps with a 12 volt test light inline with the power wire before connecting.
I don't think it reformed the caps but it helps bring them up slowly, couldn't hurt I guess so I made a habit of doing that. Also doing that when you finally connect the amp to power you don't get that big spark.
I don't think it reformed the caps but it helps bring them up slowly, couldn't hurt I guess so I made a habit of doing that. Also doing that when you finally connect the amp to power you don't get that big spark.
It's rare that using all transistors from the same batch won't eliminate the 'current hog' issue.
High biasing is what causes high idle temperatures. All you need is enough bias to prevent distortion at the higher end of the audio spectrum.
High biasing is what causes high idle temperatures. All you need is enough bias to prevent distortion at the higher end of the audio spectrum.
What do you think of bringing the caps up slowly with a resistor or test light? A best practice or not necessary even with older caps that have sat unused? I figured it can't hurt and think if I didn't I could have popped a cap right then and there.
Agree... Do you have any Front End Boards? If not, I may have a couple NOS. Let me know.
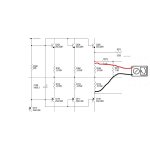
This is what a tech wrote me from SS...
To check the bias for each output pair, measure the voltage from emitter pin (TIP102) to emitter pin (TIP107) for that pair. NOT across just one resistor. You want to measure across BOTH emitter resistors. See attached. Also, double check the pretest and final test docs for correct voltage range. If you find a pair that is higher than the rest, then measure across each emitter resistor to find the current hog and replace that device. The one with the higher voltage is the current hog. Also, check the emitter resistors too. They can open up on you.
Attachments
- Home
- General Interest
- Car Audio
- Rubicon 1002 thermal runaway