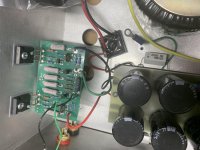
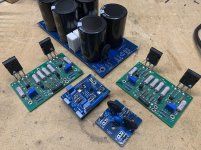
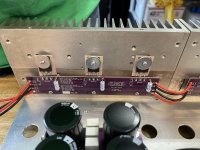
Here is a F5 rebuild on the bench. It has the usual poor quality power supply and missing ground. And it had NO FUSE!!!!!! That’s a first for me to see. That’s getting fixed! The pots on the amp boards are also getting upgraded. More pix when this one is done.
Attachments
-
 C1D54A6B-FF5F-4EAC-A76B-3EF4452BD7F3.jpg908.3 KB · Views: 302
 -
 B94073C0-B2E0-4B23-8AB0-EAA510C76868.jpg851.4 KB · Views: 269
 -
 795CBE50-808B-46E3-92C4-54EA14246101.jpg1,018.4 KB · Views: 255
 -
 9D64950B-B411-4CF3-BA9F-8D53FAA6B93F.jpg821.2 KB · Views: 262
 -
 50E31F8D-68A8-487F-98FF-E28731E04DA4.jpg1 MB · Views: 255
But there is a huge copper ground plane. I would also locate the ground connection point at the clean filtered end of the board.
It's so unfortunate that many people bought these amps thinking that they were getting a well built and safe product.
It's so unfortunate that many people bought these amps thinking that they were getting a well built and safe product.
Hi rhthatcher,
in the second pic of post #81 I see that you are also using the little Radioshack desoldering iron with the rubber vacuum pump !
I really like these a lot, very simple and effective, have worn out several tips on mine ... 😀
Did use them always, before I gifted myself one of the Chinese desoldering stations with built-in vacuum pump 🙂
I think these Radioshack desoldering irons did offer the best price-performance ratio. Did bring a spare one with me from a trip to the U.S. years ago, but haven't seen them since I haven't seen a Radioshack anymore ...
- Actually, the search engine shows that you can get them from Radioshack online still ! 🙂
Regards, Claas
I really hope there aren't any more of these fuseless wonders are out there.
Really nice work you're doing Randy! I really like the rectifier board as well.
And soon another amp will be rehabilitated... 🙂
Really nice work you're doing Randy! I really like the rectifier board as well.
And soon another amp will be rehabilitated... 🙂
Hi rhthatcher,
in the second pic of post #81 I see that you are also using the little Radioshack desoldering iron with the rubber vacuum pump !
I really like these a lot, very simple and effective, have worn out several tips on mine ... 😀
Did use them always, before I gifted myself one of the Chinese desoldering stations with built-in vacuum pump 🙂
My radio shack desoldering iron is 20+ years old. It has a lot of miles on the odometer now.
It is simple and effective, but it takes practice! It’s one of my least favorite tools, but maybe it’s just that desoldering is not not very fun. I mentally create a list of all desoldering work that needs to be done and try to knock it all out in one go.
Do you have a link to the one you’re using? Or a similar style? A better desoldering tool could be a good upgrade to my bench. And maybe I’ll ask Santa to put one under the tree…
Randy,
Thank god you are doing what you are doing and saving lives. Literally. The methodologies that Rawson uses would never even cross my mind. I am too much of a stickler. The circuit can sound 'nice' and all but if it isn't safe and reliable, it's useless.
I have a Hakko FR-301. Love it 🙂
Best,
Anand.
Thank god you are doing what you are doing and saving lives. Literally. The methodologies that Rawson uses would never even cross my mind. I am too much of a stickler. The circuit can sound 'nice' and all but if it isn't safe and reliable, it's useless.
I have a Hakko FR-301. Love it 🙂
Best,
Anand.
I have this station:
140W Desoldering Station Iron Gun 230V Vakuum Profi Abzieher ESD | eBay
Paid something like 90 UK pounds for it in 2018. Works very well, but with lead-free / silver solder it comes to its limits. Have to set it to 480 degrees Celsius, then it works well also for this high-melting solder.
There are a number of similar items around, for example:
De-LEAD FREE DESOLDERING STATION with LCD Panel zd-8915 Grey 220v Euro Plug | eBay
Actually, two different versions exist. One is often called ZD-8915 or ZD-8917, the other one ZD-915, ZD-917, or ZD-987.
The difference is significant, because the two versions seem to have two slightly different hand pieces (one is called -552, the other -553), and these use two different, not compatible tip versions.
There are probably variants of these designs from U.S. sellers as well.
Regards, Claas
Those Taiwainese Radio Shack desoldering irons with a hand pump are still available from Amazon for about $25, but the 2-prong plug on them is not polarized, so get that sorted before using, as one prong is connected to the metal body. I discovered this suddenly in a flash (solder acts like fuse wire), and then bought a pack of polarized plugs. But just weeks after making it safe again with a proper plug, it stopped working! So I'm using a slightly different type now, the Tenma brand with a vacuum plunger.
I use a dimmer to adjust the temperature on both of these types, as they're way too hot.
https://smile.amazon.com/dp/B00068I...id=3M1MPYQUVYKXP&ref_=lv_ov_lig_dp_it_im&th=1
https://smile.amazon.com/dp/B008DJR...olid=3M1MPYQUVYKXP&psc=1&ref_=lv_ov_lig_dp_it
I use a dimmer to adjust the temperature on both of these types, as they're way too hot.
https://smile.amazon.com/dp/B00068I...id=3M1MPYQUVYKXP&ref_=lv_ov_lig_dp_it_im&th=1
https://smile.amazon.com/dp/B008DJR...olid=3M1MPYQUVYKXP&psc=1&ref_=lv_ov_lig_dp_it
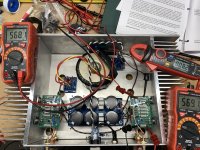
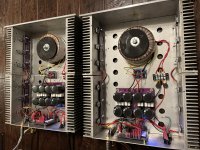
F5 is fired up for setting current and offset. Sound on the bench speakers is quite nice! This will get cooked a few hours tomorrow, readjusted, and then some burn in time it before returns to its owner.
Attachments

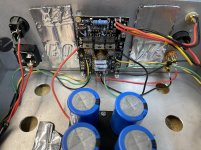
That is a nice update with proper grounding, PCBs and clean, updated connections.
I'm sure the owner will be pleased to have a great sounding, well sorted F5!
I'm sure the owner will be pleased to have a great sounding, well sorted F5!
Adding in a few pics of the Aleph 2 Monos that I updated from an earlier R**** build. Randy set up the Aleph 2 FE boards and daughter boards which sound great and power some vintage ADS 910s easily.
Adding a few of the before and after pics...
As always, thanks to Papa for his skill and generosity! And thanks to Randy for his support and expertise in all things R****!
Adding a few of the before and after pics...
As always, thanks to Papa for his skill and generosity! And thanks to Randy for his support and expertise in all things R****!
Attachments


Well done!
I am frankly horrified by the horrendous soldering of the original R**** behemoths. It's done with such carelessness 😱
Best,
Anand.
I am frankly horrified by the horrendous soldering of the original R**** behemoths. It's done with such carelessness 😱
Best,
Anand.
Well done Will!!!
This was a super exciting project to help with, and I'm thrilled it has come to life!
This was a super exciting project to help with, and I'm thrilled it has come to life!
What an amazing transformation WG45!!! Great job and congratulations on another new toy! 
Beautiful looking boards Randy!
Beautiful looking boards Randy!
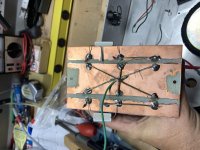
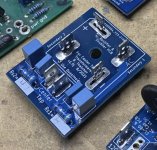
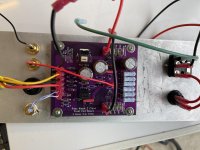
Testing the Ground PCB
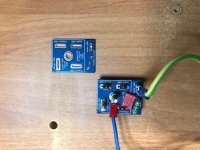
So I got a few of the special "Ground PCBs" that rhthatcher made. (Many thanks again, Randy !)
These normally provide a grounding path between Signal (Audio) Ground and Chassis Ground, but with some resistance in between in order to prevent ground loops.
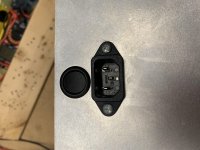
The second task of the connection between Audio Ground and Chassis Ground is to prevent the Audio Ground sitting at a large fault potential in case rail voltage or even wall AC voltage somehow gets connected to Audio Ground. For this, the connection between Audio Ground and Chassis Ground has to be able to carry a large fault current, which then gets directed from Chassis Ground to PE, tripping the house circuit breaker for that wall AC line. That's one of the reasons why we connect the PE tab from the IEC inlet directly to chassis immediately after the inlet.
The element carrying the fault current between Audio Ground and Chassis Ground in this case is a 35A bridge rectifier - the Ground PCB attaches to that and provides some convenient connection points. In nomral conditions (no fault), the bridge rectifier "isolates" Audio Ground from Chassis Ground by one or two diode drops, depending on connections. The ground-loop-breaking path between Audio Ground and Chassis Ground is provided by a thermistor (CL60 has 15R cold) or a resistor (typically something like 10R-22R). In a fault case, the potential difference is higher than the diode drop, the diodes in the bridge rectifier connect, and the fault current can flow.
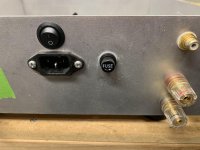
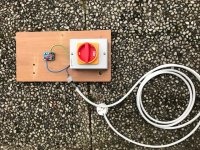
The Ground PCB I got has 1 oz copper layer (35 um), and I wasn't sure if the PCB could carry a large fault current. So, I decided to build a little test rig - see photo. Turning the switch to "on" connects Hot to Neutral of a wall AC connection, simulating a fault current by providing a direct short at 230V AC.
No problem, no drama - shorting the AC did not elicit any reactions at the PCB, just the circuit breaker tripped. This is for 16A at 230V line voltage, and the PCB and rectifier carried the full current to trip the breaker; no ground fault protector involved that might have tripped at a much lower current.
Conclusion: This Ground PCB works perfectly for its intended purpose, including carrying the large fault current "in case" 😀
Regards, Claas
So I got a few of the special "Ground PCBs" that rhthatcher made. (Many thanks again, Randy !)
These normally provide a grounding path between Signal (Audio) Ground and Chassis Ground, but with some resistance in between in order to prevent ground loops.
The second task of the connection between Audio Ground and Chassis Ground is to prevent the Audio Ground sitting at a large fault potential in case rail voltage or even wall AC voltage somehow gets connected to Audio Ground. For this, the connection between Audio Ground and Chassis Ground has to be able to carry a large fault current, which then gets directed from Chassis Ground to PE, tripping the house circuit breaker for that wall AC line. That's one of the reasons why we connect the PE tab from the IEC inlet directly to chassis immediately after the inlet.
The element carrying the fault current between Audio Ground and Chassis Ground in this case is a 35A bridge rectifier - the Ground PCB attaches to that and provides some convenient connection points. In nomral conditions (no fault), the bridge rectifier "isolates" Audio Ground from Chassis Ground by one or two diode drops, depending on connections. The ground-loop-breaking path between Audio Ground and Chassis Ground is provided by a thermistor (CL60 has 15R cold) or a resistor (typically something like 10R-22R). In a fault case, the potential difference is higher than the diode drop, the diodes in the bridge rectifier connect, and the fault current can flow.
The Ground PCB I got has 1 oz copper layer (35 um), and I wasn't sure if the PCB could carry a large fault current. So, I decided to build a little test rig - see photo. Turning the switch to "on" connects Hot to Neutral of a wall AC connection, simulating a fault current by providing a direct short at 230V AC.
No problem, no drama - shorting the AC did not elicit any reactions at the PCB, just the circuit breaker tripped. This is for 16A at 230V line voltage, and the PCB and rectifier carried the full current to trip the breaker; no ground fault protector involved that might have tripped at a much lower current.
Conclusion: This Ground PCB works perfectly for its intended purpose, including carrying the large fault current "in case" 😀
Regards, Claas
Attachments
Good question. I looked at hi fi shark for "Rawson" and see 74 old listings. I imagine that's only a portion of them. About a dozen have come across my bench over the past 2 years. I've seen: Aleph J, Mini J, F5, F2J, F3, Gainclone, and now Aleph 5. They all have the same grounding and PSU issues.
At some point I'm planning to put an ad up somewhere to fix these. Bare minimum is total power supply revamp. Even if the request is to fix something broken, the mains wiring, grounding, and PSU PCB will need to be upgraded if it's coming across my bench. Audio related upgrades optional (caps, etc.)
Randy,
I am pretty sure the F3 you bought from me was originally advertised by Tim on Audiogon back in the day.
- Home
- Amplifiers
- Pass Labs
- Rawson Repair Reflections