Thanks Richard - the problems were the cables provided by Ghentaudio.
Unluckily they were wrong, but luckily the purifi documentation helped to build a new cable in the correct way.
Now it's sounding and it's amazing.
Real power and transparence.
Unluckily they were wrong, but luckily the purifi documentation helped to build a new cable in the correct way.
Now it's sounding and it's amazing.
Real power and transparence.
Hi Daniel,
I just replied to your PM. My best guess is that you made a mistake in step 6 of the build instruction and you did not put the SMPS1200 in unregulated mode. Maybe you changed the jumpers incorrectly?
Please let us know if it works after checking this.
BR,
Richard
It's easy but I strongly suggest to build it with someone who knows how to deal with high current circuitries.
Some "hurdles" I've encountered:
1) the power switch was not documented and I had to try the right configuration....as I have some experience I did it, but it's 220V and much ampere on it!
2) the power cable provided by Ghentaudio was wrong. Instead of being wired pin-to-pin (ie pin 1 goes on pin 1 on the other side), it was crossed.
The result was the power supplier going into protection. I rebuilt it using the manual on the purifi site, very clear and easy to follow.
3) when you test the amplifier and then re-open the box, you must not touch anything as the condensers are loaded still with electric charge.
In general we are speaking of 1200W power supply, 800W musical watt and more or less 26 ampere, which is a lot.
The case is well done, laser cut and elegant.
Richard instructions are a great help, so thanks Richard!!!
Nice! On a scale 1-10 10 being most difficult how much of a challenge was this to put together?
Hi Daniele,
These are great additions indeed! It is an easy task, assuming that all the materials and cables are correctly supplied. And yes, you are indeed dealing with high current circuitries, SO BE CAREFUL! As this is a DIY audio forum, I assume we are all well aware of the risks involved. Anyhow, good to point it out again.
Thanks,
Richard
Hi Richard,
First of all, thank you for your excellent instructions which gave me the courage to try my first diy attempt to build the Purifi Eval-1 kit. I have some comments and questions and would be grateful for your guidance.
1. Ghent seems to have change the AC inlet from the one shown in your Step 12 (see the wiring diagram pictured in Ghent's website on the purifi casing). An additional pair of short jumpers was also included in the wiring harness I received, presumably to satisfied the new inlet configuration. Fortunately, the wiring instructions are not too difficult to follow. You may want to put an addendum in your excellent instructions on this.
2. Ghent also supplied a new part, a curious small speakon plug-inwith a little wire jumper inserted. Would you be able to advise what this is for please?
3. The purifi eval-1 module has an on/off switch sticking out from the rear. What is the function of this switch since the AC inlet also has a on/off switch please?
Appreciate your kind guidance. Thank you.
Richard, just wish to thank you for the excellent guide! Just assembled mine. Do you know if ALL Ghent supplied power cables are incorrect or just a small batch?
Hi Soulfood,
My apologies for the late reply, but I can't get the notifications to work on this forum. 🙁
Re your questions:
1. Putting an addendum in will be hard for me not having seen the other AC inlet that Ghent apparently supplies now with the case. Maybe you can share some pictures of the correct wiring and I will include it into the manual.
2. Same as 1, but if anyone can provide me with some pictures I will update the manual.
3. The 'on/off switch' sticking out of the rear of the EVAL1 board, is actually the standby switch S1. More information can be found in the EVAL1 user guide: https://purifi-audio.com/wp-content/uploads/2020/09/EVAL1-Users-Guide-1.25.pdf
BR,
Richard
Hi Richard,
First of all, thank you for your excellent instructions which gave me the courage to try my first diy attempt to build the Purifi Eval-1 kit. I have some comments and questions and would be grateful for your guidance.
1. Ghent seems to have change the AC inlet from the one shown in your Step 12 (see the wiring diagram pictured in Ghent's website on the purifi casing). An additional pair of short jumpers was also included in the wiring harness I received, presumably to satisfied the new inlet configuration. Fortunately, the wiring instructions are not too difficult to follow. You may want to put an addendum in your excellent instructions on this.
2. Ghent also supplied a new part, a curious small speakon plug-inwith a little wire jumper inserted. Would you be able to advise what this is for please?
3. The purifi eval-1 module has an on/off switch sticking out from the rear. What is the function of this switch since the AC inlet also has a on/off switch please?
Appreciate your kind guidance. Thank you.
Thank you for letting me know! Re the power cables, I don't know. My amp was a one off build which I am enjoying every day. No plans to start a business. 😀
Richard, just wish to thank you for the excellent guide! Just assembled mine. Do you know if ALL Ghent supplied power cables are incorrect or just a small batch?
Hi All, I'm looking for a Purifi FE02 board which is unfortunately not for sale separately. I do have all the other stuff needed in my current amp but I would like to test by using this board. If you are in Europe and willing to sale this board drop me a message 🙂. Thank you in advance.
Did you check with Soundimports.eu? I know they do not list the FE02 separately on their website, but they might be willing to purchase a full amplifier set and sell you the FE02 separately as they also offer the ET400 separately on their website.
BR,
Richard
BR,
Richard
Hi All, I'm looking for a Purifi FE02 board which is unfortunately not for sale separately. I do have all the other stuff needed in my current amp but I would like to test by using this board. If you are in Europe and willing to sale this board drop me a message 🙂. Thank you in advance.
Another option: Purifi 1ET400A / Hypex NC500 Input Buffer: Purifi 1ET400A / Hypex NC500 Input Buffer – Neurochrome
Hi Richi and Mello. I opted to buy a new eval1 set and fingers crossed that the guide will make my first build ever a success 🙂.
help with power jumper
Richi,
Noob here! Just put the combination together with your instructions.
Excellent! Easy!
Just one question, it's come up in previous posts about needing to use the jumper for 110. I went back through the instructions and didn't see it mentioned. I haven't read any other manuals.
Is there something else to do? concerning 220V to 110V?
Thanks for your help!
Bill
Hi Bill,
To be honest: I don't know. I live in The Netherlands so no experience with 110v at all. What I did find in the Hypex power supply manual is that with the low line jumper placed, the power supply accepts 110v input. As far as I understand that is all you need to do to operate at 100v instead of 220v.
Link to the Hypex PS manual: https://www.hypex.nl/documenten/download/2221
BR,
Richard
Hi Richi and Mello. I opted to buy a new eval1 set and fingers crossed that the guide will make my first build ever a success 🙂.
Cool! Enjoy.
That will work
Richi,
Thanks for the advice. Manual is easy to read and should be an easy adjustment.
Thanks again for the assembly manual.
Bill
Richi,
Thanks for the advice. Manual is easy to read and should be an easy adjustment.
Thanks again for the assembly manual.
Bill
Hi Richi and Mello. I opted to buy a new eval1 set and fingers crossed that the guide will make my first build ever a success 🙂.
And, did the kit arrive already? Any first results at your end?
BR,
Richard
The last bits of my kit are scheduled to arrive tomorrow. Thanks RichiNL for the great instructions. This is my first kit to put together like this.
Richi,
Noob here! Just put the combination together with your instructions.
Excellent! Easy!
Just one question, it's come up in previous posts about needing to use the jumper for 110. I went back through the instructions and didn't see it mentioned. I haven't read any other manuals.
Is there something else to do? concerning 220V to 110V?
Thanks for your help!
Bill
The only step is to install the jumper for 110v.
Richard,
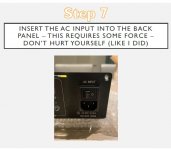
Thanks for your excellent instructions. I am working on a pair of IcePower 1000ASP in Ghent GK-ASP-MXR cases build, and have run into an issue inserting the AC power inlets into the rear panel, seems that your did too.

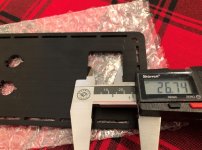
The opening on the rear panel is 26.74mm wide.

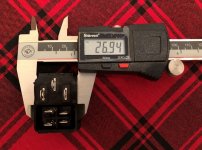
The AC inlet is 26.94mm wide.

I've tried forcing it, using way more force than I think I should, and it still won't go. I've tried heating the panel in the sun and cooling the inlet in the freezer, it went about halfway in and was scraping plastic off the sides of the AC inlet.
Anyone have any other ideas?
Thanks,
David
Thanks for your excellent instructions. I am working on a pair of IcePower 1000ASP in Ghent GK-ASP-MXR cases build, and have run into an issue inserting the AC power inlets into the rear panel, seems that your did too.

The opening on the rear panel is 26.74mm wide.

The AC inlet is 26.94mm wide.

I've tried forcing it, using way more force than I think I should, and it still won't go. I've tried heating the panel in the sun and cooling the inlet in the freezer, it went about halfway in and was scraping plastic off the sides of the AC inlet.
Anyone have any other ideas?
Thanks,
David
....I've tried forcing it, using way more force than I think I should, and it still won't go. I've tried heating the panel in the sun and cooling the inlet in the freezer, it went about halfway in and was scraping plastic off the sides of the AC inlet.
Anyone have any other ideas?
Did you consider using a file to add more clearance? Or a Dremel tool?
- Home
- Amplifiers
- Class D
- Purifi EVAL1 Ghent case build instruction