It was a really tight fit, but I was able to get my mine in place by just pushing on it really hard with my thumbs. If that didn't work I probably would have used a file to gently widen the case opening.
Did you consider using a file to add more clearance? Or a Dremel tool?
It was a really tight fit, but I was able to get my mine in place by just pushing on it really hard with my thumbs. If that didn't work I probably would have used a file to gently widen the case opening.
I'd thought of a file/dremel/sandpaper, but really didn't want to get into modifying the chassis or the AC inlet. I emailed Ghent and his response was simply to push harder. 🙁
Since I've already scraped up one of the AC inlets trying to force it in, I guess I'll lightly sand both sides, shaving off 0.1mm from each side shouldn't be too hard.
Last edited:
Hi David,
You are right, I did hurt myself. Actually, it was a bloody mess. Litteraly. 😀
I agree with you that Ghent should widen the opening in the back panel a bit to be able to push the AC inlet in with less force.
BR,
Richard
You are right, I did hurt myself. Actually, it was a bloody mess. Litteraly. 😀
I agree with you that Ghent should widen the opening in the back panel a bit to be able to push the AC inlet in with less force.
BR,
Richard
Richard,
Thanks for your excellent instructions. I am working on a pair of IcePower 1000ASP in Ghent GK-ASP-MXR cases build, and have run into an issue inserting the AC power inlets into the rear panel, seems that your did too.
View attachment 941631
The opening on the rear panel is 26.74mm wide.
View attachment 941632
The AC inlet is 26.94mm wide.
View attachment 941633
I've tried forcing it, using way more force than I think I should, and it still won't go. I've tried heating the panel in the sun and cooling the inlet in the freezer, it went about halfway in and was scraping plastic off the sides of the AC inlet.
Anyone have any other ideas?
Thanks,
David
I put the kit together this afternoon and I'm thoroughly impressed. I've only run some elac debut 2.0 speakers so far and they've never sounded finer. I've run them on an SMSL SA300 and an Audiolab 8300 and they always felt like they were lacking until I hooked them up to this kit.
I'll test the LS50 Metas on them tomorrow night.
It does appear that Ghent is shipping a different IUC piece now. It may be worth updating the instructions with this picture from their website which shows how to run the jumpers.
I'll test the LS50 Metas on them tomorrow night.
It does appear that Ghent is shipping a different IUC piece now. It may be worth updating the instructions with this picture from their website which shows how to run the jumpers.
Attachments
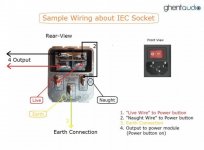

franklyspeaking. Good of you to post the wiring diagram for the new IUC unit which appears on Ghent's website. I had mentioned this to Richard in my Feb 17 posting. The website has also ungraded the picture of the wiring harness with clear descriptions of each of the wires including the little jumper which is to be used on the power supply unit for conversion from 220 volts to 110 volts.
With these new pictures/diagrams and Richard's excellent instructions, installation should be even more straight-forward.
The Purifi amp is a truly amazing amp presenting a clear transparent holographic soundstage, neutral with oodles of micro-details. However I would strongly recommend the use of the IsoAcoustics isolators if the full capabilities of the Purifi is to be appreciated. I was a sceptic of exotic anti-vibrational isolation devices. For the last half a century I was sold on the theory a well-spiked isolation was enough. Focal's recommendation on the use of IsoAcoustics footers on its speakers shattered all that. Using IsoAcoustics pugs on the Purifi brought out even greater transparency, image specificity and micro-details. I now use them on all my devices.
Hi all, I have seen the comments on the new IUC here. I will update the instructions accordingly when I find the time. However, I am not sure how to update the document on my shared iCloud Drive without having to change the URL to the shared document. So that I need to figure out first. Otherwise the existing link will no longer work and Ghent now also uses that link on his website.
BR,
Richard
edit: typo
BR,
Richard
edit: typo
Using IsoAcoustics pugs on the Purifi brought out even greater transparency, image specificity and micro-details. I now use them on all my devices.
Can you please post the exact product name/number here as IsoAccoustics offer so many products? I am already using the Gaia 2 under my Dynaudio speakers and I love them!
BR,
Richard
Hi.
Just build one. Thx for the efforts Richi.
Some feedback.
The power socket changed as somebody mentioned earlier. That's the most critical part of all! Not good that it is not described. 😡
The harness therefore also changed.
There's also a new 110V/220V jumper.
You get confused if you open the doc and find a different set of cables.
The problem.
You need to know that you find the latest info on the Ghent page. Because even Ghent himself refers to the no longer accurate build instructions over here.
It's really not that easy to get the wires and jumper attached to the power socket.
First of, make sure to follow the separate wiring images on Ghent audio!
Then you really have to make sure the wires sit tight. It happened to me that one came off,
even though I thought I was done with it. While doing it you also have to make sure not to break anything!
What else!?
Somehow I had to disassemble the amp board. I wouldn't manage to get the complete module
fitted into the holes. Instead of trying to get the whole thing in at once, I decided to fit the IO board only first.
After that I attached the amp boards inside the case. I think that approach is less risky to break anything.
I am pretty impressed that everything fits perfectly.
Perhaps it'd be worth to mention in the doc to check the gain factor before closing the
case..
One Q:
Regarding the harness "shielding" option as suggested in the instruction.
Why not grounding the shield on one side at least and attach it to the ground point?
Finally. ( I hope the Ghent folks read this 😉 )
Ghent sells all kind of pretty good high quality cables.
1. Why not offering quality power cables !?!?
2. Why can't I order a separate Purifi harness set?
3. Wouldn't a HQ harness (perhaps even shielded) set make sense!?!?
Anyhow.
I think that's one of my best looking and highest quality DIY project so far.
I'm more than happy with what I see an hear. 😀
Enjoy.
Last edited:
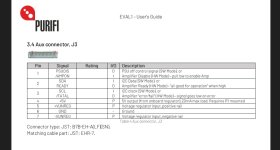
Добрый день. Вы использовали SMPS1200A400 , что произойдет, если вы поставите SMPS1200A700 ? Спасибо.Привет, это мой первый пост на этом форуме. Однако я был здесь много раз, много читая о том, как построить мои моноусилители nCore несколько лет назад, а также о том, как совсем недавно построить стерео усилитель Purifi EVAL1.
Тем не менее, я не смог найти четкую пошаговую инструкцию о том, как создать стерео усилитель Purifi EVAL1. Поэтому я сам создал инструкцию. Я подумал, что было бы неплохо поделиться этим здесь, так как многие, подобные мне, попытались бы найти здесь такую инструкцию.
Я использовал комплект для стереосистемы Ghent Audio Purifi, аудиопроводы Ghent, Hypex SMPS1200A400 и модуль Purifi EVAL1.
Надеюсь, вам понравится мое пошаговое руководство. Если у вас есть предложения или вы обнаружите ошибки, пожалуйста, дайте мне знать. Спасибо!
Ссылка: iCloud
br,
Ричард
 Это англоязычный форум
 Translation
Good afternoon. You used SMPS1200A400 , what happens if you install SMPS1200A700 ? Thank you.
"Good afternoon. You used SMPS1200A400 , what happens if you install SMPS1200A700 ? Thank you. "Добрый день. Вы использовали SMPS1200A400 , что произойдет, если вы поставите SMPS1200A700 ? Спасибо.
Using SMPS1200A700 with +/- 85V is NOT be a good idea with the Purifi 1ET400A with absolute maximum of +/- 75V.
https://www.hypex.nl/product/smps1200a700/137https://purifi-audio.com/eigentakt/
This thread has a lot of info Purifi amplifier builds, here is one of my posts: https://www.diyaudio.com/community/...nc500-input-buffer.351387/page-4#post-6881803
That makes sense of course and it was something I wanted to do at some point to see if it would improve the sound. However, the amp sounded excellent already and I never made it a priority to try it.Regarding the harness "shielding" option as suggested in the instruction.
Why not grounding the shield on one side at least and attach it to the ground point?
In the mean time I have replaced the Purifi amp with an LSA Warp 1 power amplifier. I like it even more than my Purifi DIY amp: more meat on the bone in the low regions, fuller mids and more PRaT. Couldn't be happier with where class D has been going over the last few years.
BR,
Richard
Hello,
I am interested in buying the eval1 kit plus hypex ps from Europe, but without the case as it is quite expensive, almost plus 50%.
https://www.soundimports.eu/en/purifi-eval1.html
I don't know if they provide the right aux cable to connect the purifi kit and the ps. In their supply it looks the cable is different.
https://www.soundimports.eu/en/soundimpress-pu400-2ch-kit.html
I don't even know if I understand correctly what does what.
Is it switch, aux power or both ? A regular connector would not work, right?
Thanks
Attachments
I got more information from the purifi site itself.
I don't know why they don't provide a power cable already made and why we shall have to finish the building of the cable
https://purifi-audio.com/shop/eval1...#attr=263,264,265,266,267,268,269,270,271,272
I don't know why they don't provide a power cable already made and why we shall have to finish the building of the cable
https://purifi-audio.com/shop/eval1...#attr=263,264,265,266,267,268,269,270,271,272
- Home
- Amplifiers
- Class D
- Purifi EVAL1 Ghent case build instruction