Good Day
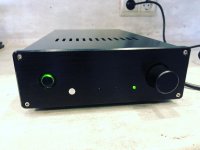
I finished my Naim Nait DIY project
Amp board is rebuilding China KIT of NAP200 with original selected parts.
And preamp is my design NAC42 board with input selector and MCU Atmel Tiny13A
I finished my Naim Nait DIY project
Amp board is rebuilding China KIT of NAP200 with original selected parts.
And preamp is my design NAC42 board with input selector and MCU Atmel Tiny13A
Attachments

Hi all!
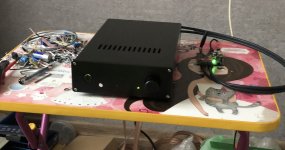
I completed my H-ENG Class B amplifier build this evening and took a few quick pictures alongside the preamp from my previous post in this thread. I am happy with how they both turned out - you can see my aesthetic inspiration in the background; a classic Class B amplifier in the Creek 'CAS-4040'.


I completed my H-ENG Class B amplifier build this evening and took a few quick pictures alongside the preamp from my previous post in this thread. I am happy with how they both turned out - you can see my aesthetic inspiration in the background; a classic Class B amplifier in the Creek 'CAS-4040'.
Thanks mate! They are Cheval SA-series cases. You can get them on eBay here.Neat job, 002!
Where do you source your cabinets?
I had a local company powder-coat mine in black.
Cheval make nice looking cabinets.Thanks mate! They are Cheval SA-series cases. You can get them on eBay here.
Unfortunately shipment cost to EU exceeds cabinet price 🙁
Yes, it is pretty rough to get them shipped to Aus too honestly - but it ticked the boxes for me looks-wise, so I bit the bullet.Cheval make nice looking cabinets.
Unfortunately shipment cost to EU exceeds cabinet price 🙁
Maybe I am naive but I figured it would be easier to find good looking enclosures when I was starting out with these projects, but alas it is surprisingly difficult.
Beautiful amp ! Where did you get this stunning vu meter ?Hiraga Le Monstre
My Hiraga 8W
Cicada amp, 15W class A with totem pole MOSFET output. Not the most nicely looking amp, it just screams DIY


Great work!!!Cicada amp, 15W class A with totem pole MOSFET output. Not the most nicely looking amp, it just screams DIY
View attachment 1101744
View attachment 1101745
Aluminium radiators from power triacs or power diodes ?
Either of them, I'm not sure. They have M20 threads in them. Some local shop sell them for a very moderate price. They came a bit rugged so I sanded them to give a nicer finish.Great work!!!
Aluminium radiators from power triacs or power diodes ?
That toroid! Have you wound it yourself?Hiraga Le Monstre
My Hiraga 8W
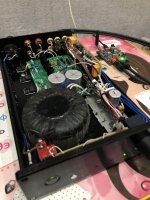
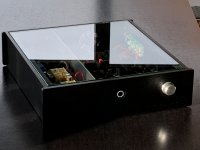
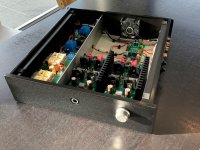
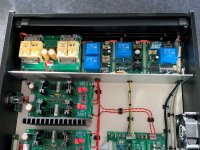
Today I finished my preamp, based on a Blowtorch Clone line amp.
The preamp is remote controled, thanks to Meldano's Muses 72323 circuit. It has three input channels, balanced and unbalanced output.
This preamp also triggers the poweramp's to switch on or off.
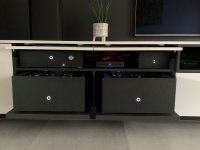
Inside the preamp is a fan installed (noiseblocker) running on a reduced voltage to keep the inside at reasonable temperatures (50W dissipation!). This PSU is also used to run the fan's built into the audio furniture.
Hoop up wire I used is Neotech OCC solid copper.
Dimensions are: width 460mm, depth 450mm and height 120mm, weight is approx 10kg.
The preamp is remote controled, thanks to Meldano's Muses 72323 circuit. It has three input channels, balanced and unbalanced output.
This preamp also triggers the poweramp's to switch on or off.
Inside the preamp is a fan installed (noiseblocker) running on a reduced voltage to keep the inside at reasonable temperatures (50W dissipation!). This PSU is also used to run the fan's built into the audio furniture.
Hoop up wire I used is Neotech OCC solid copper.
Dimensions are: width 460mm, depth 450mm and height 120mm, weight is approx 10kg.
Attachments


Nice build!
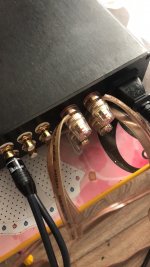
Quite unusual to have input and output connectors on the side instead of the rear…. I suppose it could be more easy this way…
For the remote control, I cannot see the window or opening on the front plate to detect the infrared signal (if that is what is used) does it mean that the top clear cover allows to capture the remote signal?
Fab
Connectors on the back would be a PITA to connect everythind and slide the preamp in the furniture. If the preamp would be smaller and light weight, maybe then I would place them on the back.
Well; on the front a a few 2mm holes where a transparant plastic light guider is put in assembled on top of SMD LED's, a same plastic guider is used to from the 2mm opening to the IR receiver. It works perfect. These 2mm opening for the input selection and IR receiver are positioned below the volume knob. It's difficult to see (both in real life as on the pictures), I'm happy with that.
Well; on the front a a few 2mm holes where a transparant plastic light guider is put in assembled on top of SMD LED's, a same plastic guider is used to from the 2mm opening to the IR receiver. It works perfect. These 2mm opening for the input selection and IR receiver are positioned below the volume knob. It's difficult to see (both in real life as on the pictures), I'm happy with that.
My stereo amp with sabre dac and i2s input onboard.Full galvanic isolation. Output transistors IXFN80N60P3 and IXTN40P50P. +- 75v this version. Higher also possible but don’t think it will be ever needed. 3 modes. Voltage mode, current mode, and mixed mode with adjustible corner frequency for transition from voltage to current. All protections, auto on off. Only smps supply needed. Very high performance, but it is little overkill. Very many parts onboard and the price is high because of that. Thought to use in all of my projects, but now i think less features version would make more sence to use. The board even can be used as four quadrant voltage/ current power supply as it is dc coupled. Designed to handle 10A rms with proper heatsink, but not tested for high power aplication yet 😮 have no time 🥲
Hello,
What is the brand of the 6 band resistors ?
Thanks
Regards
Cicada amp, 15W class A with totem pole MOSFET output. Not the most nicely looking amp, it just screams DIY
I've got almost the same heatsinks and configuration 🙂
https://www.diyaudio.com/community/threads/amp-camp-amp-aca.215392/post-6064361
Nothing wrong with screaming DIY 👍
Very nice. I want to rebuild it in the future with shorter base and a proper PS. Those SMPSes are just too bulkyI've got almost the same heatsinks and configuration 🙂
https://www.diyaudio.com/community/threads/amp-camp-amp-aca.215392/post-6064361
Nothing wrong with screaming DIY 👍
hello nosHello,
What is the brand of the 6 band resistors ?
Thanks
Regards
- Home
- Amplifiers
- Solid State
- Post your Solid State pics here