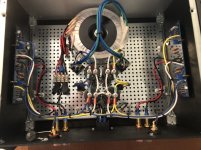
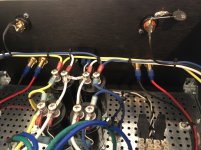
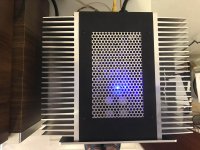
Here’s my standard F5 built with diyaudio store parts. Came out fine, sounds great. I’m running the bias higher than normal but heat sinks are staying cool.
Attachments

Thanks everyone! Time to start a preamp project!
Try the Wayne Colburn BA2018 circuit- it’s great and has the perfect amount of gain for the F5.
For those in the know it is obvious that the box on the right is an F5
For the sharp eyed what are the two boxes to the left?
Bottom one looks to possibly to be a 70’s era Pioneer or Sansui receiver?
Here’s my standard F5 built with diyaudio store parts......
Congratulations! Glad it worked for you. I like the point to point cap wiring - not seen too often anymore.
Now build a set of m2 boards to try and compare 🙂
For those in the know it is obvious that the box on the right is an F5
For the sharp eyed what are the two boxes to the left?
Technics SA-xxx on top.
Sansui G-6000 on bottom.
Technics SA-xxx on top.
Sansui G-6000 on bottom.
To get that from this means that truly, you are an hi-fi god!
Attachments
To get that from this means that truly, you are an hi-fi god!
I got lucky.

I got lucky.
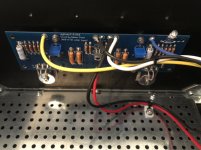
Here they are in all their glory. Now can you cap it all off and tell me what that is on top?
Attachments
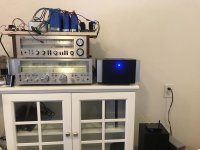
Here they are in all their glory. Now can you cap it all off and tell me what that is on top?
Technics SA-500.
But the item on the very top looks like a power source for your F5 (surely can't be your pre-amp or an Icepower Class D build 😀).
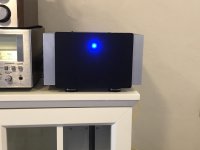
The F5 looks tiny when beside the Sansui. And I fo like the looks of your build, black face silver fins, and blue LED.
Your room is in the basement? The humidity would fluctuate wildly with the seasons in my old house's basement that I needed a dehumidifier in summer (also helped keep the humans more comfortable) and humidifier in the winter.
Technics SA-500.
But the item on the very top looks like a power source for your F5 (surely can't be your pre-amp or an Icepower Class D build 😀).
The F5 looks tiny when beside the Sansui. And I fo like the looks of your build, black face silver fins, and blue LED.
Your room is in the basement? The humidity would fluctuate wildly with the seasons in my old house's basement that I needed a dehumidifier in summer (also helped keep the humans more comfortable) and humidifier in the winter.
It is really only an F2.5. If you look to the left of the Sansui you can just see the heat sink for the other half which has not yet got a box. The second power supply is on the bench and I am just starting in on the case for it.
All above ground and separated from the house by a garage, which is good. I live in the desert which solves the humidity problem but it means I need the air-con to run Mr. Pass' designs.
Love the Sansui just to look at.
Hello everyone
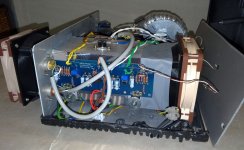
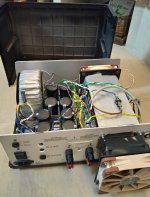
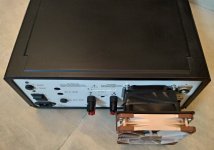
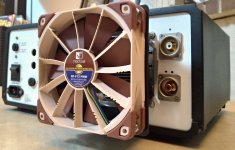
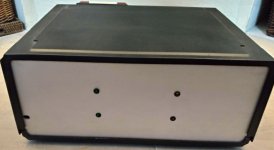
I would like to show you my f5, it is a little different from the usual as it is cooled by fans, the enclosure is made of cast alloy and reused from a laboratory power supply. The interior is not as tidy as I have seen, but space was scarce. Last picture is a safety feature, a thermal switch, which opens at 60ºC and cuts the supply to the toroidal transformer but maintaining the supply of the fans which is independent of the main supply.
Best regards
Carlos
Attachments
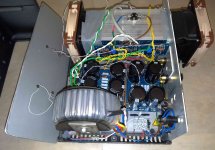
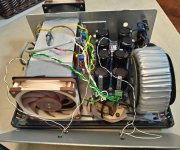

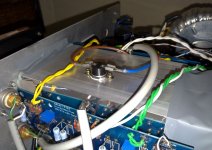
it's crowded iside, but it's yours!
🙂
beware of NTCs leaned on metal washers, not one F5 did go BigBadaBoom because paint on NTC gone south
better move them to ceramic part of mosfet case,, reset Iq after that
🙂
beware of NTCs leaned on metal washers, not one F5 did go BigBadaBoom because paint on NTC gone south
better move them to ceramic part of mosfet case,, reset Iq after that
Hello Zen Mod
Thank you for your recommendation, I will make the changes as soon as possible.
Best regards
Carlos
Thank you for your recommendation, I will make the changes as soon as possible.
Best regards
Carlos
it's crowded iside, but it's yours!
🙂
beware of NTCs leaned on metal washers, not one F5 did go BigBadaBoom because paint on NTC gone south
better move them to ceramic part of mosfet case,, reset Iq after that
Do you suggest that for all types of NTCs? I have the orange/yellow ones from the DiyAudioStore kit and built it per the v3 build guide, which has it touching the tip to the washer.
I wouldn't mind making my F5 more rock solid, but I'm trying to picture how to do this. There isn't much surface on the FETs that isn't covered by the big washers, and also I'm trying to imagine how I can get the NTCs to continue having good contact after bending the leads. One time when I wasn't careful I bent the NTC away from the surface by accident, and I had to desolder it, re-bend it and re-solder it to get it to push against the washer.
What about small pieces of Keratherm between the NTCs and the washers?
Some people have reported good results with parts similar to this.
https://www.diyaudio.com/forums/pass-labs/188691-illustrated-guide-building-f5-122.html#post5986448
If link doesn't work - post #1220 in the build guide.
Do you suggest that for all types of NTCs? I have the orange/yellow ones from the DiyAudioStore kit and built it per the v3 build guide, which has it touching the tip to the washer.
I wouldn't mind making my F5 more rock solid, but I'm trying to picture how to do this. There isn't much surface on the FETs that isn't covered by the big washers, and also I'm trying to imagine how I can get the NTCs to continue having good contact after bending the leads. One time when I wasn't careful I bent the NTC away from the surface by accident, and I had to desolder it, re-bend it and re-solder it to get it to push against the washer.
What about small pieces of Keratherm between the NTCs and the washers?
well, whatever you do to prevent trouble is good
frankly , I didn;t even think of that bad scenario untill it happened to some Greedy Boy around
even small area of ceramic is good enough - put small blob of thermal goo in between, then maybe small blob of RTV Silicone on side , to keep it firm
Hello everyone
I would like to show you my f5, it is a little different from the usual as it is cooled by fans, the enclosure is made of cast alloy and reused from a laboratory power supply. The interior is not as tidy as I have seen, but space was scarce. Last picture is a safety feature, a thermal switch, which opens at 60ºC and cuts the supply to the toroidal transformer but maintaining the supply of the fans which is independent of the main supply.
Best regards
Carlos
I'm always glad to see people re-purpose old gear for DIY. I'm likely to use an old NAD THX amp case that I got from the dump for an AlephJ build sometime in the not too distant future. So for the fan tunnel, I assume you have heat sinks turned into the tunnel? Interesting idea for fitting it all together in a case with no external heat sinks.
Hello Carlp
Glad you liked, you will most likely have more space with the NAD amp case, but the idea of cooling with fans makes it gain a lot of space and a lot of waf ...
The heatsink I used was this one LA 21 150 24 V | Disipador, para usar con Aluminio rectangular universal con ventilador, 0.13K/W, 150 x 92 x 93mm | RS Components (there are bigger and longer ones but they don't fit) with an adapter for fans with a larger diameter of noctua because they are quieter than the original fan.
The rear fan only had to be placed because on hot summer days the thermal switch would go off after 30 min of operation, currently it is not necessary but I have not yet made a system to turn it off easily.
Best regards
Carlos
It is really only an F2.5. If you look to the left of the Sansui you can just see the heat sink for the other half which has not yet got a box. The second power supply is on the bench and I am just starting in on the case for it.
All above ground and separated from the house by a garage, which is good. I live in the desert which solves the humidity problem but it means I need the air-con to run Mr. Pass' designs.
Love the Sansui just to look at.
Do you have some more details on that chassis?
- Home
- Amplifiers
- Pass Labs
- Pictures of your diy Pass amplifier