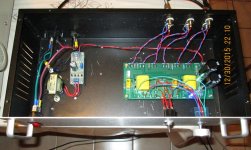
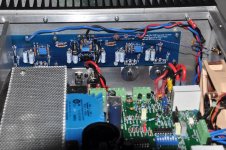
Here's a couple of images of my bread board Zen V8, no feed back, mono block (there are two). I've been listening to them for about a year now lime this. Just haven't had time to upgrade the parts and build a chassis.
The little heat sink is for the JFET and the big one is for the MOSFET. Wood block isolates them because I didn't use insulators, only thermal grease. Notice the switching power supply. With a CLC filter and star ground, I was able to quiet the buzzy ripple enough so that I have to put my ear a couple of inches away from the speaker to hear it.
Cinco
Super COOL Zen amplifier 😀
Congratulations and thanks for sharing

Man Cave Industrial Fugly!

It's Alive!.....It's Alive!....It's Alive!!!......

Super COOL Zen amplifier 😀
Congratulations and thanks for sharing
Thanks.
B1
Hi,
A few years ago I bought a mostly complete B1 board from a member.
I had wanted to rebuild it with a few upgraded parts, but never got around
to it.
A couple days ago I decided to try to get it working just with the
parts around the house. I added the few missing parts
(a couple of 22000uF caps and a blue led) to the PCB.
The recycled case once held a BOZ and later a gainclone. The power
supply is just a small transformer with an LM317 set at 18V. The pot
is a 20k cheapie fake alps.
I'll test it a bit more before hooking it up.
Cheers,
Dennis
Attachments

3 channel F5 balanced monblocks
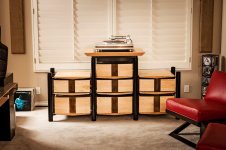
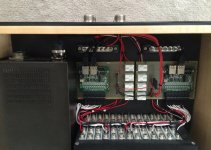
Just got these up and running over the holidays. There is a separate battery power supply based on large format LiFeP04 cells that are typically used for automotive applications - a total of 4 chassis. The chassis all have a wooden front that is designed to look like drawers in a chest - the idea was to create a modern console from an aesthetics standpoint. The other item that is a bit unusual is that I built in a 3-way analog crossover in each monoblock to allow for active triamping of my speakers.
I have really enjoyed this forum over the last few years and want to thank Nelson Pass and the members for providing a fun place to exchange ideas. Happy New Year Everyone. Bruce
Attachments
-
 BF_Rack_Closeup-002_retouchFlat.jpg145.3 KB · Views: 1,136
 -
 technicspwrsupply2lowres.jpg126.5 KB · Views: 1,037
 -
 moduleparts2lowre.jpg98.9 KB · Views: 1,073
 -
 3channelF5pwrsupplyrearlowres.jpg135.3 KB · Views: 1,641
 -
 3channelF5back.lowresjpg.jpg152.7 KB · Views: 1,682
 -
 3channelF5insidelowres.jpg155.1 KB · Views: 1,719
Chesus!
Those are some amazing looking amps and batteries.
Take good care of The batteries and I'm sure those do provide you with great sound 🙂
Those are some amazing looking amps and batteries.
Take good care of The batteries and I'm sure those do provide you with great sound 🙂
Front Plate howto?
Hi bfalls,
Thanks for sharing your build, wonderful front plate design, do you care to share how you got the curve of the front plate done so evenly?
Hi bfalls,
Thanks for sharing your build, wonderful front plate design, do you care to share how you got the curve of the front plate done so evenly?
Thank you to everyone for the feedback. The wooden fronts were made to my drawing by a place that has the equipment to do curved laminations - evanc is correct...I made all of the metal parts for the chassis and the stand as I have access to CNC equipment.
The speakers that necessitated this project are JBL Everest - I was using a pair of modified F5's (balanced monos) for long time before doing the surgery.
The speakers that necessitated this project are JBL Everest - I was using a pair of modified F5's (balanced monos) for long time before doing the surgery.
Pass DIY Addict
Joined 2000
Paid Member
from an aesthetics standpoint.
I'm sorry, I like your windows most.
HNY, Bruce.
(couldn't help wondering what those L+R things are?)
Last edited:
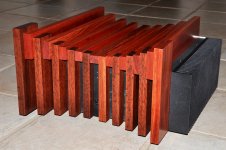
My take on the Nelson Pass F5 finally finished after 3 years
Thank you to Nelson Pass for making the design available and to Cviller for the F5C V2.0 circuit boards.
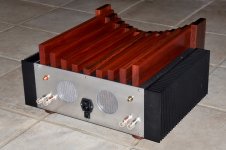
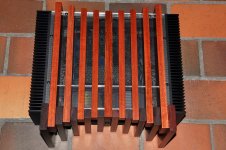
The amplifier uses dual-mono construction with a 400VA toroidal transformer (Antek AS-4225) per channel and weighs in at a hefty 25kg. Each of the main heatsinks (Conrad MF35-151.5) dissipates about 112W (each MOSFET biased at 0.9A gives 2 x 0.9A x 62V rail to rail = 112W) causing a heatsink temperature of about 60C during normal operation.
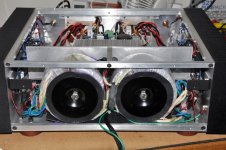
Dual low noise fans (Noctua NF-R8) turn on if either heatsink reaches 65C and the amplifier is automatically switched off should a heatsink reach 70C.
A 3A circuit breaker (typical current 1.5A for 240VAC input) rather than a fuse is used on the mains power to save sorting through my fuse collection should an the overcurrent "event" occur.
The soft start circuit employs two physically large series connected thermistors (Ametherm MS22 20005) which are shorted out using a relay a few seconds after start up - this prevents the thermistors running hot continuously. Two additional relays ( Amplimo LSP relay) connect the loudspeakers a few seconds later. Abnormal dc voltage on either output will cause the relays to disconnect the loudpeakers and to disconnect the mains power from the amplifier. So far both outputs have under 30mV of offset.
A timing circuit prevents restarts for 30 seconds to enable the thermistors to always run cool and thus provide a true "soft" start.
The mains power is AC coupled to the transformers to prevent any adverse magnetization if the mains should contain any dc component. Each channel has 8 x 22000uF capacitors rated at 105C - hopefully to improve reliability given the high temperatures inside the amplifier enclosure.
The top and front of the case is covered with black aluminium mesh (to let the heat out) and jarrah timber finished in tung oil with a bees wax polish (so far has not melted !).
Rick
Thank you to Nelson Pass for making the design available and to Cviller for the F5C V2.0 circuit boards.
The amplifier uses dual-mono construction with a 400VA toroidal transformer (Antek AS-4225) per channel and weighs in at a hefty 25kg. Each of the main heatsinks (Conrad MF35-151.5) dissipates about 112W (each MOSFET biased at 0.9A gives 2 x 0.9A x 62V rail to rail = 112W) causing a heatsink temperature of about 60C during normal operation.
Dual low noise fans (Noctua NF-R8) turn on if either heatsink reaches 65C and the amplifier is automatically switched off should a heatsink reach 70C.
A 3A circuit breaker (typical current 1.5A for 240VAC input) rather than a fuse is used on the mains power to save sorting through my fuse collection should an the overcurrent "event" occur.
The soft start circuit employs two physically large series connected thermistors (Ametherm MS22 20005) which are shorted out using a relay a few seconds after start up - this prevents the thermistors running hot continuously. Two additional relays ( Amplimo LSP relay) connect the loudspeakers a few seconds later. Abnormal dc voltage on either output will cause the relays to disconnect the loudpeakers and to disconnect the mains power from the amplifier. So far both outputs have under 30mV of offset.
A timing circuit prevents restarts for 30 seconds to enable the thermistors to always run cool and thus provide a true "soft" start.
The mains power is AC coupled to the transformers to prevent any adverse magnetization if the mains should contain any dc component. Each channel has 8 x 22000uF capacitors rated at 105C - hopefully to improve reliability given the high temperatures inside the amplifier enclosure.
The top and front of the case is covered with black aluminium mesh (to let the heat out) and jarrah timber finished in tung oil with a bees wax polish (so far has not melted !).
Rick
Attachments

- Home
- Amplifiers
- Pass Labs
- Pictures of your diy Pass amplifier